By The Power Of UnRAID – The Secret Reveal Of ESXi And Windows 11 VMs
For the last few episodes of Hancock’s VMware Half Hour, we have been quietly building something a little different.
On the surface it looked like a simple DIY UNRAID NAS project and a couple of Windows 11 P2V demonstrations.
In reality, everything was running inside virtual machines on an UnRAID host.
In Part 7 of the DIY UNRAID NAS series, we finally pull back the curtain and reveal what has really been powering the lab:
UnRAID running nested ESXi and Windows 11 VMs, complete with PCI passthrough.
This post walks through the idea behind the episode, how it ties back to earlier parts, and why I keep saying,
“By the power of UnRAID.”
Recap: Parts 6, 100 and 101
If you have been following along you will have seen:
Part 6 – Installing and testing Samsung 990 PRO NVMe drives in the Intel NUC based NAS.
Part 100 – Performing P2V migrations of Windows 11 systems.
Part 101 – Continuing the Windows 11 P2V work and refining the process.
In those episodes the star of the show appeared to be a physical Windows 11 machine and a separate ESXi host called ESXi052.
In Part 7 we reveal that this was deliberately misleading. Both the Windows 11 system and the ESXi host were in fact virtual machines.
The Secret: Everything Was A Virtual Machine
Part 7 opens by jumping back to those previous episodes and then revealing the twist:
The “physical” Windows 11 machine you saw on screen was actually a Windows 11 VM.
The ESXi host ESXi052 that we used for P2V work was also a VM.
The same VM was used in Part 6 when we installed and tested the NVMe drives.
In other words, the entire recent run of content has been driven by virtual machines on UnRAID.
The NVMe upgrades, the Windows 11 P2Vs, and the ESXi demonstrations were all happening inside VMs, not on bare metal.
Windows 11 With PCI Passthrough
One of the key enabling features in this setup is PCI passthrough on UnRAID.
By passing through hardware devices such as NVMe controllers or GPUs directly into a Windows 11 VM,
we can test and demonstrate “bare metal like” performance while still keeping everything virtual.
In the video we show Windows 11 running with PCI passthrough on UnRAID, giving the VM direct access to the hardware.
This is ideal for lab work, testing, and for scenarios where you want to push a homelab system without dedicating separate physical machines.
Nested ESXi 8.0 On UnRAID
The next part of the reveal is nested virtualization.
UnRAID is hosting a VMware vSphere Hypervisor ESXi 8.0 VM which in turn can run its own VMs.
This gives an incredibly flexible environment:
UnRAID manages the storage, cache, parity and core virtual machine scheduling.
ESXi runs nested on top for VMware specific testing and lab work.
Windows 11 runs as another VM on the same UnRAID host, with PCI passthrough as needed.
With this approach a single Intel NUC based NAS can simulate a much larger lab
while still being compact and power efficient.
By The Power Of UnRAID
To celebrate the reveal I created a fun meme inspired by the classic “By the power of Grayskull” scene.
In our version, “By the power of UnRAID” raises ESXi and Windows 11 high above the NUC,
showing that UnRAID is the platform empowering the whole setup.
Whether you are running nested ESXi, Windows 11 with PCI passthrough, or a mixture of containers and VMs,
UnRAID makes it straightforward to combine storage flexibility with powerful virtualization features.
The Power Of UnRAID In The Homelab
The big takeaway from Part 7 is simple:
A single UnRAID host can consolidate multiple roles: NAS, hypervisor, and workstation.
You can experiment with ESXi 8.0, Windows 11, and PCI passthrough without building a large rack of servers.
By keeping everything virtual you gain snapshots, flexibility, and the ability to rebuild or clone systems quickly.
For homelab enthusiasts, students, and anyone who wants to learn VMware or Windows 11 in depth,
this approach offers a lot of power in a very small footprint.
Watch The Episode
If you want to see the full walkthrough, including the moment the secret is revealed,
watch Part 7 of the DIY UNRAID NAS series on Hancock’s VMware Half Hour.
You will see exactly how the Windows 11 VM, the nested ESXi host, and UnRAID all fit together.
Conclusion
Part 7 closes the loop on a long running lab story.
What looked like separate physical systems were really virtual machines,
carefully layered on top of an UnRAID powered NAS.
By the power of UnRAID, we have been able to demonstrate NVMe upgrades, Windows 11 P2Vs, and ESXi 8.0 testing
all on a single compact platform.
If you are planning a new homelab or want to refresh an existing one,
consider what UnRAID plus nested ESXi and Windows 11 VMs could do for you.
Welcome back to Hancock’s VMware Half Hour and to Part 6 of the DIY UNRAID NAS build series.
In this episode I install two Samsung 990 PRO Gen 4 NVMe M.2 SSDs into the Intel NUC 11 Extreme.
The NUC 11 Extreme has a surprisingly capable NVMe layout, providing:
2 × PCIe Gen 4 NVMe slots
2 × PCIe Gen 3 NVMe slots
The video walks through verifying the drives, opening the NUC, accessing both NVMe bays, and installing each SSD step-by-step, including the compute board NVMe slot that is a little more awkward to reach.
The episode finishes in Windows 11 where the drives are validated using Disk Manager and Samsung Magician to confirm that both NVMe SSDs are genuine.
What Is Covered in Part 6
Checking the authenticity of Samsung 990 PRO NVMe SSDs
Accessing both the bottom and compute-board NVMe slots in the Intel NUC 11 Extreme
Installing and securing each NVMe stick
Reassembling the NUC 11 Extreme, including panels, shrouds, NIC and PCIe bracket
Confirming both NVMe drives in Windows 11
Using Samsung Magician to verify that the drives are genuine
Preparing the NVMe storage for use in later parts of the UNRAID NAS series
Chapters
00:00 - Intro
00:07 - Welcome to Hancock's VMware Half Hour
00:29 - In Part 6 we are going to fit Samsung 990 PRO NVMe
01:24 - Intel NUC 11 Extreme has 2 x Gen3, 2 x Gen4 slots
01:45 - Check the NVMe are genuine
04:20 - Intel NUC 11 Extreme - open NVMe bottom panel
05:23 - Install first NVMe stick
06:33 - Remove NVMe screw
07:06 - Insert and secure NVMe stick
07:30 - Secure bottom NVMe panel cover
08:40 - Remove PCIe securing bracket
08:54 - Remove side panel
09:11 - Remove NIC
09:44 - Remove fan shroud
09:59 - Open compute board
12:23 - Installing the second NVMe stick
14:36 - Secure NVMe in slot
16:26 - Compute board secured
19:04 - Secure side panels
20:59 - Start Windows 11 and login
21:31 - Check in Disk Manager for NVMe devices
22:40 - This Windows 11 machine is the machine used in Part 100/101
22:44 - Start Disk Management to format the NVMe disks
23:43 - Start Samsung Magician to confirm genuine
25:25 - Both NVMe sticks are confirmed as genuine
25:54 - Thanks for watching
About This Build
This DIY NAS series focuses on turning the Intel NUC 11 Extreme into a compact but powerful UNRAID NAS with NVMe performance at its core.
The Samsung 990 PRO NVMe drives installed in this part will provide a significant uplift in storage performance and will feature heavily in later episodes when the NAS is tuned and benchmarked.
Support the Series
If you are enjoying the series so far, please consider supporting the channel and the content:
Like the video on YouTube
Subscribe to the channel so you do not miss future parts
Leave a comment or question with your own experiences or suggestions
Follow along for Parts 7, 8, 9 and beyond
Thank you for watching and for following the build.
Enjoy the build and stay tuned for upcoming parts where we continue configuring UNRAID and optimising the NAS.
Do not forget to like, comment and subscribe for more technical walkthroughs and builds.
Welcome back to Andysworld!*™ and to Part 5 of my DIY UNRAID NAS series.
In this instalment, I explore a small but very useful upgrade: using the free internal USB headers inside the Intel NUC Extreme 11th Gen to hide the UnRAID boot USB neatly inside the chassis. This keeps the build clean, reduces the risk of accidental removal, and makes the system feel much more like a dedicated appliance.
Why Move the UnRAID USB Inside the NUC?
UNRAID must boot from a USB flash drive. Most people leave it plugged into an external port on the back of the system, but the NUC Extreme includes internal USB 2.0 header pins.
By using those internal headers, we can:
Keep the USB drive inside the case
Free up an external USB port
Reduce the chance of accidental removal or damage
Improve the overall look and tidiness of the build
Make the system feel more like a self-contained NAS appliance
Credit and Hardware Used
This idea came from a very useful Reddit thread:
Reddit source:https://tinyurl.com/yd95mu37 Credit: Thanks to “JoshTheMoss” for highlighting the approach and the required cable.
Adapter Cable
The adapter used in this build was purchased from DeLock:
This adapter converts the internal USB header on the motherboard to a standard USB-A female connector, which is ideal for plugging in the UnRAID boot drive.
What Happens in Part 5
In this episode I:
Open up the Intel NUC Extreme 11th Gen chassis
Locate the unused internal USB header on the motherboard
Prepare the UnRAID USB stick, wrapping it in Kapton tape for additional insulation and protection
Install the DeLock internal USB adapter
Route and position the cable neatly inside the chassis
Connect the USB stick to the internal adapter (with the usual struggle of fitting fingers into a very small case)
Confirm that the system still boots correctly from the now-internal USB device
Give a short preview of what is coming next in Part 6
Video Chapters
00:00 – Intro
00:07 – Welcome to Hancock's VMware Half Hour
00:47 – Using the free internal USB headers
01:05 – Reddit Source – https://tinyurl.com/yd95mu37
01:17 – Kudos to "JoshTheMoss"
02:32 – The Reddit Post
02:44 – Purchased from – https://www.delock.com/produkt/84834/merkmale.html
02:59 – Intel NUC Extreme 11th Gen close-up
03:58 – Internal USB header left disconnected
04:36 – USB flash drive is used for UnRAID
04:49 – Wrapped USB flash drive in Kapton Tape
05:31 – Fit the cable with fat fingers
07:09 – Part 6 – NVMe Time
07:51 – 4 × 4 TB Samsung 990 PRO NVMe Gen 4
08:25 – Thanks for watching
Watch the Episode
Embedded video:
Follow the DIY UNRAID NAS Series on Andysworld!*™
This project is progressing nicely, and each part builds on the last. In Part 6, I move on to storage performance and install 4 × 4 TB Samsung 990 PRO Gen 4 NVMe SSDs for serious throughput.
If you are interested in homelab builds, UNRAID, VMware, or just general tinkering, keep an eye on the rest of the series here on Andysworld!*™.
Welcome to AndysWorld.org.uk! Today, we’re diving into a project that’s perfect for anyone looking to build a powerful, yet compact, DIY Network-Attached Storage (NAS) solution. In this post, I’ll walk you through the first part of building a ‘MEGA’ NVMe NAS using the Intel NUC 11 Extreme (Beast Canyon). This mini-PC packs a punch with its powerful hardware, making it a great choice for a NAS build, especially when combined with UnRAID to handle storage and virtualization.
Why Choose the Intel NUC 11 Extreme for a NAS?
If you’ve been looking into NAS setups, you know the balance between power, size, and expandability is crucial. The Intel NUC 11 Extreme (Beast Canyon) checks all the right boxes, offering:
Compact Form Factor: It’s a small but powerful solution that doesn’t take up much space.
High-Performance NVMe Support: NVMe drives provide incredibly fast data transfer speeds—perfect for a NAS that needs to handle heavy workloads.
Flexibility for Virtualization: With UnRAID, you can set up multiple virtual machines, containers, and storage arrays, making it a versatile solution for any home or small office.
For this build, we’re focusing on using NVMe storage for high-speed access to files and a 64GB Kingston Fury DDR4 RAM kit to ensure smooth performance under load.
What You’ll Need for This Build:
Intel NUC 11 Extreme (Beast Canyon)
64GB Kingston Fury DDR4 RAM
2 x 512GB XPG GAMMIX NVMe SSDs
UnRAID Operating System
A few basic tools for assembly (screwdriver, anti-static mat, etc.)
If you’ve never worked with the Intel NUC before, don’t worry! I’ll guide you through every step of the assembly process. Let’s get into it!
Step-by-Step Build Process:
1. Unboxing the Intel NUC 11 Extreme
First things first, let’s unbox the Intel NUC 11 Extreme (Beast Canyon). When you open the box, you’ll find the compact, sleek chassis, which packs quite a punch for such a small form factor. This NUC is equipped with an 11th Gen Intel Core i7 processor and can support a variety of high-speed storage options, including NVMe SSDs.
2. Installing the RAM and NVMe Drives
With the NUC unboxed, the next step is to install the Kingston Fury RAM and XPG GAMMIX NVMe SSDs. Be careful during installation—especially with the tiny NVMe screws! The NUC has an easy-to-access compute board where both the RAM and NVMe drives will fit.
Installing the RAM: Simply slot the 64GB Kingston Fury DDR4 RAM sticks into the dedicated slots, making sure they’re fully seated.
Installing the NVMe SSDs: These go directly onto the motherboard and can be secured using small screws. Be sure to handle them gently as the connectors are quite delicate.
3. Reassembling the NUC
Once the RAM and NVMe drives are installed, it’s time to reassemble the NUC. This involves:
Reattaching the fan tray and shroud
Reinstalling the side and back panels
At this stage, everything should feel secure and ready for the next steps.
Why NVMe Storage for a NAS?
NVMe drives are game-changers when it comes to NAS storage. Here’s why:
Speed: NVMe offers lightning-fast read/write speeds compared to SATA SSDs or traditional HDDs. For anyone who works with large files or needs to serve data quickly, NVMe is a must.
Future-Proofing: With more applications and data being handled in the cloud, having NVMe in your NAS ensures your storage solution is ready for the future.
Reliability: NVMe drives are more reliable than traditional spinning hard drives, with less moving parts and faster data recovery times.
What’s Next?
Now that we’ve completed the hardware installation, in the next post, we’ll dive into setting up UnRAID on the NUC. UnRAID will allow us to easily configure our storage arrays, virtual machines, and containers—all from a user-friendly interface. Stay tuned for Part 2, where we’ll cover configuring the software, optimizing the NAS, and making sure everything runs smoothly.
Helpful Resources:
To help you along the way, I recommend checking out the blog posts from two experts in the field:
This build was just the beginning! The Intel NUC 11 Extreme provides an excellent foundation for a fast, reliable NAS. With NVMe storage and the flexibility of UnRAID, you can build a high-performance system that’s both versatile and compact.
What do you think of this build? Have you used the Intel NUC for similar projects? Drop a comment below or connect with me on social media—I’d love to hear about your experiences!
Follow Andy’s World for More DIY Tech Projects Don’t forget to check out the latest posts and tutorials on AndysWorld.org.uk to keep up with all things tech and DIY. Happy building!
In Part 6 of the Minisforum MS-A2 Series, we show you how to migrate VMware ESXi Virtual Machines (VMs) to Microsoft Hyper-V on Windows Server 2025 — using the powerful and compact Minisforum MS-A2 as the ultimate homelab platform.
This video features Veeam Backup & Replication v12.3 to safely back up your ESXi VMs and restore them directly to Hyper-V. It’s a clean and efficient migration method for anyone exploring life after VMware.
Whether you’re planning a full platform switch or testing a hybrid setup, you’ll find practical, step-by-step guidance from backup to restore — with key gotchas and tips throughout.
In this episode, you’ll learn:
Preparing VMware ESXi VMs for migration
Creating backups using Veeam v12.3
Restoring backups to Microsoft Hyper-V
Configuring networking, storage, and integration services
Post-migration testing and optimization
Real-world advice for homelabbers and IT professionals
Perfect for #homelab enthusiasts, sysadmins, and IT pros evaluating alternatives to VMware.
Got questions or want to share your experience? Drop a comment below!
Like this video if it helped you
Subscribe and hit the bell to follow the full MS-A2 homelab journey
So in today’s, crude and experimental research I thought I would connect all our VMware vSphere Hypervisors (ESXi 5.5 build 1892794) to a NFS datastore presented to the ESXi Hosts from a Synology NAS, and we’ll try the following tests
I deployed a small Windows 7 template, onto the NFS datastore as follows
No Cache Enabled – 3 minutes 27 seconds to deploy
Read and Write Cache Enabled – 2 minutes and 40 seconds to deploy.
Time for some more testing – The template deployed to the datastore was converted to a virtual machine, and the following tests were performed using CrystalDiskMark 5.1.2 in the virtual machine.
NFS Exported volume No SSD Cache on the Synology NAS.
NFS Exported volume Read and Write SSD Cache on the Synology NAS.
NFS Exported volume Read only SSD Cache on the Synology NAS.
Some a bunch of very confusing results! And every time I test the results are similar.
I’ve been recently experimenting with SSDs (solid state disks), to accelerate my spinning rust in my Synology NAS.
Recently in DSM, a new SSD cache option is available, which allows you to create a read or write cache with 1 or 2 SSD devices respectively.
Here are some results, which I’ve graphed
In my very quick and crude tests, I could see an improvement in Writing to the NAS, which doubles in performance. Read speed is very similar, and the cache was “warmed-up” before testing.
And here’s a video of the new Synology SSD Cache Read Hit Rate graphic, which looks a little graphic equalizer, from the 70-80s, so I’ve dropped a music track in the background! I thought it only right to over-flange (distort!) the track, so you may want to turn down your volume!
When I first started experimenting with computers in the early 80’s, I was fascinated with the Mandelbrot set, and spent many hours generating it on a BBC Micro, later I added a Second 6502 Processor, I then upgrade to a Master 128k with a Turbo Co-Processor, all in the aid of more compute power! (I search high and low for a Acornsoft GXR rom, to give me more colours, and finally got one from Plymouth Polytechnic Computer Science Department!).
BBC Micro Mandelbrot
This week, I find myself with the following configuration:-
(2) nVidia Tesla K40 (currently the most powerful and most expensive graphics processing unit (gpu), used for compute (no video output!).
1 Terra Byte PCI-e Flash Card (SSD but plugs into the motherboard!).
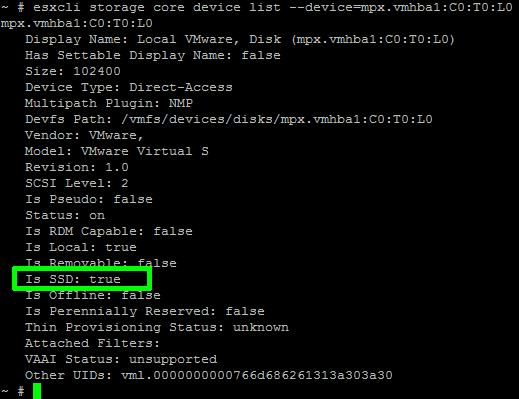
In VMware vSphere 5.x (ESXi 5.x) there is a new feature called Host Cache Configuration. This new feature allows the VMware vSphere Administrator to configure the VMware vSphere 5.x (ESXi 5.x) host server to use a cache on a Solid State Disks (SSD) for the virtual machine’s swapfile for better performance, because the SSD has much faster latency than a traditional mechanical disk. This is also known in VMware Administrator circles as Swap to Host Cache or Swap to SSD. Once Host Cache Configuration has been enabled, the virtual machines will be swapping to SSD, but this swapfile is not a true swap file, and the entire virtual machine swap file (.vswp) is not stored on the SSD.However, not all SSD devices are correctly tagged as SSD. This tutorial shows how to tag a Non-SSD storage device as SSD, if you want to experiment with Host Cache Configuration but do not have a SSD to hand. This is not supported by VMware, tagging a non-SSD as a SSD.
The same procedure can be followed to tag a SSD, correctly, if it’s not recognized by the VMware ESXi server.
With the current fall in prices for consumer SSDs, it can give a real performance boost to a VMware ESXi 5.x server which is short on memory. Consumer SSDs e.g. Kingston SSDNow V+200 Drive Model SVP200S37A/60G are generally cheaper than server memory. We recently purchased this model for £29.99 GBP.
The commands we will be using in this Tutorial, are the esxcli commands, these commands can be executed on the ESXi shell, through the vMA or PowerCLI esxcli remote version. In this tutorial I’ll be logging into the ESXi server, and executing the commands on the ESXi shell.
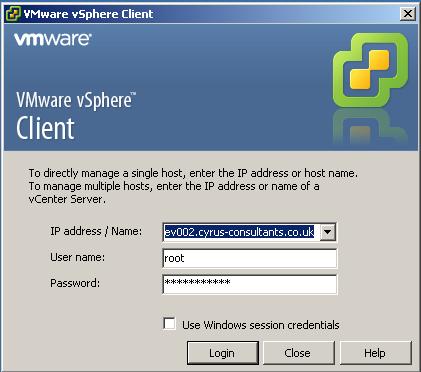
1. Connect to the VMware vSphere Hypervisor (ESXi) or VMware vSphere vCenter Server
Using the VMware vSphere Client, Login and Connect to the ESXi server, using IP address or hostname of the ESXi server, using root username and password credentials. If you have a VMware vSphere vCenter server, you could also specify IP address or hostname of the vCenter server.
Using the VMware vSphere Client, Login and Connect to the ESXi server
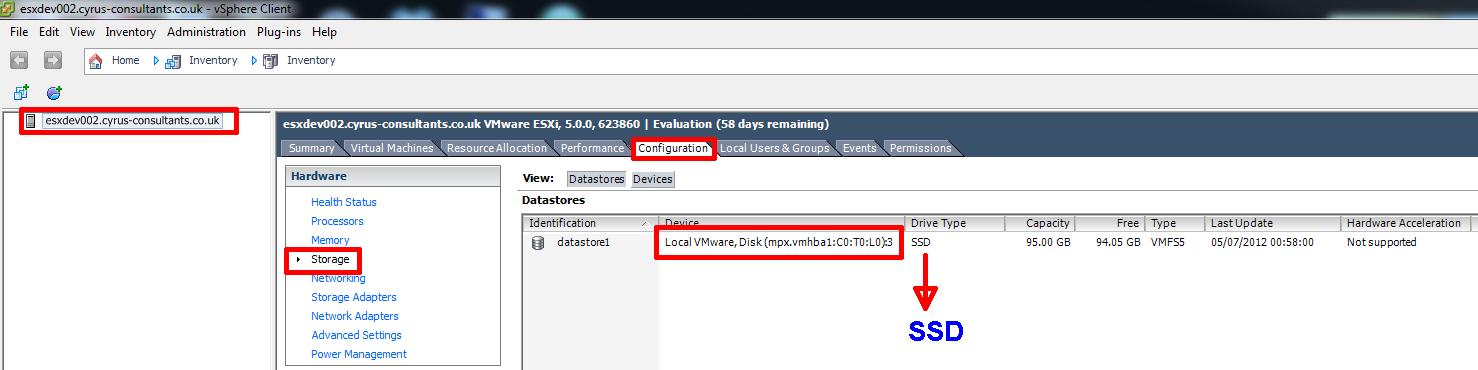
2. Check and record the storage device name to be tagged as a SSD
Check there is a VMFS volume already formatted on the storage device, you want to present to the Host ESXi server, as a SSD and record the device name for later in Step 4.
Select Host > Configuration > Storage
storage device to configure as SSD
In the example above, the local storage device mpx.vmhba1:C0:T0:L0 is a local disk, formatted with the datastore name datastore1 as VMFS5. Record the storage device name mpx.vmhba1:C0:T0:L0.
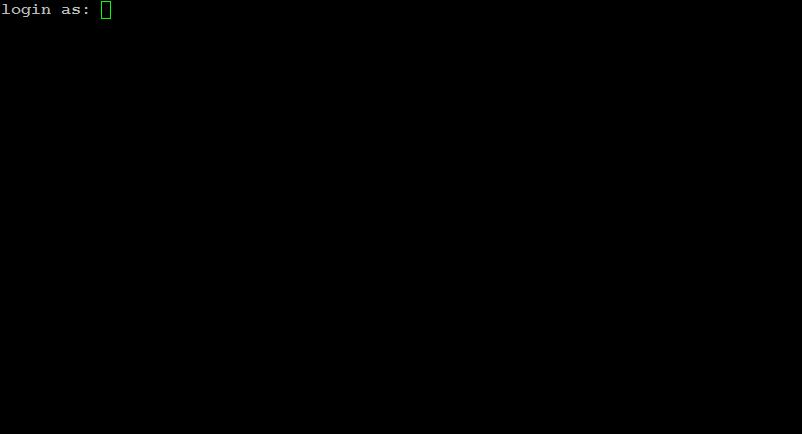
3. Logon to ESXi console (shell) via PuTTY
Using PuTTY a free telnet and SSH client or another SSH client Login and Connect to the VMware Hypervisor ESXi server, using IP address or hostname of the VMware Hypervisor ESXi server, using root username and password credentials.
putty SSH terminal session
logged in as root to ssh terminal session
4. Create a new SATP rule
At the console or SSH session type the following commands to create a new SATP rule.
using the device name recorded in Step 2 above. The console will return a new line. To check the rule has been created correctly type the following commands
esxcli storage nmp satp rule list | grep enable_ssd
the following screenshot should be displayed
Confirmation of rule creation
confirming the creation of the rule.
5. Claim storage device
At the console or SSH session type the following commands
I have seen the following error messages when trying to claim devices, either restart the server or use the “unclaim” device command.
Unable to unclaim path vmhba1:C0:T0:L0 on device mpx.vmhba1:C0:T0:L0. Some paths may be left in an unclaimed state. You will need to claim them manually using the appropriate commands or wait for peri
you can unclaim the device by specifying the device name.
I’ve been experimenting with the HP ProLiant MicroServer N36L, to extend its capacity to support an additional 2 AHCI SATA Ports, from the standard IDE mode offerings, that the on-board SATA and eSATA ports offer. This will support the use of SSDs better in the future.
Storage Controllers available to VMware vSphere 4.1 U1, not there are four AHCI SATA controllers, vmhba0, vmhba34, vmhba35, and vmhba36. These correspond to the “not supported hot plug” bays.
HP ProLiant MicroServer BIOS POST before tweak!
VMware ESXi 4.1 installed on HP ProLiant MicroServer Before tweak!
and also two IDE vmhba1 and vmhba33.
VMware ESXi 4.1 installed on HP ProLiant MicroServer Before tweak!
After tweaking…a total of six AHCI SATA ports, vmhba0, vmhba33, vmhba34, vmhba35, vmhba36 and vmhba37.
HP ProLiant MicroServer BIOS POST After tweak!
VMware ESXi 4.1 installed on HP ProLiant MicroServer After tweak!
If you want more details, ping me an email or twitter, and I’ll send you the bios.


![[Valid RSS]](http://andysworld.org.uk/images/valid-rss.png "Validate my RSS feed")