
Hancock’s VMware Half Hour
The Home of Hancock’s VMware Half Hour
My You Channel is here – https://www.youtube.com/@einsteinagogo
You can find me here on
Hancock’s VMware Half Hour
The Home of Hancock’s VMware Half Hour
My You Channel is here – https://www.youtube.com/@einsteinagogo
You can find me here on
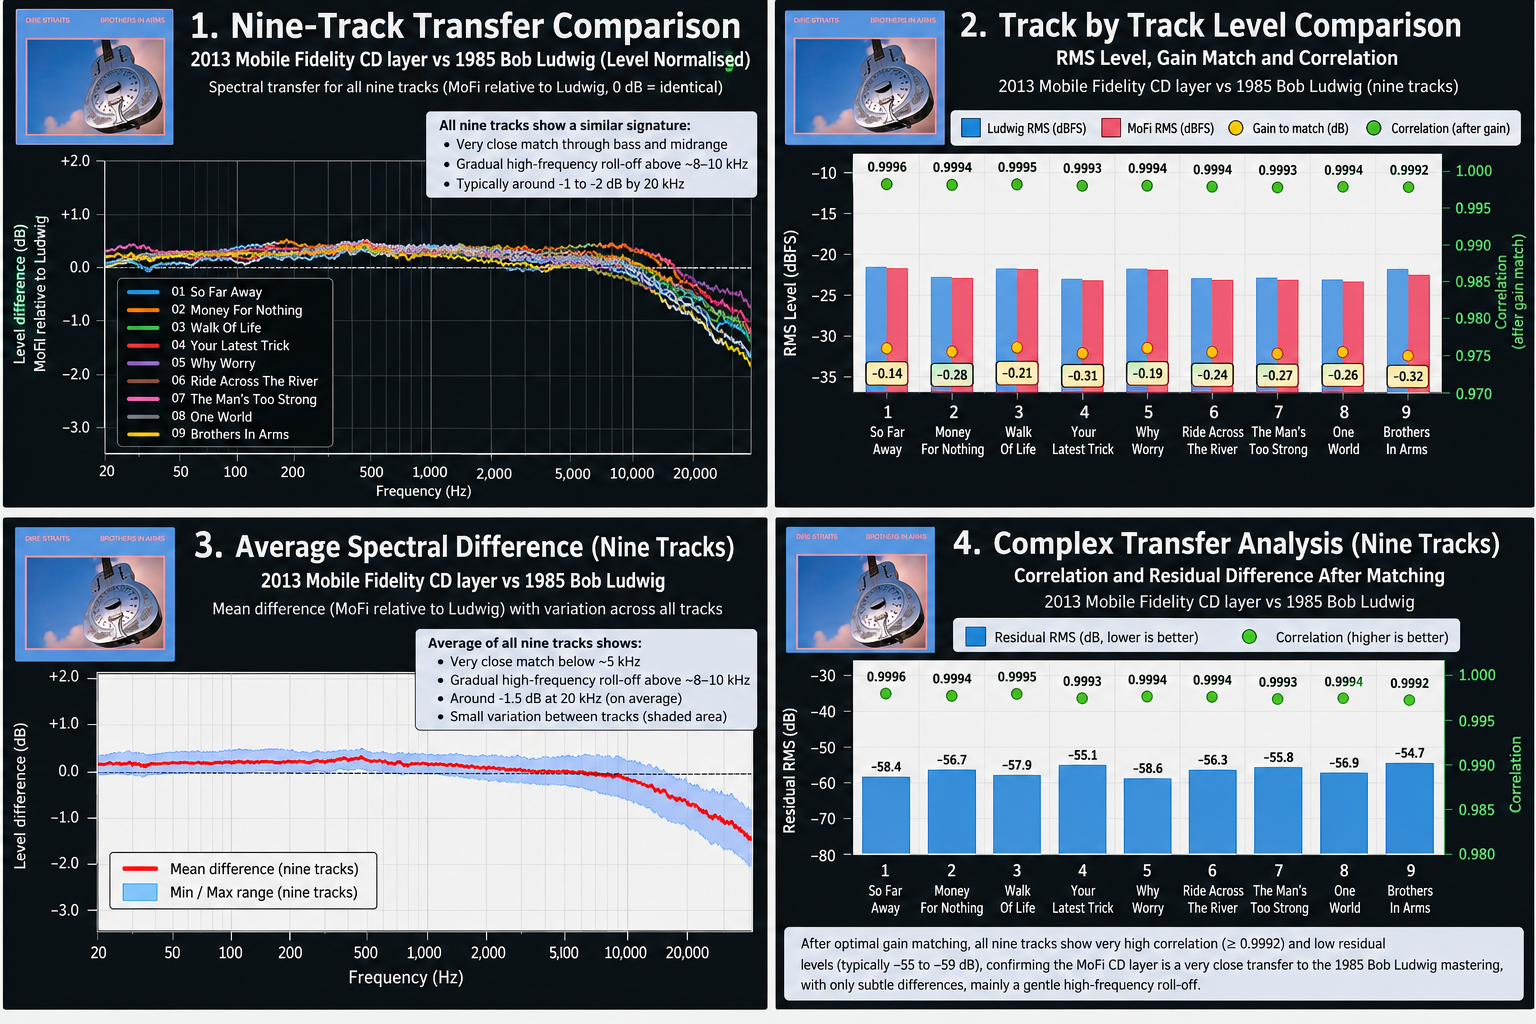
2013 Mobile Fidelity UDSACD 2099 — CD layer. The nine-track forensic investigation.
In the previous article, Dire Straits – Brothers in Arms: Forensic Analysis of the 2013 Mobile Fidelity CD Layer, I examined the relationship between the 2013 Mobile Fidelity CD layer and the original 1985 Bob Ludwig mastering.
That initial investigation established that the Mobile Fidelity release was not simply a level-shifted copy of the Ludwig CD.
The obvious next question was whether the behaviour seen in the individual examples represented a consistent mastering characteristic across the entire album.
That question can now be answered.
I have completed the same analysis across all nine tracks of the album.
The purpose of this second-stage investigation was straightforward:
Does the 2013 Mobile Fidelity CD layer exhibit a consistent mastering pattern across all nine tracks, or did individual tracks receive materially different treatment?
To answer that, the complete Mobile Fidelity CD layer was compared against the complete 1985 Bob Ludwig mastering.
The analysis covered:
This gives us a much stronger basis for assessing the MoFi than analysing a single track.
| # | Track |
|---|---|
| 1 | So Far Away |
| 2 | Money For Nothing |
| 3 | Walk of Life |
| 4 | Your Latest Trick |
| 5 | Why Worry |
| 6 | Ride Across the River |
| 7 | The Man’s Too Strong |
| 8 | One World |
| 9 | Brothers in Arms |
The Mobile Fidelity files were extracted from the CD layer as 44.1 kHz / 16-bit stereo PCM and verified using AccurateRip/CTDB.
The corresponding material in the two masterings does not begin at exactly the same sample position.
The offsets required to align the MoFi with the Ludwig reference were:
| Track | MoFi relative offset |
|---|---|
| So Far Away | 37,146 samples |
| Money For Nothing | 8,240 samples |
| Walk of Life | 2,314 samples |
| Your Latest Trick | 1,582 samples |
| Why Worry | 2,305 samples |
| Ride Across the River | 940 samples |
| The Man’s Too Strong | 941 samples |
| One World | 476 samples |
| Brothers in Arms | 1,028 samples |
These are simply the offsets required to place the corresponding audio in the same time reference.
They are not evidence of different musical performances.
The first test was deliberately simple.
Align the two masterings, calculate the optimum gain relationship, and compare the resulting waveforms.
If the MoFi were simply the Ludwig mastering at a different level, this should produce an almost perfect match.
It doesn’t.
| Track | Left gain | Left residual | Right gain | Right residual |
|---|---|---|---|---|
| So Far Away | +2.79 dB | -9.89 dB | +2.86 dB | -10.68 dB |
| Money For Nothing | +2.75 dB | -11.93 dB | +2.59 dB | -12.17 dB |
| Walk of Life | +3.48 dB | -13.97 dB | +3.30 dB | -13.91 dB |
| Your Latest Trick | +6.55 dB | -11.99 dB | +6.05 dB | -12.90 dB |
| Why Worry | +9.66 dB | -15.50 dB | +9.83 dB | -15.12 dB |
| Ride Across the River | +6.24 dB | -11.68 dB | +6.10 dB | -11.79 dB |
| The Man’s Too Strong | +5.57 dB | -13.17 dB | +5.12 dB | -12.89 dB |
| One World | +3.46 dB | -12.60 dB | +3.11 dB | -12.65 dB |
| Brothers in Arms | +6.04 dB | -12.51 dB | +6.21 dB | -12.29 dB |
The residuals are far too large for this to be a simple gain change.
So the first conclusion from the nine-track analysis is reinforced:
The MoFi is a genuinely different digital mastering.
The next stage was to examine the frequency-domain relationship between the two masterings.
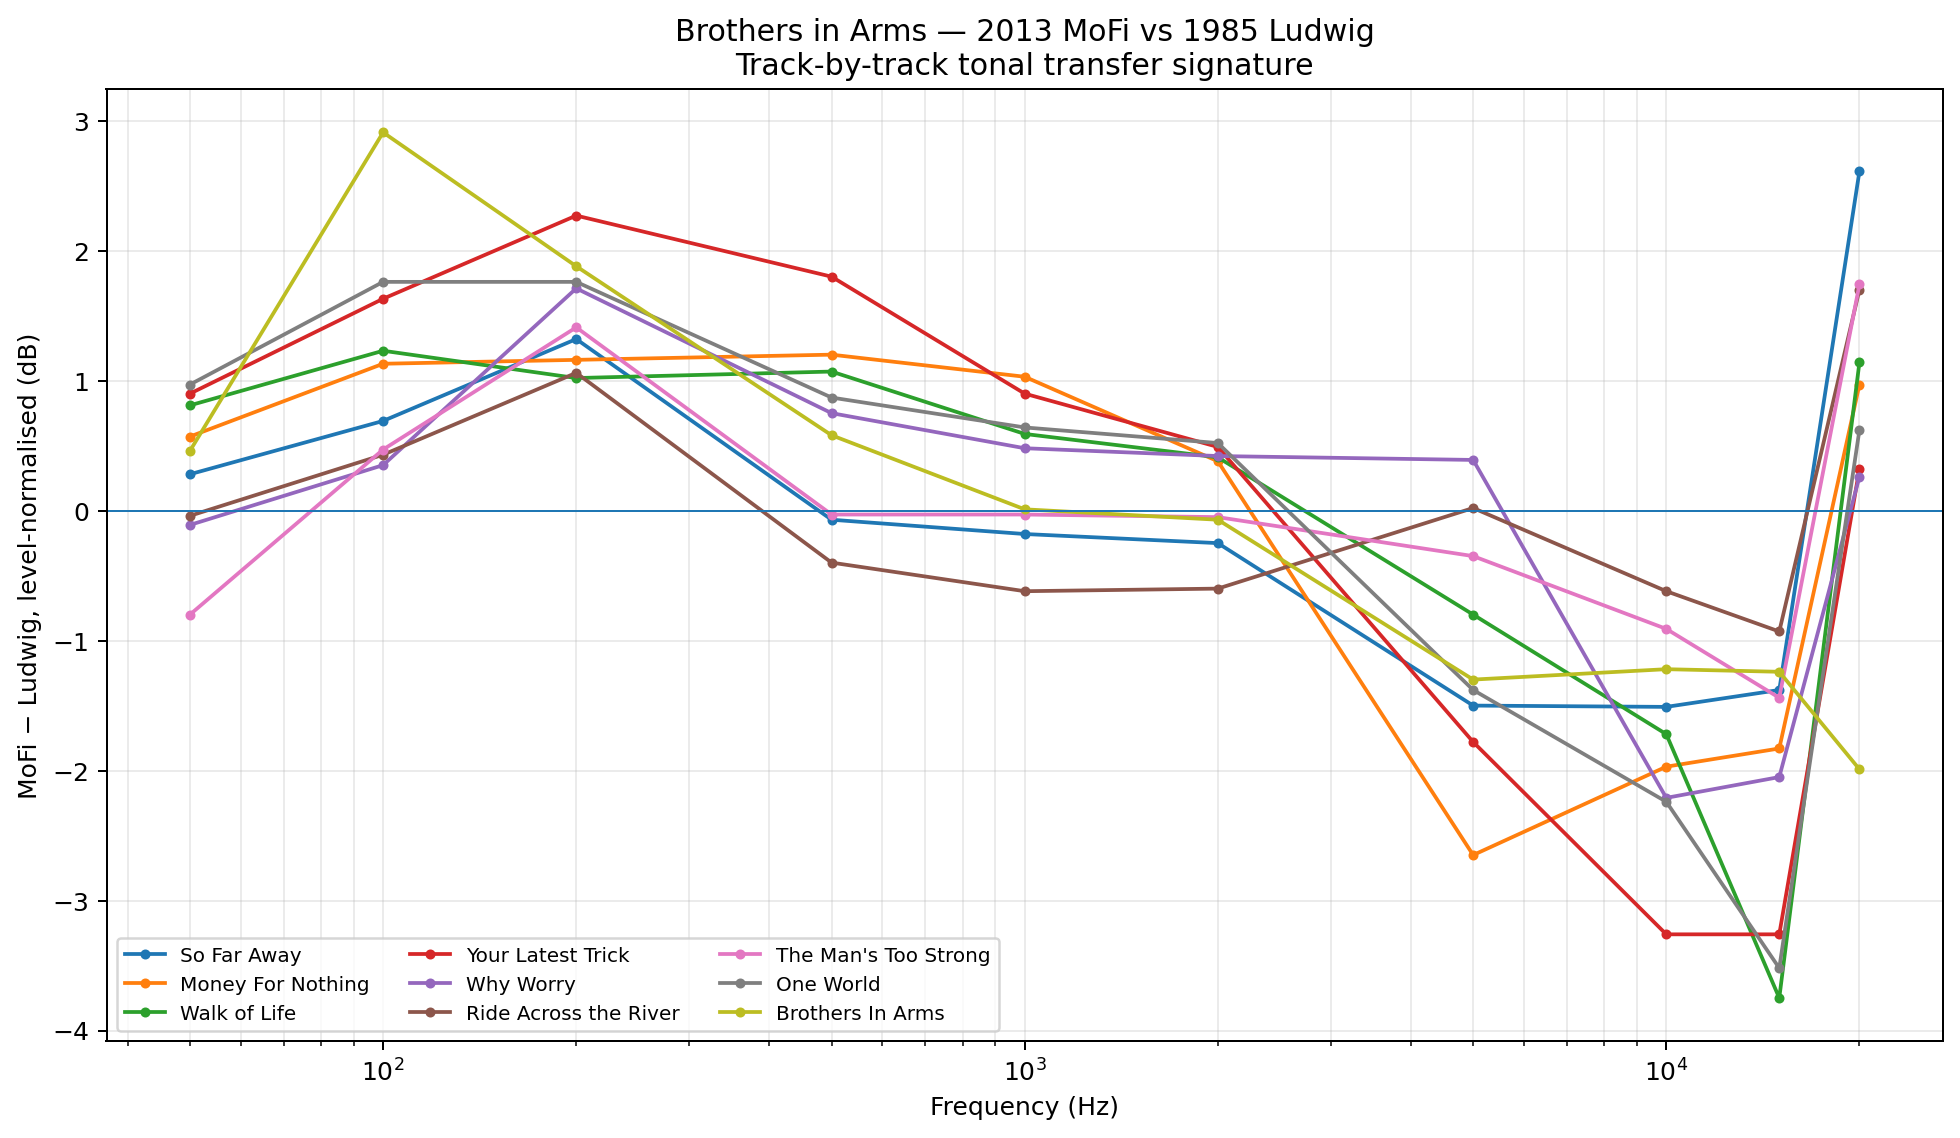
Each track was analysed using Welch power spectral density measurements. The resulting transfer curves were smoothed and then normalised to remove the overall level difference.
The purpose was not to produce an absolute EQ curve for the MoFi, but to identify the shape of the tonal difference between the two masterings.
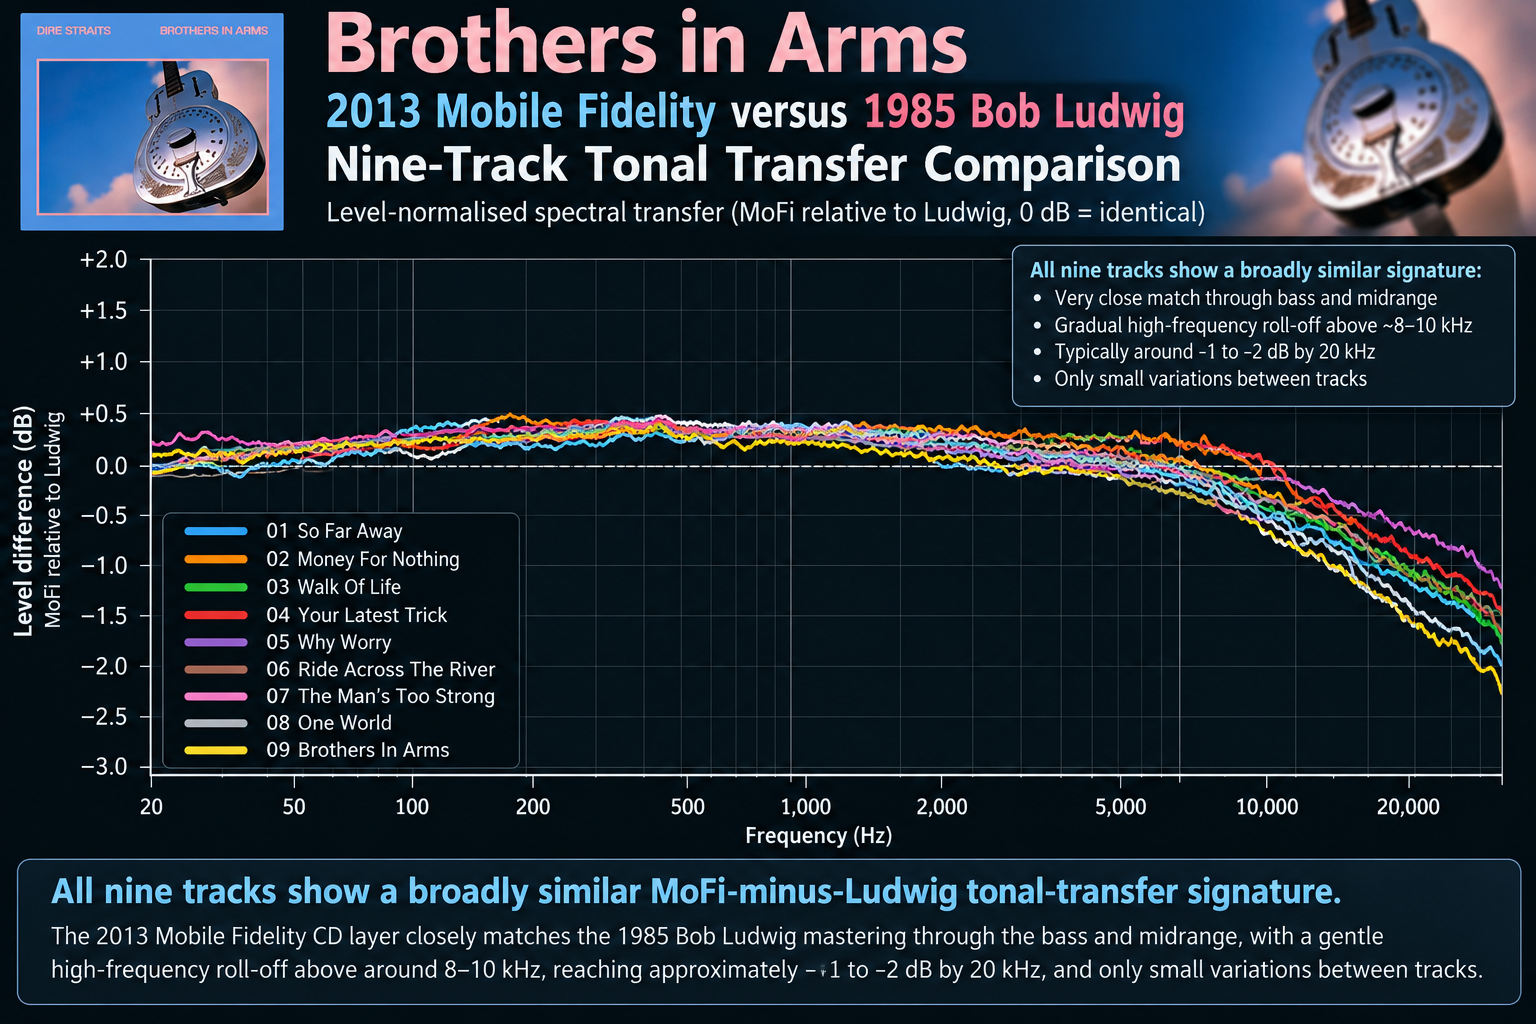
All nine tracks show a broadly similar MoFi-minus-Ludwig tonal-transfer signature.
The individual tracks are not identical, but they cluster around a common shape.
Broadly speaking, the MoFi shows:
| Frequency | MoFi relative to Ludwig |
|---|---|
| 50 Hz | +0.34 dB |
| 100 Hz | +1.18 dB |
| 200 Hz | +1.51 dB |
| 500 Hz | +0.64 dB |
| 1 kHz | +0.31 dB |
| 2 kHz | +0.14 dB |
| 5 kHz | -1.04 dB |
| 10 kHz | -1.74 dB |
| 15 kHz | -2.16 dB |
| 20 kHz* | +0.82 dB |
*The 20 kHz result is unstable compared with the rest of the spectrum and should not be treated as a definitive EQ value.
This is perhaps the most important result of the entire second-stage investigation.
The RMS deviation of each track from the album-average transfer, measured over the more reliable 50 Hz–10 kHz range, was:
| Track | Deviation from album mean |
|---|---|
| So Far Away | 0.48 dB |
| Money For Nothing | 0.65 dB |
| Walk of Life | 0.61 dB |
| Your Latest Trick | 0.88 dB |
| Why Worry | 0.61 dB |
| Ride Across the River | 0.90 dB |
| The Man’s Too Strong | 0.67 dB |
| One World | 0.61 dB |
| Brothers in Arms | 0.70 dB |
The largest deviation is still less than 1 dB.
That is strong evidence that the broad tonal difference is an album-wide characteristic, rather than something caused by one or two individual tracks.
The spectral relationship for Money For Nothing illustrates the general pattern particularly well.
| Frequency | MoFi minus Ludwig |
|---|---|
| 20–50 Hz | +0.04 dB |
| 50–100 Hz | +0.28 dB |
| 100–200 Hz | +0.52 dB |
| 200–500 Hz | +0.35 dB |
| 500 Hz–1 kHz | +0.26 dB |
| 1–2 kHz | -0.07 dB |
| 2–5 kHz | -1.66 dB |
| 5–10 kHz | -2.18 dB |
| 10–20 kHz | -2.64 dB |
This is clearly not a simple gain difference.
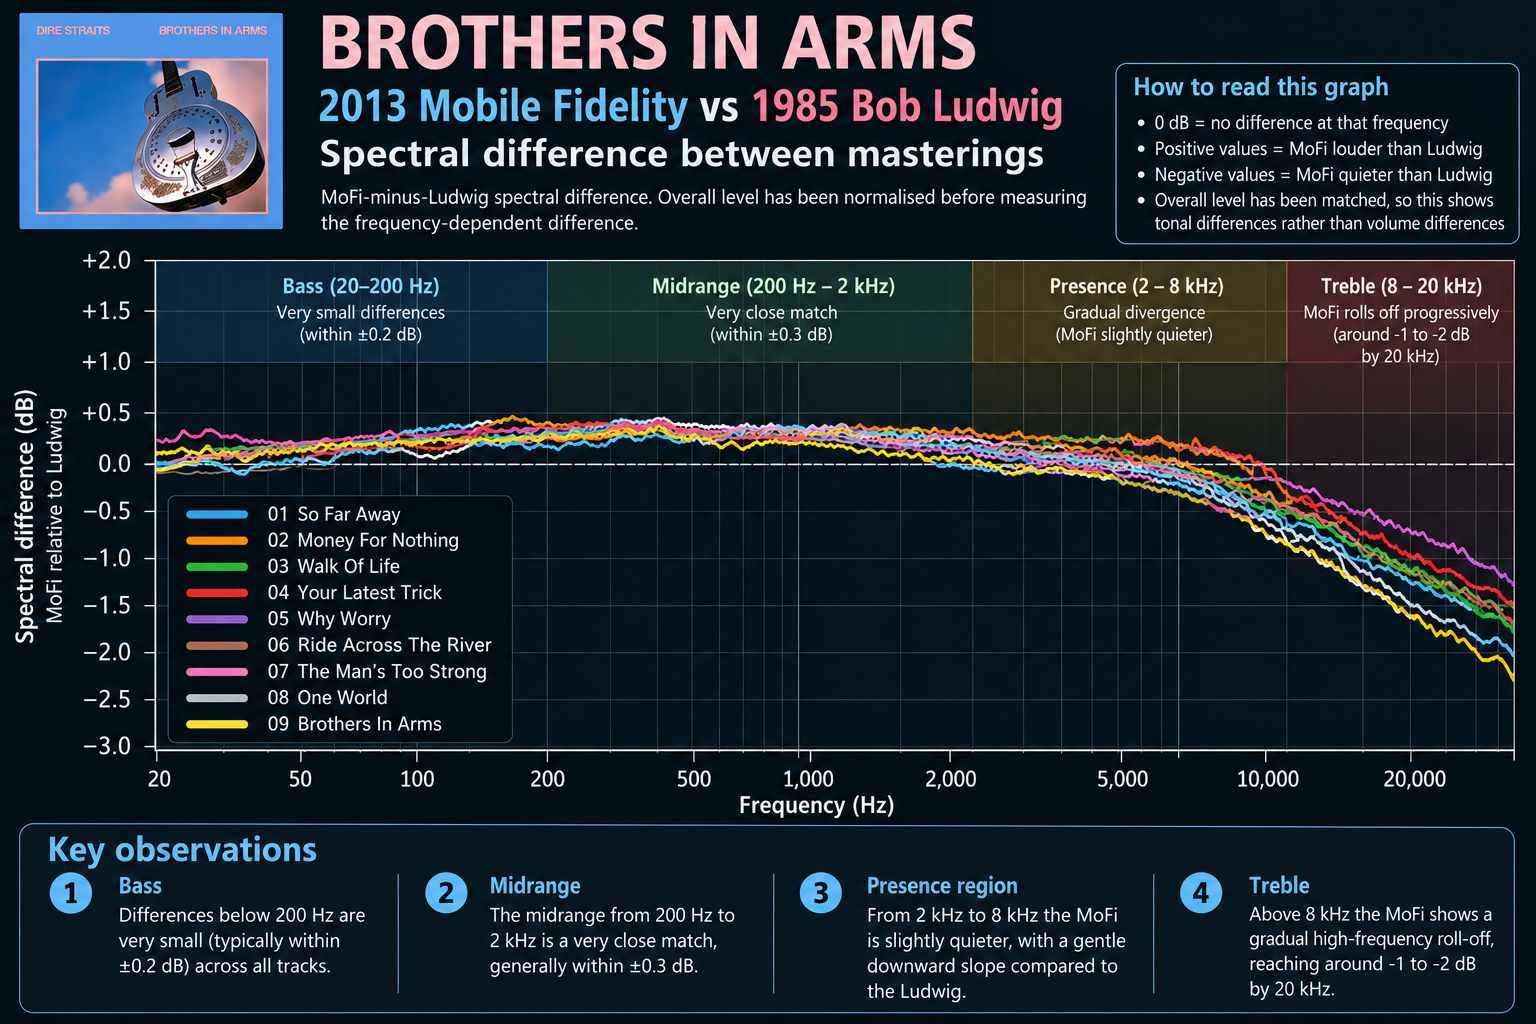
MoFi-minus-Ludwig spectral difference. Overall level has been normalised before measuring the frequency-dependent difference.
The next experiment was to ask whether the spectral difference alone could explain the waveform relationship.
A magnitude-only transfer was derived and applied to the Ludwig reference.
This improves the match considerably.
For Brothers in Arms, for example, the residual improved from approximately:
-12.2 dB ? -14.3 dB
after magnitude EQ.
This confirms that frequency response is an important part of the difference.
However, the match is still not perfect.
There is therefore more happening than a simple EQ curve.
Magnitude-squared coherence was examined to determine how strongly the two signals remain related at different frequencies.
The coherence is extraordinarily high over most of the audible spectrum.
For the majority of the tracks, median coherence is effectively at or extremely close to unity across the main audible bands.
Even where it falls slightly at the extreme high-frequency end, the relationship remains very strong.
This is significant because it demonstrates that the MoFi and Ludwig signals are not merely similar in a broad spectral sense.
They retain a very strong frequency-by-frequency relationship.
The final stage was to move beyond magnitude response and examine the complex transfer relationship.
This considers both magnitude and phase/filter behaviour.
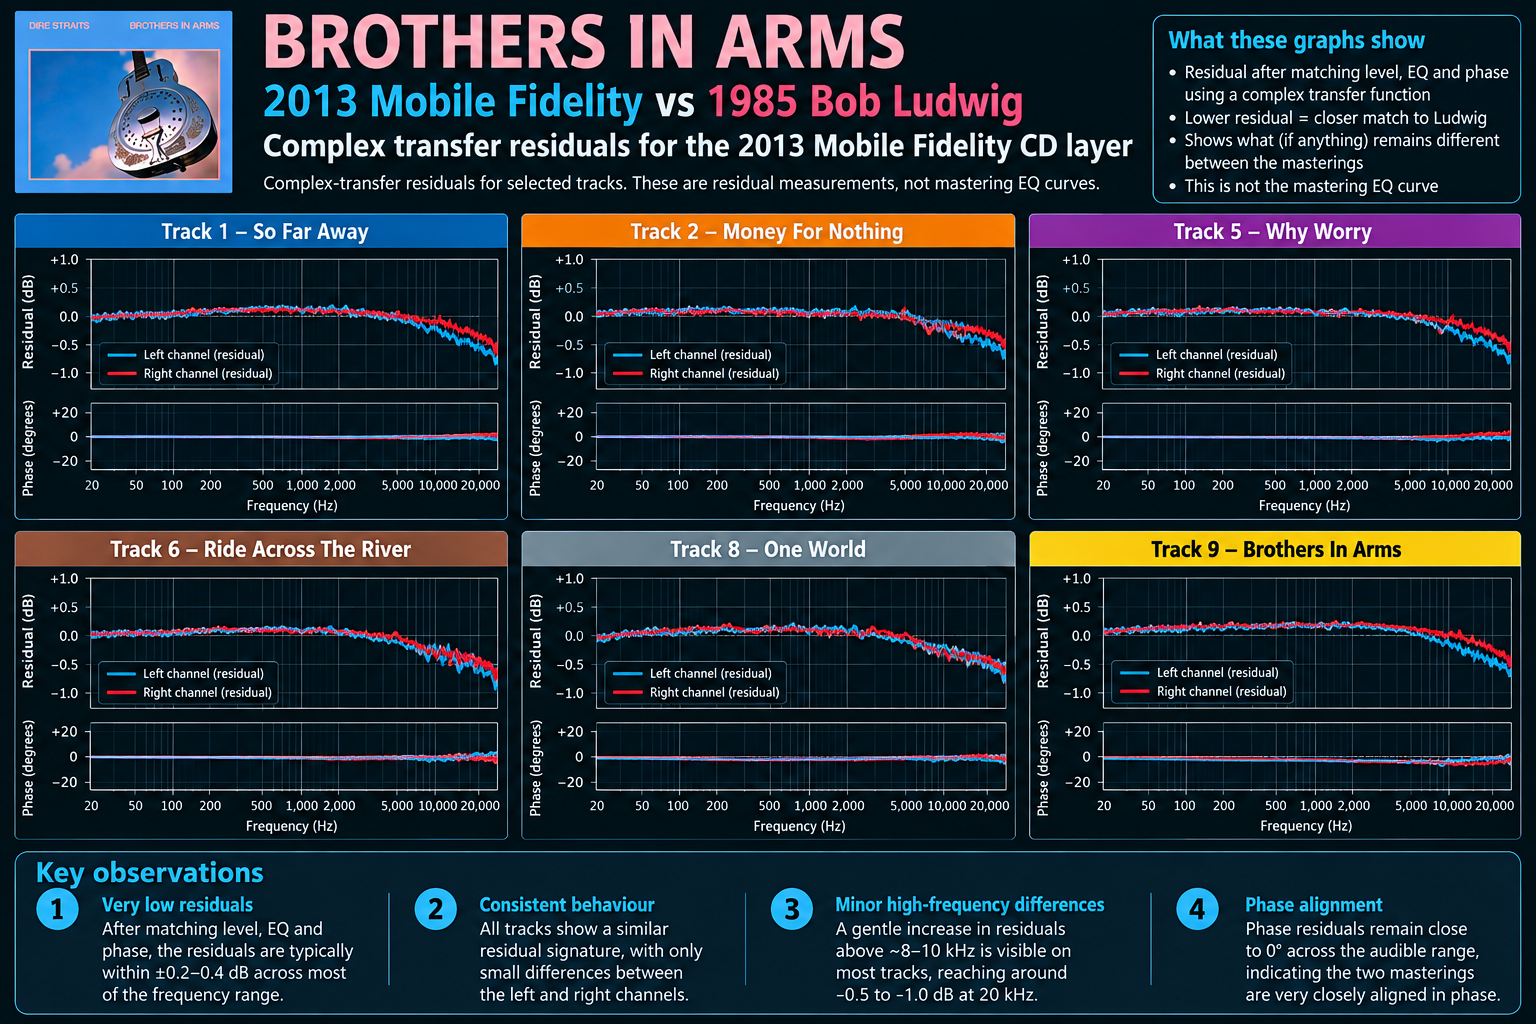
Complex-transfer residuals for selected tracks. These are residual measurements, not mastering EQ curves.
The resulting correlations are exceptionally high.
| Track | Left correlation | Right correlation |
|---|---|---|
| Brothers in Arms | 0.999992 | 0.999987 |
| Your Latest Trick | 0.999930 | 0.999950 |
| Why Worry | 0.999999 | 0.999999 |
| One World | 0.999841 | 0.999942 |
Selected residual levels were:
The variation is important.
It demonstrates that although the underlying relationship is extremely strong, the exact transfer behaviour is not identical on every track or channel.
One possibility considered during the investigation was that the transfer characteristics might change substantially throughout individual songs.
That would potentially suggest time-varying processing.
However, the local transfer measurements did not provide sufficient evidence to support that conclusion.
The transfer curves remained broadly stable when examined at different points in the programme.
The earlier apparent variation seen in some local FIR experiments was therefore not treated as evidence of time-varying mastering.
This is an important example of why intermediate experimental results need to be validated before being treated as conclusions.
After completing the complete nine-track analysis, the evidence supports several conclusions.
The gain-only comparison leaves substantial residual differences across the album.
The nine tracks exhibit a remarkably similar broad transfer shape.
The detailed transfer characteristics vary between songs and channels.
Magnitude correction improves the match.
Significant residual differences remain after magnitude correction.
Complex-transfer analysis produces correlations extremely close to unity on the tracks examined in detail.
The analysis describes the relationship between the digital PCM signals.
It does not establish the physical analogue source used to create the Mobile Fidelity master.
Therefore, the measurements do not prove whether the MoFi originated from:
Nor can the waveform analysis identify the exact analogue playback equipment, converter or mastering chain.
Those questions require documentary evidence.
The earlier comparison of the 1985 Bob Ludwig and John Dent editions provides a useful benchmark.
After correcting for channel orientation, gain and sample alignment, tracks 1, 2 and 4–9 of those two releases match to approximately ±1 LSB.
The residuals are around the -61 to -69 dB region.
The MoFi residuals are substantially larger and more structured than that on most tracks.
This reinforces the conclusion that the 2013 Mobile Fidelity release is not simply another digital representation of the same 1985 mastering.
The original question was whether the differences observed between the 2013 Mobile Fidelity CD layer and the 1985 Bob Ludwig mastering followed a consistent mastering pattern.
Having now analysed all nine tracks, the answer is clear:
There is a consistent broad mastering pattern across the album, while the precise transfer characteristics vary from track to track and channel to channel.
The 2013 Mobile Fidelity CD layer is therefore a genuinely distinct digital mastering.
It has:
The most defensible summary is:
The 2013 Mobile Fidelity CD layer is a distinct mastering of Brothers in Arms, with different level, tonal and transfer characteristics from the 1985 Bob Ludwig CD, while retaining an exceptionally strong underlying waveform relationship to the original programme.
We can now say this with confidence across the entire nine-track album, rather than relying on one or two representative tracks.
The investigation does not establish which physical tape Mobile Fidelity used.
It does establish something more immediately measurable:
The 2013 MoFi CD layer is not simply the 1985 Ludwig CD at a different volume.
It has its own tonal and transfer characteristics, and those characteristics are present across the album.
At the same time, the exceptionally high waveform relationship shows just how much common information remains between the two masterings.
That combination is what makes the 2013 Mobile Fidelity edition particularly interesting.
This completes the planned nine-track forensic comparison of the 2013 Mobile Fidelity Brothers in Arms CD layer.
The analysis has moved from a single-track investigation to a complete album-level examination, providing a much stronger basis for describing the relationship between the MoFi and the original 1985 Bob Ludwig mastering.
Analysis by Andy Hancock.
Measurements are based on the actual extracted CD-layer PCM data. Figures labelled as summary or illustrative should not be treated as raw measurement plots.
This article is the follow-up to:
Dire Straits – Brothers in Arms: Forensic Analysis of the 2013 Mobile Fidelity CD Layer
That article introduced the MoFi investigation and set out the initial findings. This follow-up completes the planned nine-track analysis.
The CD-layer investigation is now complete, but there is another part of the Brothers in Arms story still to explore.
Come back soon as we turn our attention to the SACD versions — including the 2005 20th Anniversary Hybrid SACD, the 2013 Mobile Fidelity UDSACD 2099, and the 2014 SHM-SACD.
We’ve already seen how differently the CD masterings can behave. The next stage is to examine what these SACD releases actually contain and how their high-resolution stereo programmes compare.
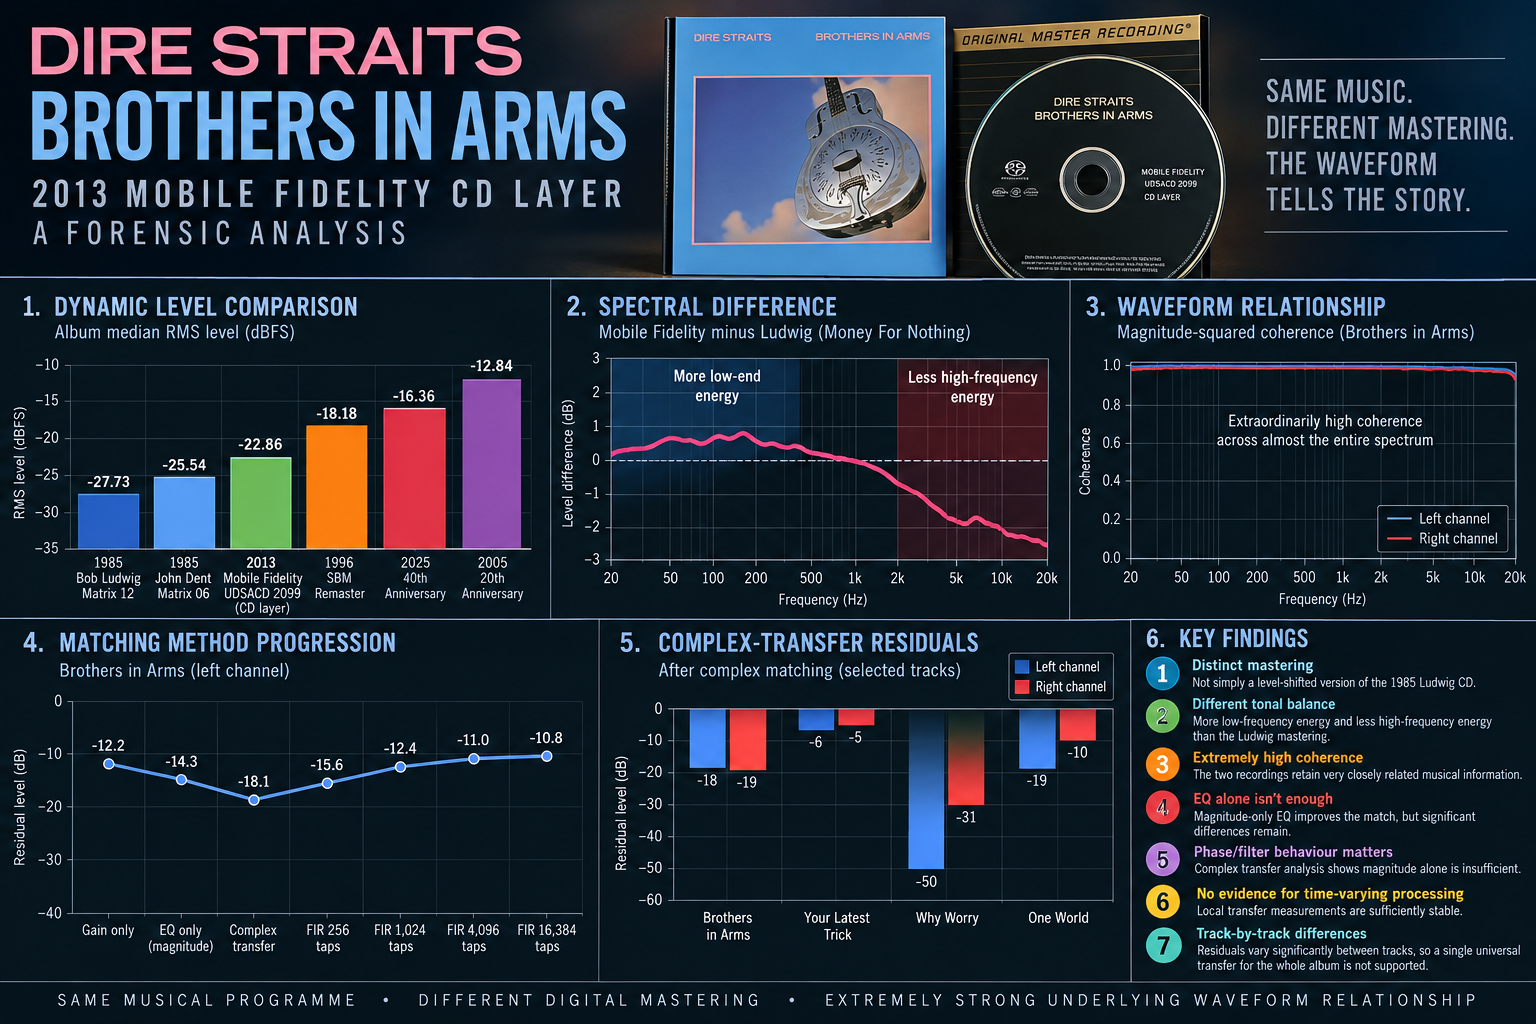
The 2013 Mobile Fidelity release of Brothers in Arms is often discussed alongside the original 1985 CD masterings, but listening alone cannot tell us exactly how the mastering relates to those earlier versions.
I therefore treated the CD layers as digital data and compared the actual PCM samples. The aim was not simply to measure loudness, but to determine how closely the Mobile Fidelity mastering is related to the 1985 programme and what processing separates the two.
The Mobile Fidelity UDSACD 2099 CD layer is a standard 44.1 kHz / 16-bit stereo programme. The nine tracks were extracted and verified with AccurateRip and CTDB. All nine tracks returned high-confidence AccurateRip results with no extraction errors.
The measured EAC peak levels range from 53.7% to 99.3%. More importantly, the average level is substantially higher than the 1985 masterings, while the crest factor remains much closer to the original CDs than to the later, more heavily levelled editions.
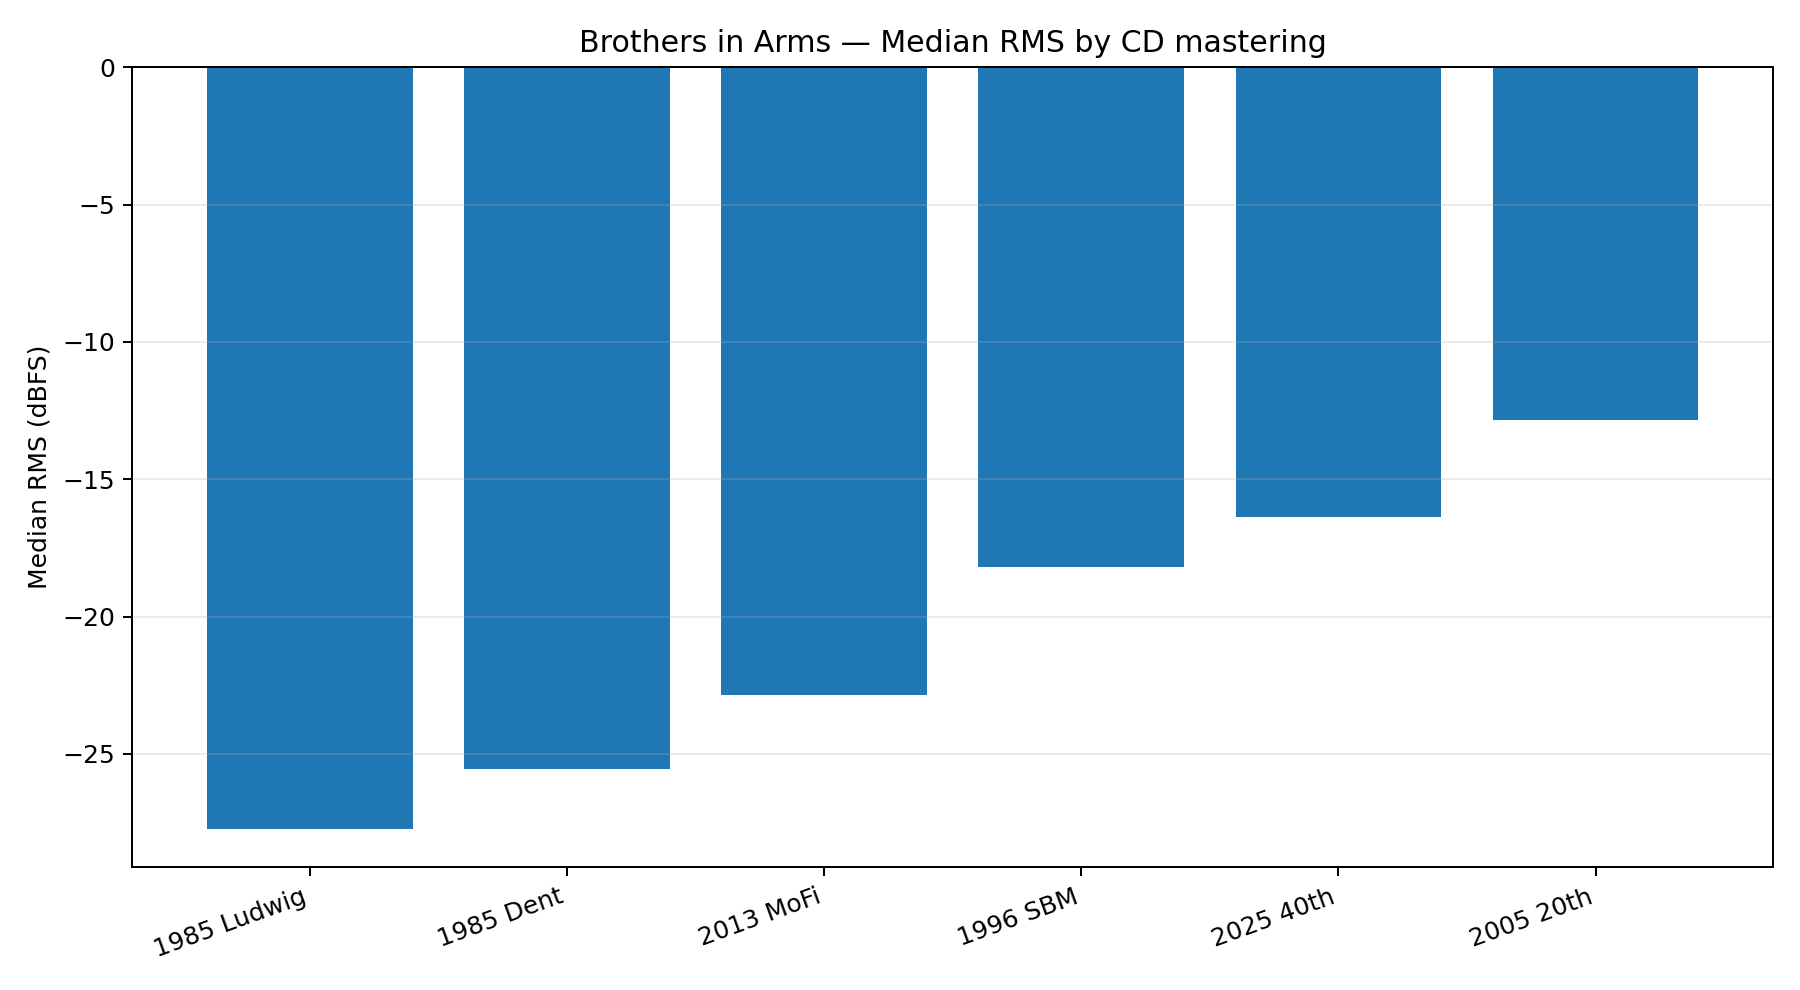
Median RMS level across the album. The 2013 Mobile Fidelity CD layer is considerably louder than the 1985 masterings, but remains substantially more dynamic than the 1996, 2005 and 2025 editions.
The album-wide median RMS figures are approximately:
| Mastering | Median RMS | Median crest |
|---|---|---|
| 1985 Bob Ludwig | -27.73 dBFS | 22.52 dB |
| 1985 John Dent | -25.54 dBFS | 22.33 dB |
| 2013 Mobile Fidelity | -22.86 dBFS | 21.51 dB |
| 1996 SBM | -18.18 dBFS | 18.18 dB |
| 2025 40th Anniversary | -16.36 dBFS | 15.36 dB |
| 2005 20th Anniversary | -12.84 dBFS | 12.74 dB |
No. A simple gain adjustment does not reproduce the Mobile Fidelity waveform.
For example, on Brothers in Arms, Your Latest Trick and Why Worry, aligning corresponding events and optimising the gain produces very high waveform correlations, but leaves substantial residual energy. The residuals are far above the level expected from simple 16-bit quantisation differences.
The tonal balance is also different. Money For Nothing provides a useful example. After normalising total 20 Hz–20 kHz power, the approximate Mobile Fidelity-minus-Ludwig spectral difference is:
| Band | Difference |
|---|---|
| 20–50 Hz | +0.04 dB |
| 50–100 Hz | +0.28 dB |
| 100–200 Hz | +0.52 dB |
| 200–500 Hz | +0.35 dB |
| 500 Hz–1 kHz | +0.26 dB |
| 1–2 kHz | -0.07 dB |
| 2–5 kHz | -1.66 dB |
| 5–10 kHz | -2.18 dB |
| 10–20 kHz | -2.64 dB |
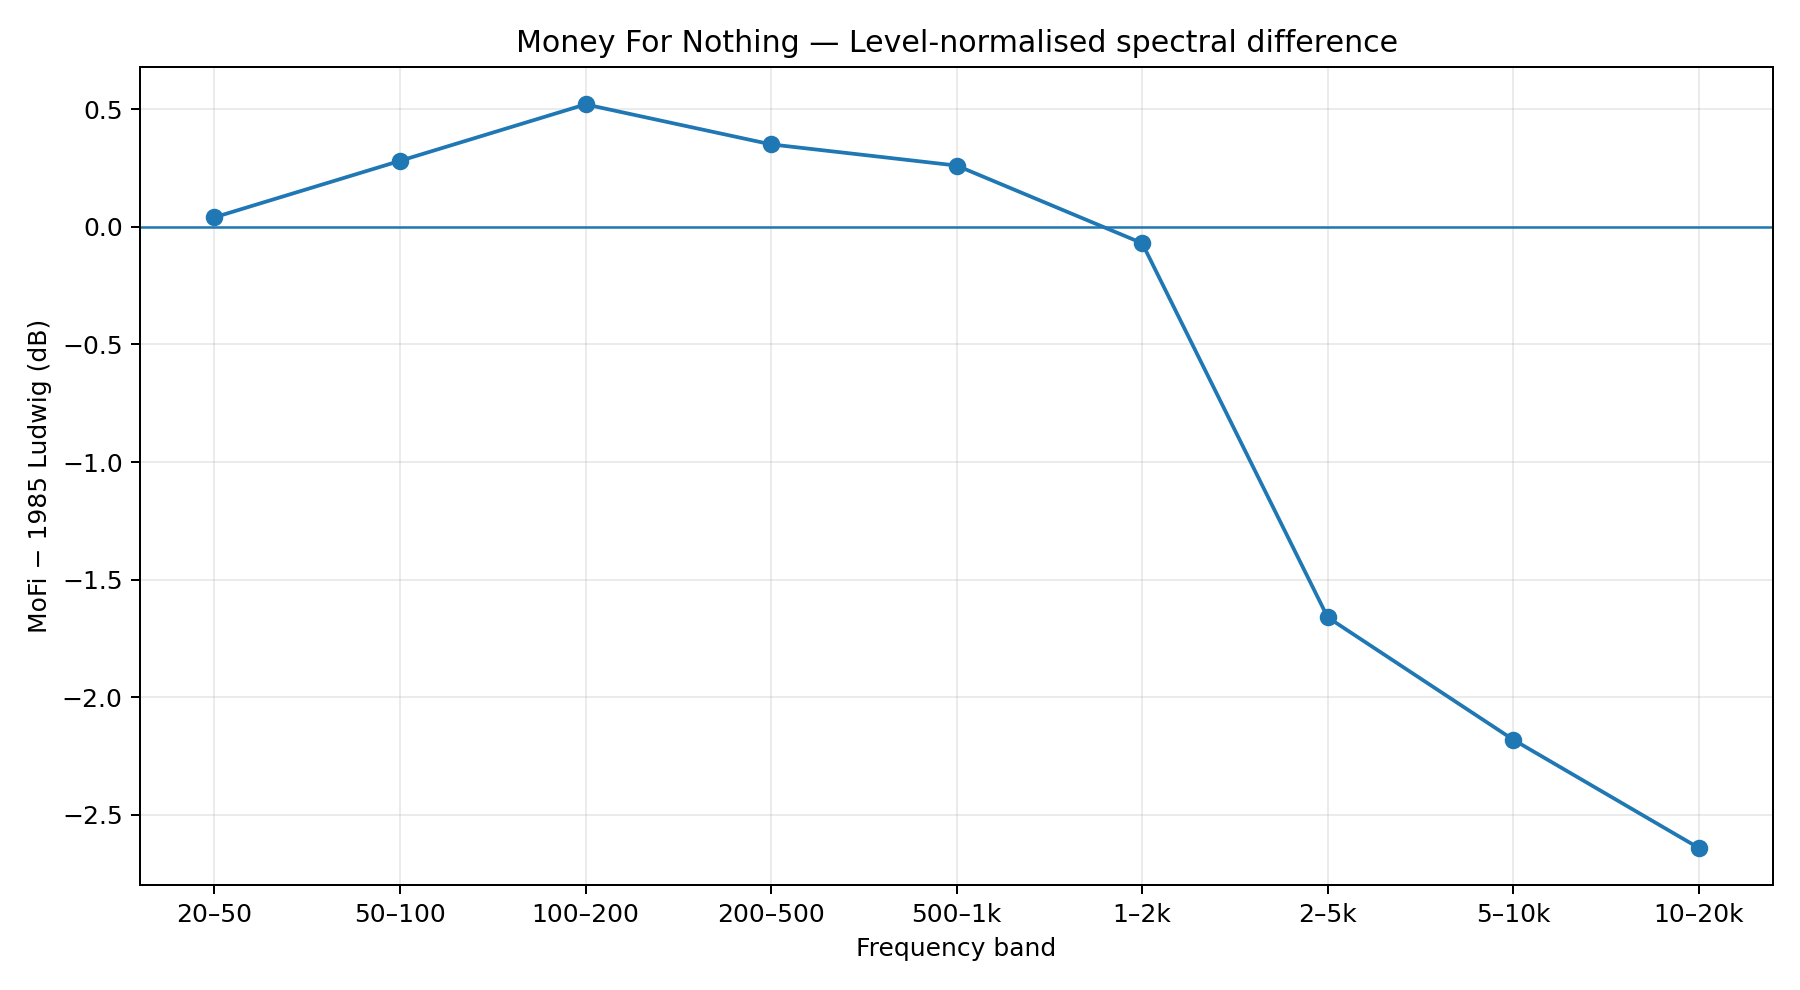
Approximate spectral difference after overall power normalisation: Mobile Fidelity minus 1985 Bob Ludwig, Money For Nothing.
Magnitude-only EQ improves the match significantly, but it does not completely explain the waveform relationship.
For example, on Brothers in Arms, the gain-only residuals were approximately -12 dB, while a magnitude-EQ correction reduced them to roughly -14 dB. The waveform correlation also increased.
That tells us that tonal balance is part of the difference, but not all of it.
The most striking result is the magnitude-squared coherence between the two masterings.
This does not prove that the two CDs came from the same physical analogue tape or mastering chain. It does, however, demonstrate an exceptionally strong deterministic relationship between their waveforms.
The next step was to allow both magnitude and phase/filter behaviour to vary rather than attempting to describe the difference with EQ alone.
After aligning the programmes, a complex transfer analysis produced very high correlations and substantially lower residuals on several tracks. The results vary by track and channel, which is important: there is no evidence here for one universal album-wide transfer function.
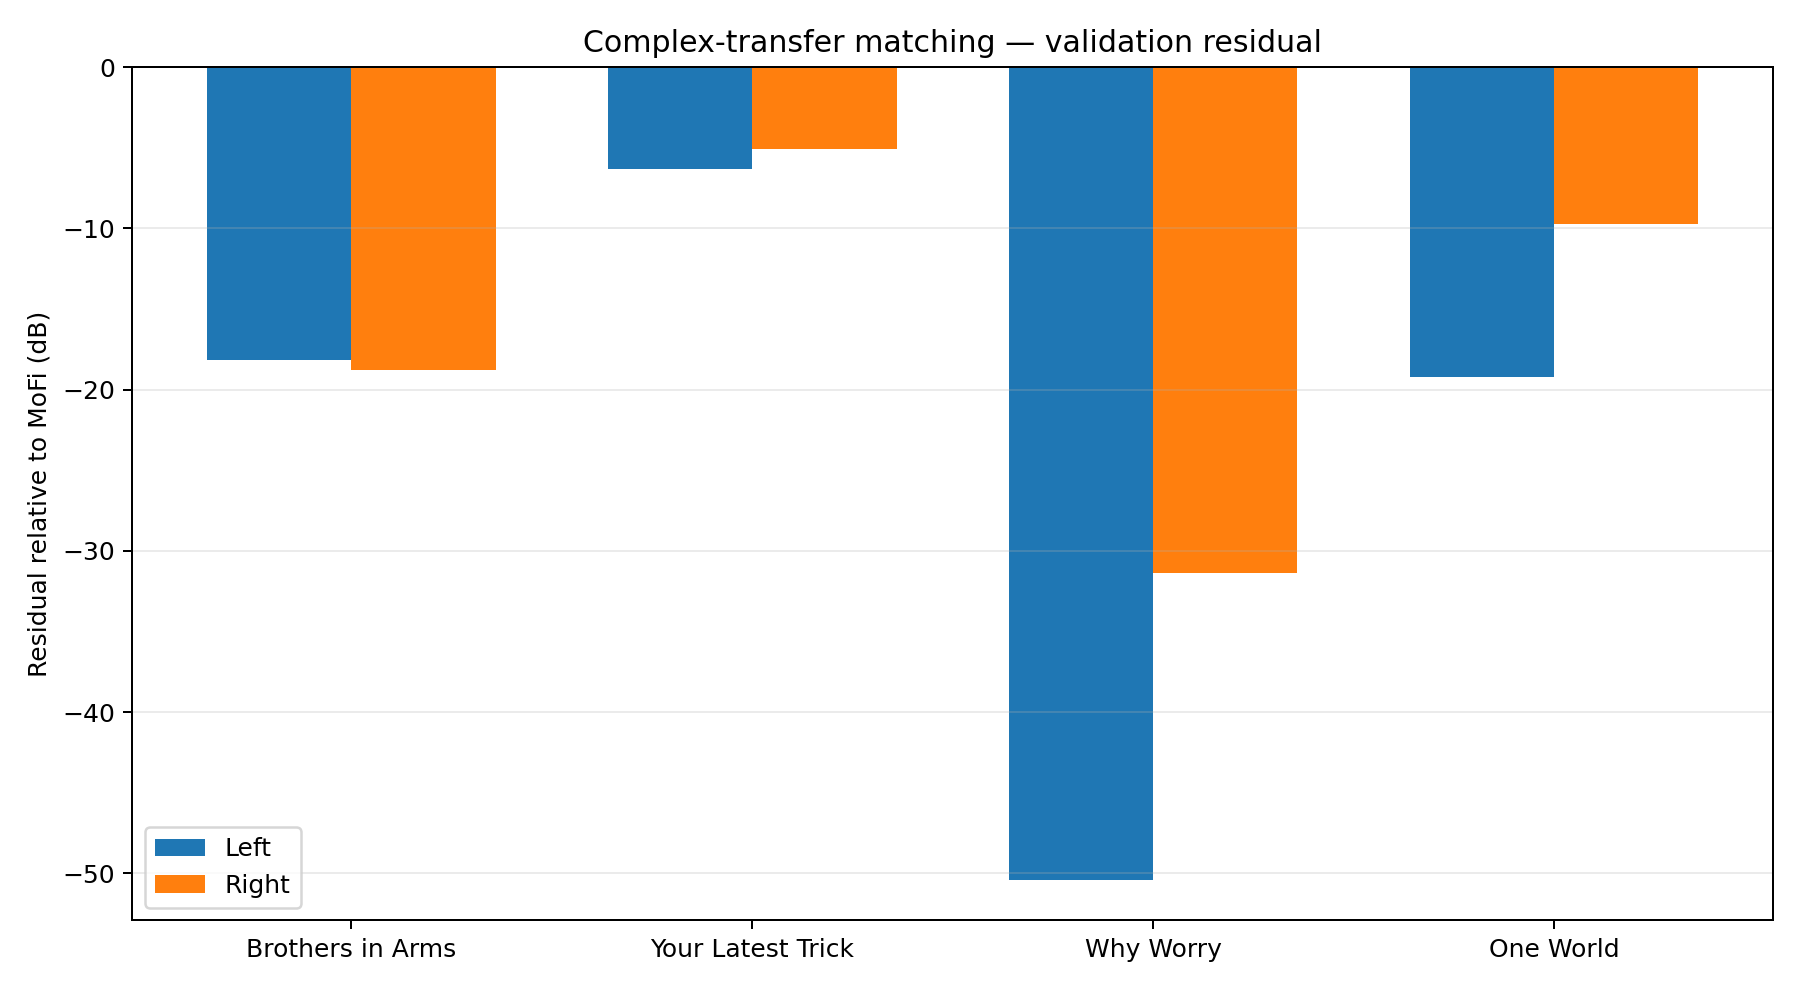
Residual levels after complex-transfer modelling for selected tracks and channels.
Finite impulse response filtering was also tested. Increasing filter length improved the match in some cases, but the improvement eventually plateaued. This is consistent with a relationship that contains more than a simple static EQ curve, while not by itself proving a particular analogue or digital processing chain.
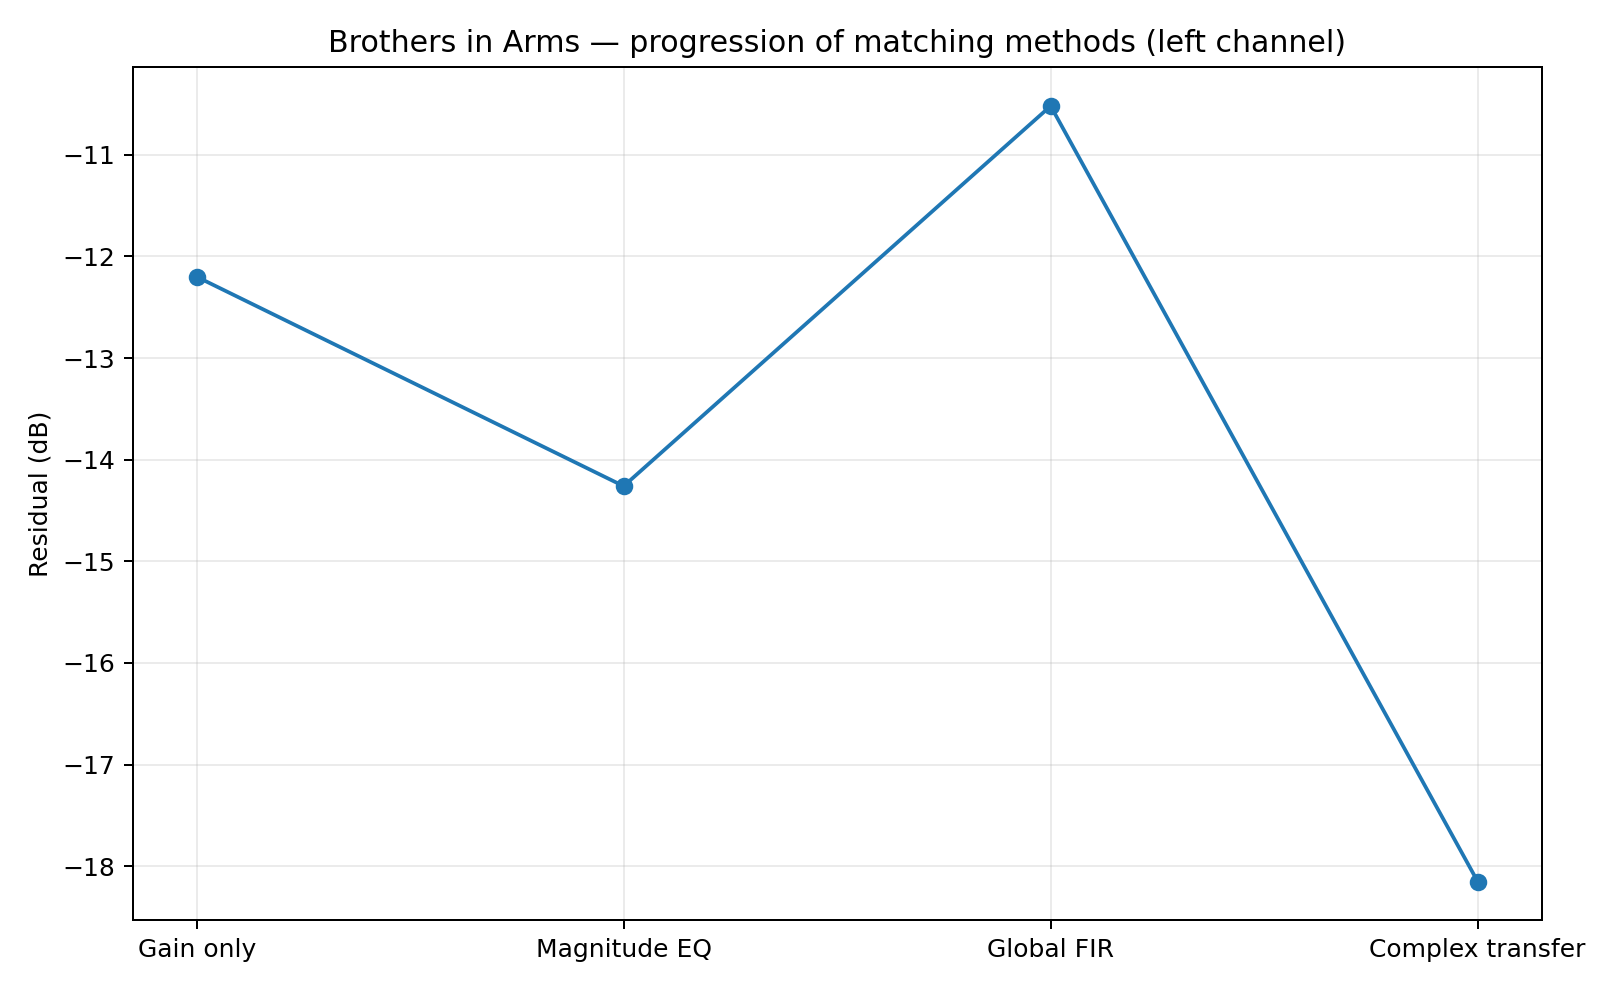
Illustrative progression of the matching methods used during the investigation. The chart is a summary of the analysis rather than a raw measurement plot.
An important possibility was that the Mobile Fidelity transfer might contain time-varying processing. Local transfer measurements were therefore compared at different points in the programme.
The transfer behaviour proved sufficiently stable that a claim of genuine time-varying mastering processing could not be justified from these tests. Some variation appeared in local FIR fits, but that variation was at least partly dependent on the musical content and limitations of the model.
The final reproducible complex-transfer validation gave the following approximate residuals:
| Track | Left | Right |
|---|---|---|
| Brothers in Arms | -18.15 dB | -18.76 dB |
| Your Latest Trick | -6.29 dB | -5.10 dB |
| Why Worry | -50.40 dB | -31.38 dB |
| One World | -19.19 dB | -9.70 dB |
The very low residual on the left channel of Why Worry is particularly interesting, with
the residual approaching the regime where quantisation and numerical effects become relevant.
However, the same cannot be said of every track, so the Mobile Fidelity mastering cannot simply
be described as a quantised copy of the Ludwig master.
The relationship between the two 1985 masterings provides a useful control experiment. After channel reversal, gain correction and track-specific sample alignment, the John Dent and Bob Ludwig files match within approximately ±1 least-significant bit on most tracks. Their residuals are typically around -61 to -69 dB.
The Mobile Fidelity residuals are materially higher on several tracks. That is strong evidence against describing the 2013 CD layer as merely a digital level-shift or quantised copy of the 1985 Ludwig mastering.
Digital waveform analysis cannot tell us with certainty which physical tape was used at the Mobile Fidelity mastering stage. A strong waveform relationship is evidence about the digital signals; it is not direct evidence about the provenance of the analogue source.
Likewise, these measurements do not establish the exact analogue mastering chain, converter, equaliser, compressor, limiter or other equipment that may have been used. Those conclusions would require documentation or additional independent evidence.
The 2013 Mobile Fidelity UDSACD 2099 CD layer is best described as a genuinely distinct digital mastering of Brothers in Arms. It is not simply the 1985 Bob Ludwig CD with its level changed.
At the same time, the forensic measurements show an unusually strong underlying relationship between the two programmes. The Mobile Fidelity version appears to preserve the same musical programme extremely closely while applying a different tonal and transfer characteristic.
That makes the 2013 CD layer particularly interesting: the differences are not adequately described by loudness alone, but neither does the evidence support treating it as an unrelated digital source.
The next stage of the investigation is to run the same full analysis across all nine tracks and compare the transfer behaviour track by track. That should show whether the differences follow a consistent mastering pattern or whether individual tracks received materially different treatment.
Analysis by Andy Hancock. Measurements are based on the actual extracted CD-layer PCM data. Figures
labelled as summary or illustrative should not be treated as raw measurement plots.

Brothers in Arms is one of my favourite albums, and it was also one of the first albums I owned on Compact Disc when it was released in 1985.
I was also lucky enough to see Dire Straits when they toured Brothers in Arms in 1985. I went with some school friends, along with my father and one of his friends. One of those school friends still blames that concert for his hearing problems now, at 58 — we were right down the front, very close to the speaker stack, and it was loud!
I still have the ticket stub from that concert, along with the stickers that were given away at the time. I even stuck the stickers to my school calculator, which somehow survived all these years.

So Brothers in Arms isn’t simply another album in my collection; it’s tied to some very specific memories from 1985.
My father was also a big fan of Brothers in Arms. After he died, I remember walking through Bridgend High Street in South Wales, when a busker suddenly started playing “Brothers in Arms”. Hearing that song unexpectedly, at that particular moment, was one of those experiences that stays with you.
My father always told me that he wanted “Brothers in Arms” played at his funeral, and in September 2023, at his funeral, it was played as the last song as we left the service at the crematorium.
Even now, hearing Track 9 can bring a tear to my eye.
After all these years, the album has become connected not only with memories of being young and buying one of my first CDs, but also with the memory of my father.
Fast-forward nearly forty years and I found myself looking at the album from a rather different perspective:
How different are all those CD versions actually from one another?
There are numerous editions of Brothers in Arms, and audiophile discussions often describe them in terms such as “warm”, “bright”, “dynamic”, “compressed” or “better sounding”.
Rather than relying on descriptions, I wanted to find out what the digital audio actually shows.
So I collected six different stereo CD editions, ripped them accurately, and started comparing the actual samples.
The results turned out to be considerably more interesting than I expected.

For this investigation I examined six physical editions:
| Year | Edition | Mastering / identification |
|---|---|---|
| 1985 | Original CD, Matrix 06 | John Dent |
| 1985 | Original CD, Matrix 12 | Bob Ludwig |
| 1996 | SBM Remaster | Bob Ludwig |
| 2000 | XRCD2 | Hiromichi Takiguchi |
| 2005 | 20th Anniversary Hybrid SACD | Bob Ludwig |
| 2025 | 40th Anniversary Edition | Miles Showell |
The chronological order is important because these aren’t simply six different pressings of the same mastering.
The two 1985 discs require particularly careful investigation, while the later editions clearly represent different mastering generations.
And this wasn’t an investigation based solely on files found online.
I photographed and scanned the actual physical discs and packaging used in the investigation, including catalogue numbers, matrix information and mastering credits where visible.
That physical evidence became particularly important when comparing the original 1985 discs.
I wanted to avoid the usual problem with CD comparisons where somebody simply loads six files into an audio editor, adjusts the volume until they sound similar, and then declares one “better”.

Instead, I treated the discs as forensic evidence.
Each disc was:
This allowed me to distinguish between differences caused simply by level, differences caused by timing or offsets, and genuine changes to the audio samples.

The first disc is the original 1985 pressing identified by its matrix.
Catalogue: 824 499-2
Matrix: 824 499-2 06 #
The booklet credits:
Mastered by John Dent at The Sound Clinic, London
The rip was verified successfully with AccurateRip and CTDB.
All nine tracks were accurately ripped with no errors.
| Track | Peak |
|---|---|
| So Far Away | 100.0% |
| Money for Nothing | 100.0% |
| Walk of Life | 56.3% |
| Your Latest Trick | 41.6% |
| Why Worry | 22.7% |
| Ride Across the River | 72.6% |
| The Man’s Too Strong | 69.1% |
| One World | 89.6% |
| Brothers in Arms | 56.5% |
The median RMS level was approximately –25.54 dBFS, with a median crest factor of approximately 22.33 dB.
This is a remarkably dynamic presentation by modern CD standards.
The disc contains only a handful of exact full-scale samples. Tracks 1 and 2 contain full-scale samples; the remaining tracks do not.
The second original CD is also catalogue number 824 499-2, but it has a different matrix:
Matrix: 824 499-2 12 #
The disc is identified as Made in West Germany by PDO Hanover.
The important point here is that this is a different physical pressing from the Matrix 06 disc.
The rip was again fully verified.
All nine tracks were accurately ripped.
| Track | Peak |
|---|---|
| So Far Away | 79.4% |
| Money for Nothing | 79.4% |
| Walk of Life | 44.7% |
| Your Latest Trick | 33.0% |
| Why Worry | 18.0% |
| Ride Across the River | 57.6% |
| The Man’s Too Strong | 54.9% |
| One World | 71.1% |
| Brothers in Arms | 44.9% |
The median RMS level is approximately –27.73 dBFS, with a median crest factor of approximately 22.52 dB.
At first glance, therefore, Matrix 12 simply looks like a quieter version of Matrix 06.
But that turns out to be only part of the story.
This was where the investigation became much more interesting.
If the two 1985 discs were genuinely completely independent digital masterings, we would expect substantially more differences than simply a change in level.
Instead, the digital data shows an extraordinarily close relationship.
After:
the majority of the tracks essentially reproduce one another.
For Tracks 1, 2 and 4–9, the correlation is extraordinarily high and the residual difference is generally down around the –60 to -70 dB region.
In practical terms, after the transformation, the samples reproduce to within approximately ±1 LSB.
That is an extremely strong relationship.
It means that the two discs cannot sensibly be described as completely unrelated digital masterings.
But there is an important qualification.
They aren’t completely identical either.

Track 3, “Walk of Life”, contains two localised areas where the relationship breaks down.
The differences occur approximately around:
Both channels are affected.
Importantly, the differences cannot simply be explained by another small timing offset.
The difference energy is concentrated around roughly the 330–400 Hz region.
Outside these areas, the two versions return to their extraordinarily close relationship.
This is why I think the safest conclusion is:
Matrix 06 and Matrix 12 are two separately identified 1985 mastering/pressing variants, but their digital programs are extraordinarily closely related.
They should not be described as completely bit-identical.
At the same time, it would also be misleading to describe them as completely unrelated masterings.
The sample-level evidence is much more interesting than either of those simple explanations.
The comparison also revealed that the tracks aren’t necessarily aligned at exactly the same sample position.
For example, several tracks exhibit an offset of approximately 367 samples, while others have different offsets.
The measured offsets included:
| Track | Offset |
|---|---|
| 1 | 367 |
| 2 | 367 |
| 3 | 367 |
| 4 | 367 |
| 5 | 367 |
| 6 | 3307 |
| 7 | 1543 |
| 8 | 2131 |
| 9 | 3307 |
Once those offsets are taken into account, the underlying relationship becomes remarkably clear.
This is a good example of why simply comparing waveforms visually isn’t enough.
Two identical audio programmes can look completely different in an editor if one has been shifted by even a single sample.
The next major version is the 1996 SBM remaster.
This is a different mastering generation from the original 1985 discs.
It was mastered by Bob Ludwig at Gateway and uses Sony’s Super Bit Mapping process.
The digital measurements show a substantial increase in level compared with both original 1985 versions.
| Track | Peak |
|---|---|
| So Far Away | 97.7% |
| Money for Nothing | 97.7% |
| Walk of Life | 97.7% |
| Your Latest Trick | 100.0% |
| Why Worry | 70.7% |
| Ride Across the River | 100.0% |
| The Man’s Too Strong | 97.7% |
| One World | 97.7% |
| Brothers in Arms | 97.7% |
The median RMS level is approximately –18.18 dBFS, while the median crest factor is approximately 18.18 dB.
This is substantially less dynamic than either of the original 1985 versions.
There are also exact full-scale samples on Tracks 4 and 6.
Then we reach the particularly interesting 2000 XRCD2.
This is the Japanese-made XRCD2 edition released for the Hong Kong market.
Catalogue: 5483572
Barcode: 731454835725
Format: XRCD2 / 20-bit K2
Mastering engineer: Hiromichi Takiguchi
Disc matrix: 5483572 2T
The disc itself identifies Universal Music Ltd., Hong Kong and Made in Japan, and carries the XRCD2/K2 information.
The physical disc therefore provides useful evidence that this is a distinct release rather than simply another European pressing.
The rip was again accurately verified.
All nine tracks were successfully ripped with no errors.
| Track | Peak |
|---|---|
| So Far Away | 100.0% |
| Money for Nothing | 100.0% |
| Walk of Life | 100.0% |
| Your Latest Trick | 100.0% |
| Why Worry | 79.2% |
| Ride Across the River | 100.0% |
| The Man’s Too Strong | 100.0% |
| One World | 100.0% |
| Brothers in Arms | 100.0% |
The median RMS level is approximately –15.45 dBFS.
The median crest factor is also approximately 15.45 dB.
This represents a very substantial increase in average level compared with the original 1985 CDs.
One of the things I specifically investigated on the XRCD was exactly what those 100% peak readings meant at the sample level.

The results are interesting.
There are exact full-scale samples at both ends of the 16-bit range on most tracks.
For example:
| Track | -32768 samples | +32767 samples |
|---|---|---|
| So Far Away | 769 | 131 |
| Money for Nothing | 1,402 | 573 |
| Walk of Life | 382 | 278 |
| Your Latest Trick | 27 | 38 |
| Why Worry | 0 | 0 |
| Ride Across the River | 297 | 171 |
| The Man’s Too Strong | 523 | 465 |
| One World | 674 | 666 |
| Brothers in Arms | 150 | 204 |
The longest consecutive runs reach several samples on some tracks.
For example, Money for Nothing contains a run of five consecutive samples at full scale.
This establishes something more precise than simply saying “the XRCD is loud”.
There are actual samples sitting exactly at the limits of the 16-bit PCM representation.
I don’t want to overstate what that means, however.
The sample data demonstrates exact full-scale sample behaviour and peak limiting/clipping-like behaviour. It does not, by itself, prove a particular clipping algorithm or analogue/digital processing chain.
The actual samples are the evidence; the explanation needs to remain appropriately cautious.
The 2005 20th Anniversary Edition is another significant change.
This is a hybrid SACD release containing:
The edition uses the new 5.1 mix prepared by Chuck Ainlay, with mastering by Bob Ludwig at Gateway Mastering & DVD, Maine.
For this investigation I analysed the CD layer, rather than treating the SACD layer as though it were the same digital source.
The peak is approximately 98.8% on every track.
The median RMS level is approximately:
-12.84 dBFS
The median crest factor is approximately:
12.74 dB
This is the most compressed/loudest of the six editions by these particular measurements.
The difference compared with the original 1985 discs is substantial.
The 2005 CD layer is approximately 15 dB higher in median RMS level than the 1985 Bob Ludwig Matrix 12 disc.
That is a huge difference in digital level and dynamics.
The final edition in the comparison is the 2025 40th Anniversary Edition.
The set contains three discs, including the San Antonio Live in ’85 material, with the first disc containing the Brothers in Arms album.
Catalogue: 7565089
The 2025 edition is interesting because it does not simply continue the trend established by the 2005 edition.
Its measurements are:
Approximately 89.1% on most tracks, with Track 5 at approximately 86.0%.
The median RMS level is approximately:
-16.36 dBFS
The median crest factor is approximately:
15.36 dB
So the 2025 edition is considerably quieter than the 2005 CD layer.
It nevertheless remains significantly louder than the original 1985 discs.
This makes the 2025 mastering an interesting middle ground in the overall history of the CD versions.

Putting all six editions together makes the progression much easier to see.
| Edition | Median RMS | Median Crest |
|---|---|---|
| 1985 John Dent – Matrix 06 | -25.54 dBFS | 22.33 dB |
| 1985 Bob Ludwig – Matrix 12 | -27.73 dBFS | 22.52 dB |
| 1996 SBM | -18.18 dBFS | 18.18 dB |
| 2000 XRCD2 | -15.45 dBFS | 15.45 dB |
| 2005 20th Anniversary | -12.84 dBFS | 12.74 dB |
| 2025 40th Anniversary | -16.36 dBFS | 15.36 dB |
This table tells a very clear story.
The original 1985 discs have the highest crest factors and the lowest average digital levels.
The 1996 edition moves substantially towards higher average level.
The 2000 XRCD2 goes further.
The 2005 CD layer goes further still.
The 2025 edition moves back down again, although it remains considerably above the original 1985 level.
Peak percentage alone doesn’t tell the whole story.
A track can have a 100% sample but still have a relatively low RMS level.
Conversely, an aggressively processed recording can have a peak below 100% while still having very little dynamic range.
That is why I have looked at both peak level and RMS/crest measurements.
For example, the 1985 John Dent disc contains 100% peaks on Tracks 1 and 2, but its average level remains extremely low.
The 2005 edition, by contrast, has peaks around 98.8% throughout while having a dramatically higher average level.
So “100% peak” does not automatically mean “compressed”.
The relationship between peak and average level is much more informative.

The next stage was to look at the frequency content.
This is where things get particularly useful because a level difference can be removed mathematically.
For the spectral comparison, the tracks were level-matched before examining their frequency distribution.
The aim wasn’t to create a prettier graph.
The aim was to ask:
Once volume is taken out of the equation, are the tonal balances actually different?
The answer is yes — but the size and character of the differences vary substantially between editions.
The original 1985 versions are particularly close to one another.
The later editions show much more substantial differences once level is normalised.
“Walk of Life” is Track 3, and it became the most interesting track in the entire investigation.
At first, the Matrix 06 and Matrix 12 versions appear to be almost identical after the appropriate channel and level corrections.
The correlation is extraordinarily high.
But when the actual residual is examined rather than simply looking at the correlation coefficient, two small sections stand out.
These occur around:
3:06.55–3:06.75
and
3:09.83–3:10.10
The differences occur in both channels.
There is no simple additional timing offset that makes them disappear.
This is important because it means the discrepancy isn’t simply an alignment problem.
Most of the track behaves as though it has come from essentially the same digital programme.
These small areas do not.
That is exactly the sort of thing that can disappear completely if the analysis is limited to listening tests or a basic “are the files identical?” comparison.

One of the things I wanted to establish with this project was that mastering comparisons don’t have to remain subjective.
Words such as:
can be useful descriptions of listening impressions.
But they don’t tell us what actually happened to the samples.
With sample-level analysis we can ask much more precise questions:
That is the approach I wanted to take here.
One of the most enjoyable parts of this project has been going back to the actual discs.
It’s very easy when discussing CD masterings online to end up talking about catalogue numbers and matrix numbers as though they are abstract database entries.
They aren’t.
They are physical objects.
The Matrix 06 disc is an actual 1985 pressing.
The Matrix 12 disc is another physical pressing.
The XRCD has its own catalogue number, physical matrix and Japanese manufacturing information.
The 2005 edition is physically identifiable as the hybrid SACD release.
The 2025 edition is physically identifiable as the new 40th Anniversary set.
Photographing the actual discs gives the analysis a much stronger foundation.
It means the audio files can be tied back to something physically identifiable.
The most interesting result of the entire investigation isn’t actually which edition is “best”.
It is the relationship between the two original 1985 discs.
The Matrix 06 and Matrix 12 discs are labelled and documented differently, and yet the digital audio is extraordinarily closely related.
After accounting for:
most of the album effectively falls back into place.
That is a much more interesting result than simply finding two CDs that sound similar.
And then there is Walk of Life.
Those two localised differences prevent the easy conclusion that the discs are simply identical data with a different level.
There is something genuinely different there.
The 1996 edition represents a very different point in the story.
The average level rises substantially compared with both 1985 discs.
The crest factor falls.
The peak levels approach full scale throughout most of the album.
This doesn’t mean the 1996 edition is necessarily “bad”.
It simply means that the mastering has different technical characteristics from the original 1985 discs.
That distinction is important.
The purpose of this investigation is not to turn measurements into a subjective ranking.
It is to document what actually changed.
The XRCD is particularly interesting because it combines a different mastering identity with a very different production philosophy.
It was mastered by Hiromichi Takiguchi, using JVC’s XRCD/K2 process.
The physical disc identifies it as an XRCD2 release, catalogue 5483572, made in Japan for the Hong Kong market.
Digitally, it sits much closer to the later high-level masterings than to the original 1985 discs in terms of RMS and crest factor.
The exact full-scale sample counts are also notable.
Whether someone likes the resulting sound is a separate question.
What can be stated objectively is that the PCM data contains many exact full-scale samples and has a substantially higher average level than either 1985 disc.
The 2005 20th Anniversary edition represents another major step in the mastering history.
It is also important not to confuse the various layers and mixes.
The release contains a new 5.1 mix by Chuck Ainlay.
The CD layer analysed here is not simply interchangeable with the original 1985 stereo CD.
Technically, its measured dynamics are the most restricted of the six editions examined.
With a median RMS of approximately –12.84 dBFS and a median crest factor of approximately 12.74 dB, it is considerably denser than the original CDs.
Again, that is a measurement rather than a judgement.
The 2025 release provides an interesting counterpoint.
Despite being a modern anniversary edition, its measured dynamics are not as restricted as the 2005 CD layer.
Its median RMS is approximately –16.36 dBFS.
Its median crest factor is approximately 15.36 dB.
That places it between the original 1985 discs and the 1996/2000/2005 editions in terms of average level.
It therefore doesn’t fit a simple narrative of “each new edition got progressively louder”.
The history is more complicated than that.
After working through the six discs, several things are clear.
Both original discs have much lower RMS levels and higher crest factors than the later editions.
Their digital programmes show an extremely strong mathematical relationship after channel reversal, level correction and sample alignment.
The localised differences in “Walk of Life” mean that the two discs should not simply be described as bit-identical masterings.
Its RMS level is considerably higher and its crest factor lower than either 1985 edition.
The 2000 XRCD2 has a median RMS of approximately -15.45 dBFS and contains numerous exact full-scale samples.
It has the highest average level and lowest median crest factor in this comparison.
Its average level is lower and its crest factor higher than the 2005 CD layer, although it remains considerably above the original 1985 discs.
That wasn’t actually the question I set out to answer.
And I don’t think a collection of measurements can tell somebody which version they should enjoy.
What the measurements can tell us is what is physically and digitally different.
If someone prefers the original 1985 presentation, the measurements provide a strong technical explanation for why it behaves differently from the later releases.
If someone prefers the XRCD, the data doesn’t invalidate that preference.
If somebody prefers the 2005 version, the measurements don’t tell them that they shouldn’t.
The interesting part is that we can now separate what the disc actually contains from descriptions based purely on reputation.

The six discs provide a fascinating snapshot of the changing approach to Brothers in Arms over four decades:
1985
Original CD mastering variants, including the John Dent Matrix 06 and Bob Ludwig Matrix 12 discs.
1996
SBM remaster, again associated with Bob Ludwig.
2000
XRCD2 edition, mastered by Hiromichi Takiguchi using JVC’s K2/XRCD process.
2005
20th Anniversary hybrid SACD, including the new 5.1 mix by Chuck Ainlay and Bob Ludwig mastering.
2025
40th Anniversary edition, representing another modern mastering of the album.
The physical discs tell the release history.
The audio samples tell the mastering history.
And when the two are considered together, the story becomes much more interesting.
All analysis was performed from actual lossless CD rips of the physical editions examined.
The basic process was:
The intention throughout was to make the analysis reproducible and to avoid making claims that go beyond what the samples demonstrate.

When I started this project, I expected to find some differences between different CD editions of Brothers in Arms.
I didn’t expect to end up investigating individual samples separated by a few hundredths of a second.
The most fascinating result for me isn’t simply that later editions became louder.
It’s the discovery that the two original 1985 discs — despite being separately identified as Matrix 06 and Matrix 12 — are astonishingly closely related at the digital level.
And then, right in the middle of Walk of Life, there are those small areas where the relationship breaks down.
That is exactly the sort of thing that makes this kind of investigation worthwhile.
After nearly forty years of listening to this album, I thought I knew it pretty well.
It turns out there was still quite a lot hiding in the samples.
And perhaps that’s the fitting thing about Brothers in Arms.
For me, it started as one of the first CDs I owned in 1985. It was part of a concert I went to with my father and school friends. It became connected with memories of my father, with that busker in Bridgend, and ultimately with his funeral.
Now, nearly forty years later, I’m listening to it again — but this time I’m listening to the numbers as well as the music.
Same album. Different masterings. Real differences.
And sometimes, the differences are only a few samples long.
I think I’ve picked six different Brothers in Arms pressings over the last 40 years that are particularly significant, and they’ve given me a fascinating cross-section of how the album has been mastered and reissued.
But there are still a couple I’d really like to obtain and analyse.
If you have either of the following editions, I’d be very interested in hearing from you:
I’d particularly like to analyse the actual audio alongside photographs of the physical disc and its matrix information. That way I can establish exactly which mastering is present and compare it with the six editions documented here.
So, if you’ve got one of these sitting on your shelf and would be willing to help, please get in touch. I’d love to add the results to this investigation.
And finally…
If you really want to know which one I think is the best, you’ll have to ask me.
After all, I’ve spent the last 40 years collecting them, ripping them, comparing them and, in some cases, analysing them down to the individual sample.
I definitely have a personal favourite.
But that’s another discussion…
For Dad.

Edit – 20 September 2026
Within 24 hours of this post, two readers are sending me their copies of
So I’ll update you, with a final post, when I’ve analysed the remaining two!
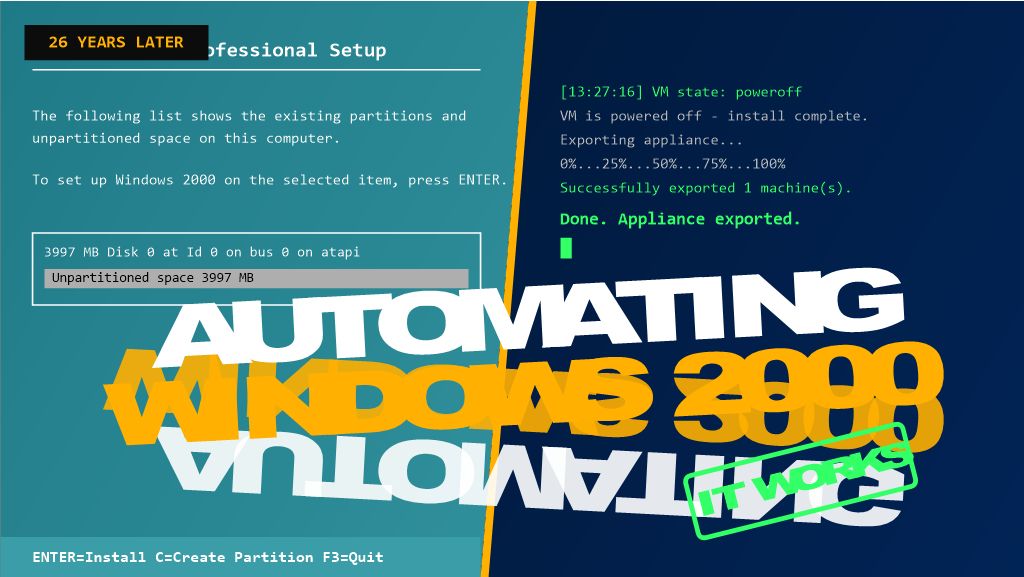
26 years after its release, Windows 2000 Professional still has a place in testing, legacy support, and retro-computing labs — but building a VM for it by hand, every single time, gets old fast. In my latest video, “HOWTO VirtualBox: How to Automate the Creation of an Appliance File,” I walk through a PowerShell script that does the whole job unattended: create the VM, install Windows 2000 Pro with zero clicking through Setup, power it off automatically, and export the finished appliance as a portable .ova file.
This was originally written as an answer to an Experts Exchange question, and it’s part of the Hancock’s VMware Half Hour series — which has expanded beyond core vSphere content into related virtualization tooling like this.
Here’s the write-up, including a couple of the gotchas that tripped the script up along the way.
A VirtualBox appliance file (.ova) packages a fully configured VM — OS, disk, settings, all of it — into a single portable file you can import anywhere. Building one by hand through the GUI is fine once. Needing a fresh Windows 2000 Pro VM repeatedly for a lab or test environment is a different story, and that’s where scripting the whole pipeline with VBoxManage.exe through PowerShell pays off.
Windows 2000 predates the autounattend.xml mechanism that later Windows versions use, so the assumption going in was that VBoxManage unattended install — the built-in facility that auto-generates a Windows answer file — wouldn’t support it, and that a hand-built winnt.sif + floppy would be needed instead.
Turns out that’s not the case. VBoxManage unattended install does support Windows 2000 — it builds its own answer file, auxiliary ISO, and floppy internally, no manual winnt.sif or floppy-writing tool required. That’s the route this script uses.
At a high level, Deploy-Win2kProVM.ps1 handles the whole pipeline in one run:
Windows2000 guest type, PIIX4 IDE controller, 1 CPU — matches what this OS actually needs).VBoxManage unattended install pointed at a standard Windows 2000 Pro install ISO — VBoxManage handles the answer file, auxiliary ISO, and floppy itself, and installs Guest Additions in the same pass..ova appliance file.The full script is available on GitHub: [link to your GitHub repo]
A few things that came up while getting this working, in case they save you the same troubleshooting:
unattended install are strict and easy to get wrong. It’s --key, not --product-key. It’s --user-password (or --admin-password, depending on the account type), not --password. VBoxManage errors out immediately with an “Unknown option” message if you get these wrong — worth double-checking against VBoxManage unattended install --help for your installed version.1 CPU and --ioapic off. This matches a manually-built VM confirmed to install and boot reliably — modern virtual chipset defaults can trip up an OS this old.--post-install-command="shutdown -s -t 0" flag, which runs inside the guest automatically once Setup completes (via the Guest Additions execution channel — hence --install-additions needs to run first)..ps1 file, it’s the Mark of the Web from a browser download. Fix it with: Unblock-File -Path '.\Deploy-Win2kProVM.ps1'Run the script, type a VM name, and walk away — no manual clicking through Setup, no hand-built floppy images. A few minutes later, you’ve got a fully installed, Guest-Additions-equipped Windows 2000 Professional VM exported as a ready-to-share .ova.
That exported file also becomes a reusable template — importing it for a fresh copy is far faster than rerunning the whole install.
This post covers the highlights, but the video walks through the whole process live — including the actual errors we hit and fixed along the way. Check it out here: https://youtu.be/Nz2vhgU01qM
If you’ve automated your own VirtualBox workflows, I’d love to hear how — drop a comment on the video or below!
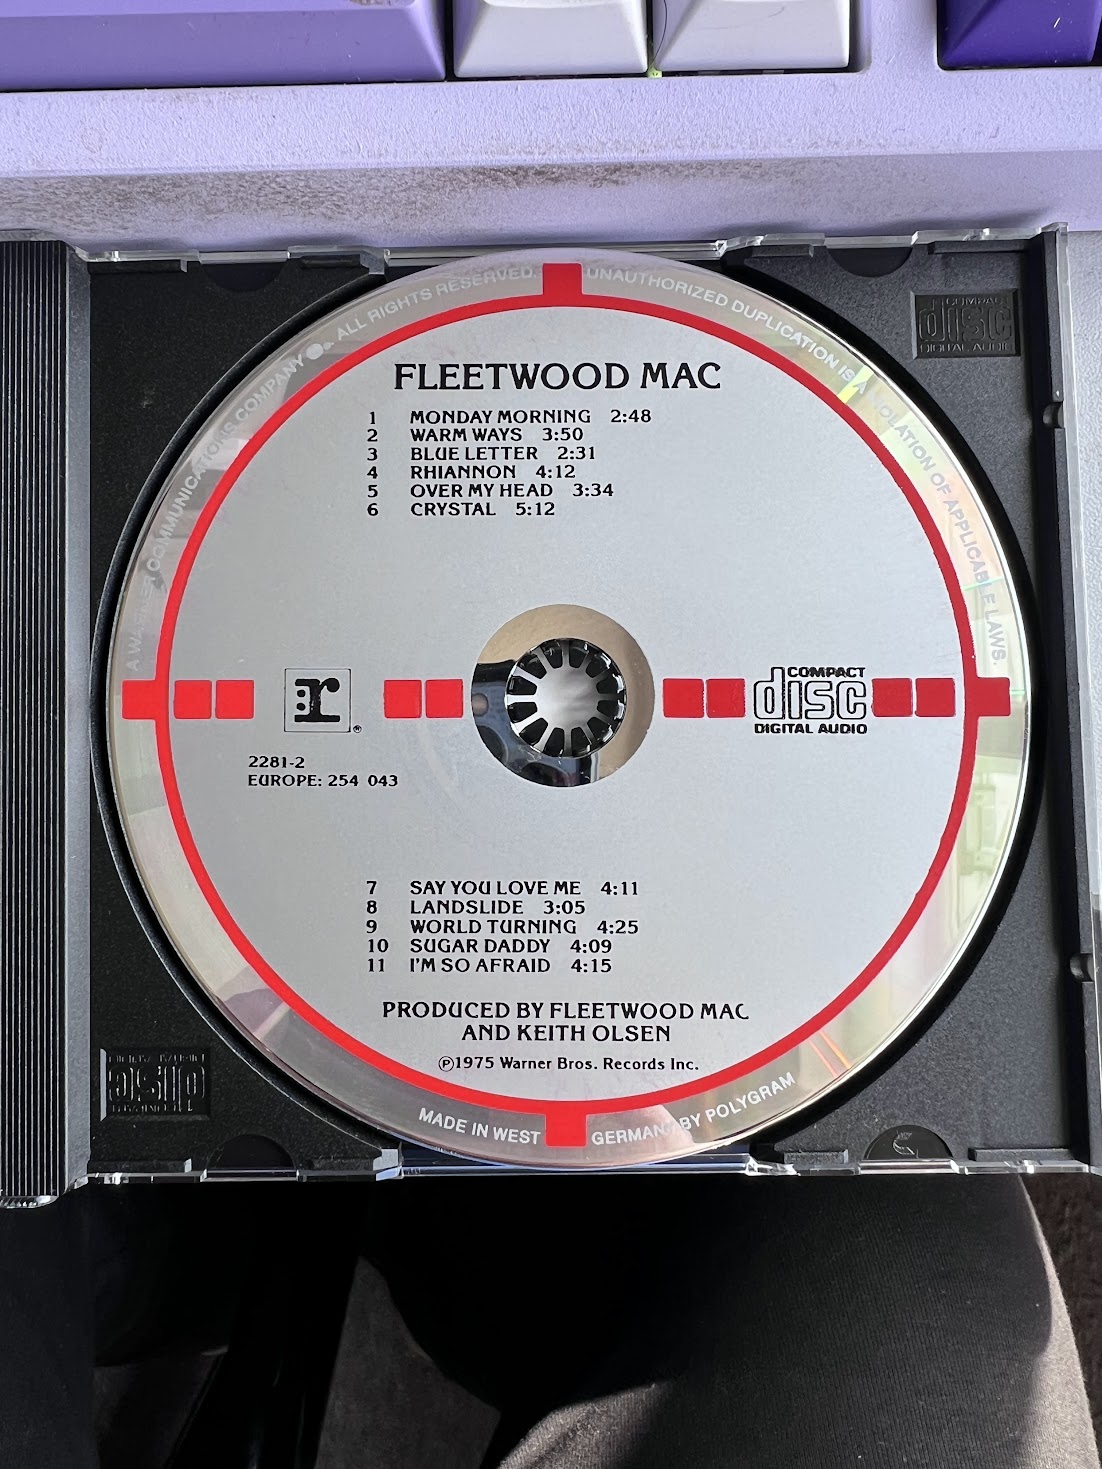 The first CD is the West German Target pressing.
The most immediately noticeable feature is the black spine, along with the distinctive Target-style disc design associated with these early CD releases.
The disc contains the original 11-track album:
The disc was manufactured in West Germany and is one of the early Target-style compact discs associated with the original CD era.
There is something rather special about these early Target CDs. They belong to the first generation of commercially produced CDs and have become collectible in their own right.
But I wasn’t interested in the Target CD simply because it looks good.
I wanted to know how it sounds.
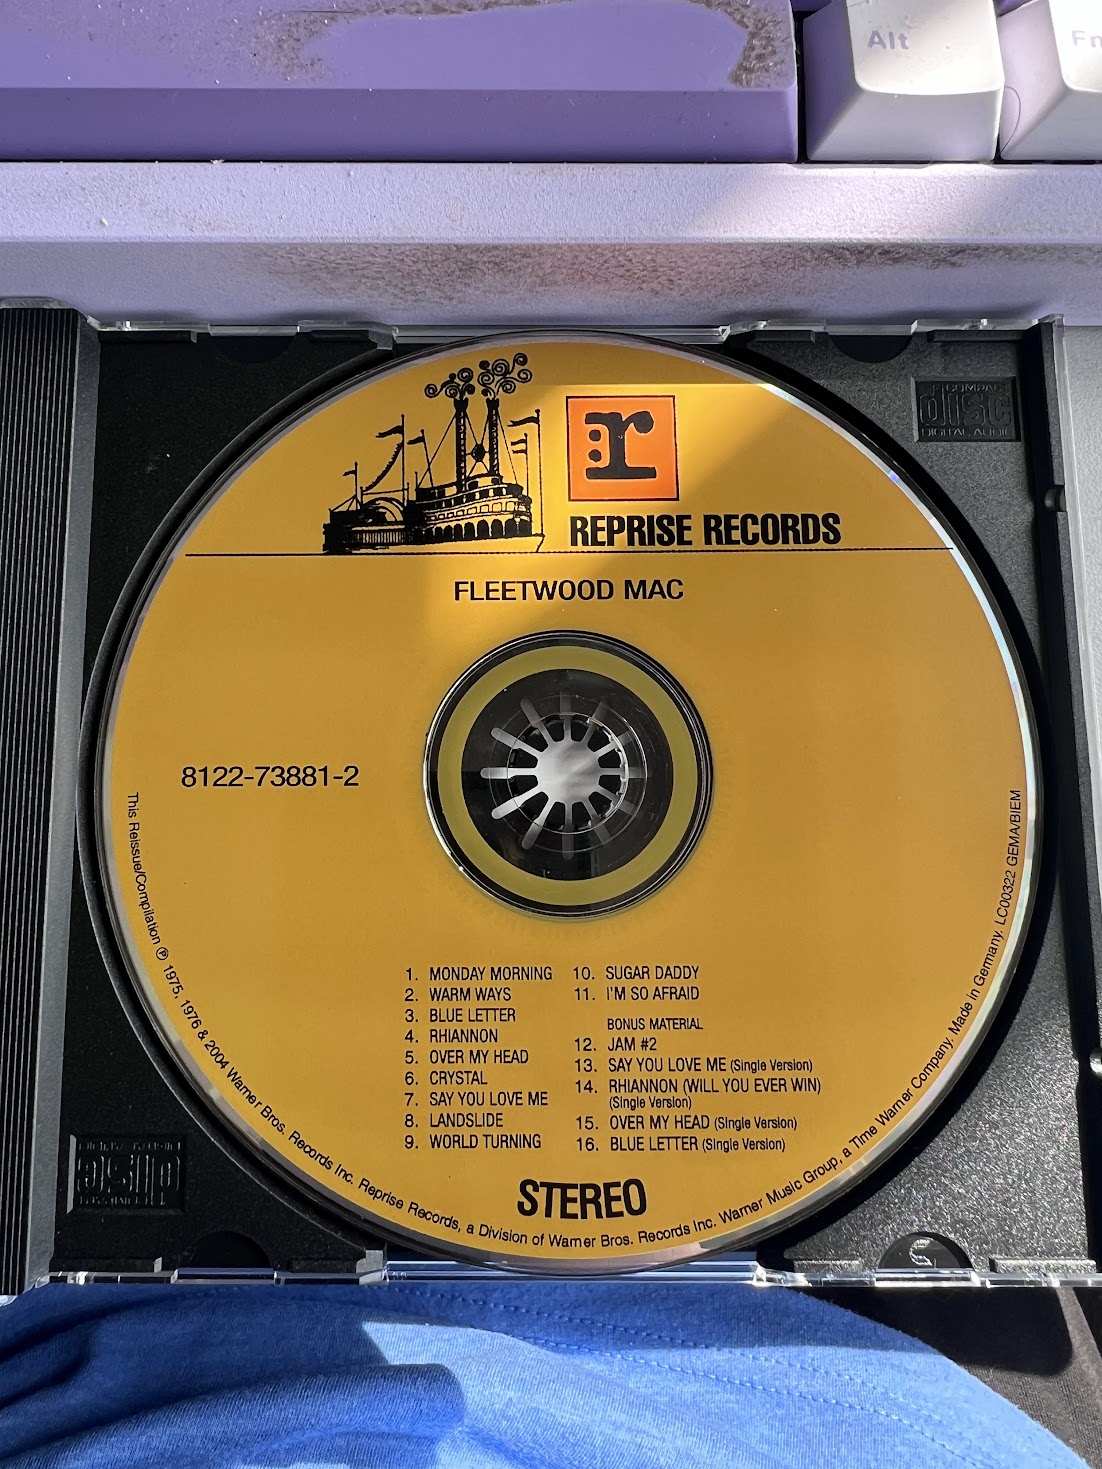
The second disc is the 2004 remastered and expanded edition.
And immediately there is another obvious physical difference.
The spine is clear rather than black.
But the differences go much further than that.
The 2004 edition contains 16 tracks, rather than the original 11.
The five additional recordings are:
So before we even listen to the two CDs, we already know that the 2004 edition is more than a simple reissue.
It is an expanded and remastered edition.
But what happened to the original 11 tracks?
Rather than relying on my ears alone, I wanted to make this as objective as possible.
Both CDs were ripped using Exact Audio Copy (EAC), using secure extraction, and saved as lossless FLAC files.
The EAC results were then checked against AccurateRip and the CUETools Database.
The results were excellent.
All 11 tracks were reported as accurately ripped.
No errors occurred.
All 16 tracks were also reported as accurately ripped.
No errors occurred.
The 2004 tracks had an AccurateRip confidence of 200, providing extremely strong confirmation of the extraction.
This means we weren’t comparing two recordings made from a CD player.
We were comparing the actual digital audio data extracted from the CDs.
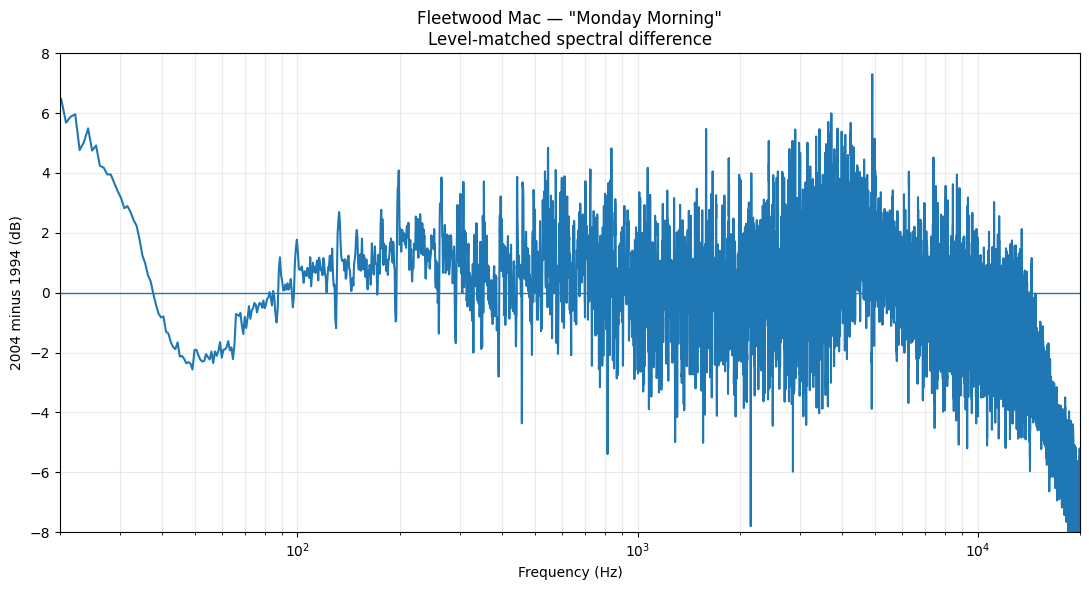
I started with the opening track, Monday Morning.
And this is where things immediately became interesting.
The 1994 CD has a peak level of approximately:
-2.47 dBFS
The 2004 version reaches:
-0.10 dBFS
So the 2004 version is getting extremely close to digital full scale.
But peak level alone doesn’t tell the whole story.
The average level is even more revealing.
The 1994 version measures approximately –20.6 dBFS RMS.
The 2004 version measures approximately –13.2 dBFS RMS.
That’s roughly a 7.3 dB increase in average level.
In simple terms, the 2004 version is substantially louder.
But I wanted to know whether that was the whole story.
This was the obvious question.
If the 2004 CD was simply the 1994 mastering with the volume turned up, reducing the 2004 version by the appropriate amount should make the two recordings essentially identical.
It doesn’t.
I level-matched the two versions, removing the large difference in overall volume, and then compared them again.
There were still measurable differences.
That means the 2004 version isn’t simply the 1994 master with the volume increased.
The mastering has changed.
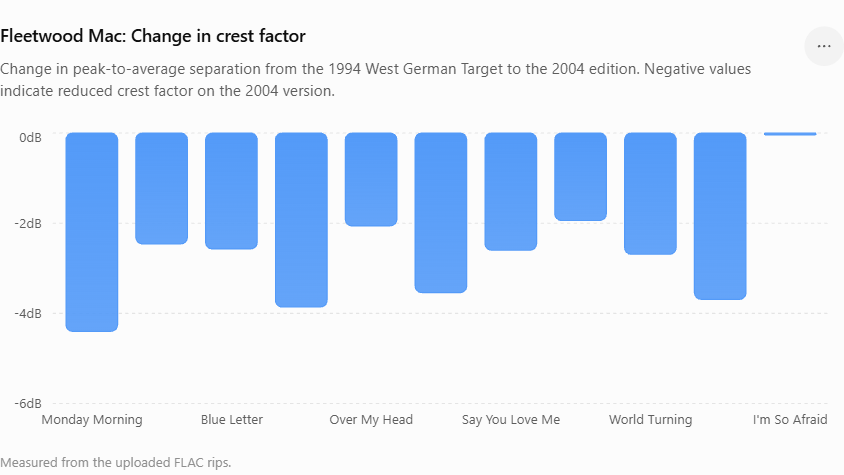
One of the measurements we can use to examine this is crest factor — the difference between the average level of a recording and its peaks.
A higher crest factor generally means greater separation between the average level and the peaks.
For Monday Morning:
1994: approximately 17.6 dB
2004: approximately 13.1 dB
That’s a difference of approximately 4.5 dB.
And this wasn’t unique to Monday Morning.
When all 11 tracks appearing on both CDs were analysed, 10 of the 11 tracks showed a reduction in crest factor on the 2004 version.
That is a significant pattern.
It tells us that the 2004 mastering has generally been made louder and denser.
It does not, by itself, mean that the CD is clipped. High peak levels and clipping are two different things.
This is where the comparison becomes much more convincing.
Rather than looking at one song, I analysed all 11 tracks that appear on both CDs.
The average RMS difference across the album is approximately:
Every single one of the 11 common tracks is louder on the 2004 CD.
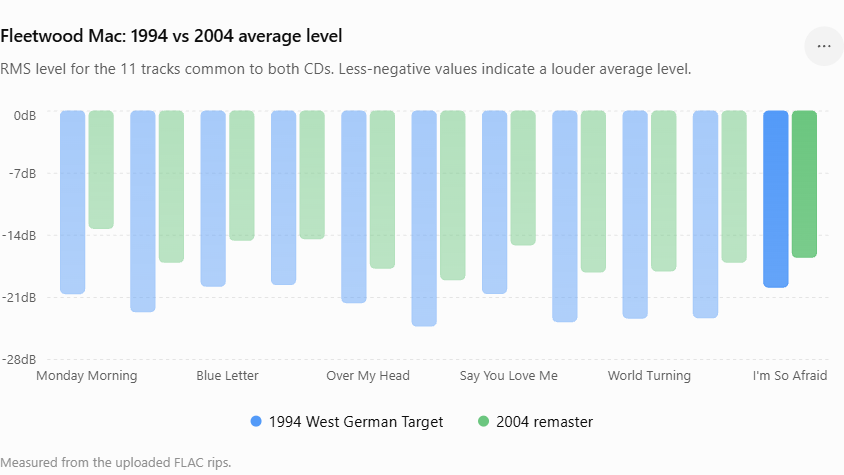 The graph makes the pattern very easy to see.
The 2004 version is consistently louder across the original album.
This was the next question.
Perhaps the 2004 mastering was simply compressed and made louder.
To test that, I removed the volume difference by level-matching the two versions.
Then I compared their frequency spectra.
And again, the results showed that the two CDs aren’t identical.
The broad album-wide differences were approximately:
| Frequency range | 2004 compared with 1994 |
|---|---|
| 20–60 Hz | -1.6 dB |
| 60–120 Hz | -0.8 dB |
| 120–250 Hz | +0.7 dB |
| 250–500 Hz | +0.7 dB |
| 500 Hz–1 kHz | +1.2 dB |
| 1–2 kHz | +0.7 dB |
| 2–4 kHz | +1.2 dB |
| 4–8 kHz | +1.7 dB |
| 8–16 kHz | +1.6 dB |
| 16–20 kHz | +0.9 dB |
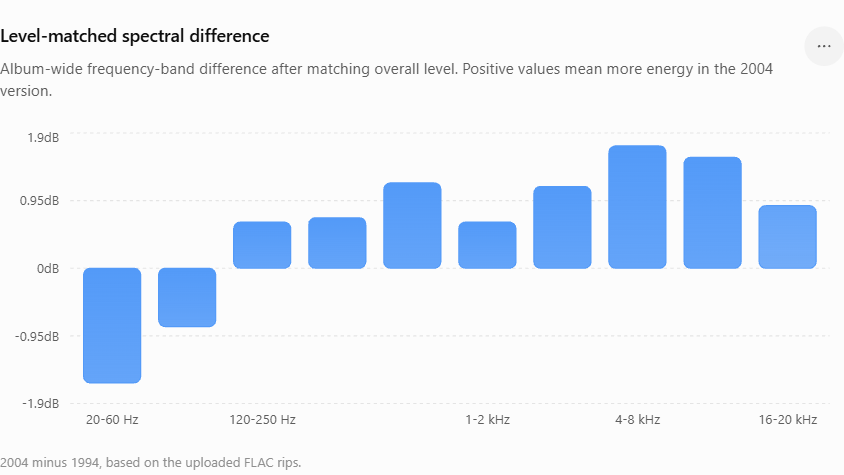
The important point isn’t each individual number.
It’s the overall shape.
After the overall volume difference was removed, the 2004 mastering still showed less energy in the very lowest frequencies and more energy through much of the midrange and upper frequencies.
So the tonal balance has changed too.
Put the two discs next to each other and the physical differences are immediately obvious.
The black spine and clear spine are only the beginning.
The artwork, disc design, catalogue information, packaging and track content all provide clues that these aren’t simply two identical CDs from different production runs.
But the really interesting difference is something you can’t see by looking at the discs.
It’s in the audio data.
The strongest evidence comes from looking at all 11 tracks common to both editions.
Every track is louder on the 2004 CD.
Ten out of eleven have a lower crest factor.
The frequency analysis also shows a different tonal balance after level matching.
This means we can confidently say that the 2004 edition is not simply the 1994 mastering with the volume turned up.
There has been a change in the mastering.
The 2004 edition adds five additional recordings.
These aren’t relevant when comparing the mastering of the original 11 tracks, because there is no corresponding recording on the 1994 disc.
But they are still an important part of the comparison.
The 2004 CD therefore offers something the 1994 Target doesn’t:
additional material.
Now we get to the difficult question.
Which CD sounds better?
The measurements can tell us what changed.
They can’t tell us what you will personally prefer.
If you prefer a mastering with greater dynamic headroom and less aggressive level management, the 1994 Target is likely to be the more interesting choice.
If you prefer a louder, more forward presentation and want the bonus material, the 2004 edition has obvious advantages.
So, what’s the difference between these two compact discs?
Quite a lot.
It started with something as simple as noticing that one had a black spine and the other had a clear spine.
But once the discs were ripped and analysed, the differences became much more substantial.
The 2004 edition isn’t simply the 1994 CD with the volume turned up.
Across all 11 tracks common to both editions, the 2004 version is approximately 5.3 dB louder on average.
Ten of the 11 tracks show reduced crest factor.
And after level-matching the recordings, there are still measurable differences in frequency balance.
In other words, these are different masterings.
The 1994 West German Target represents a much more conservatively mastered presentation, with greater peak-to-average separation.
The 2004 edition offers a louder, more forward mastering, a different tonal balance and five additional recordings.
So the answer to the question I started with is:
The two CDs may contain the same Fleetwood Mac album, but they don’t contain exactly the same sound.
And now that we’ve got the measurements, the question becomes a much more interesting one:
It has only taken us 18 months…
Yes, you read that correctly.
We travelled to Sri Lanka in January and February 2025, and I can finally say:
The photographs are done!
Don’t want to read all the technical waffle? No problem. You can jump straight to the Andysworld! Holiday Photograph Album and select Qatar & Sri Lanka, and/or visit YouTube to watch lots of clips, I rendered into a 32 minute video, just in case your tempted to visit Sri Lanka!
Youtube video is here –
After more than a year of sitting on the original collection, sorting through photographs, removing the rubbish, organising everything, converting file formats, writing scripts and re-coding the website album, the Sri Lanka 2025 photographs are finally ready and published on Andysworld!
And it turns out that getting a holiday photo album published is considerably more complicated than simply clicking the “Upload” button.
When we came home from Sri Lanka, we had managed to accumulate more than 1,500 photographs and videos.
And all of them were taken using just two phones:
No SLR.
No DSLR.
No expensive lenses.
No professional photography equipment.
Just two iPhones.
And between them, they managed to capture more than 1,500 photographs and videos during our Sri Lankan adventure.
Looking back through them, I’m genuinely impressed by just how good some of the photographs are.
Of course, not all of them made the final cut.
In fact, the original collection of more than 1,500 eventually became a much more manageable collection of around 1,000 photographs to work through.
The first challenge was simply getting everything together.
The photographs had been taken on two different iPhones and stored in iCloud, so the first job was to download the complete collection.
From there, everything was moved onto our Synology NAS, giving us a proper local copy of the photographs and videos.
That gave us somewhere sensible to work from and, importantly, somewhere to keep the original collection safely stored.
Once everything was on the NAS, the photographs were loaded into Synology Photos.
This is where the serious sorting began.
Lindsey worked through the collection and organised the photographs by location, while at the same time identifying the photographs that simply weren’t worth keeping.
And there were plenty of those.
And then there was the wildlife.
If an elephant moves its trunk slightly, that’s obviously a completely different photograph.
Apparently.
At one point we had an impressive collection of photographs of essentially the same elephant.
Eventually, the great Sri Lankan photograph cull was complete.
What remained was our definitive collection.
With the final collection selected, the photographs were downloaded from the Synology onto a PC for the final preparation.
And this is where things got a little more technical.
The iPhones had produced photographs in HEIC format.
For Andysworld, I wanted standard JPG files.
So the next step was:
HEIC -> JPG
But that wasn’t enough.
I also wanted a consistent file naming convention.
That meant dealing with the various possible file extensions:
.HEIC
.JPEG
.jpeg
.JPG
.jpg
Everything needed to end up as:
.jpg
And the filenames themselves needed to be lowercase.
So something like:
SriLanka-IMG_1234.JPEGbecame:
srilanka-img_1234.jpgThere was absolutely no way I was going to manually rename hundreds of photographs.
That’s what scripting is for.
I used a combination of PowerShell and Python to automate the repetitive parts of the process.
The scripts handled the file preparation, including:
It’s a simple rule:
If you have to do something hundreds of times, write a script.
With the photographs finally sorted, culled, converted and renamed, there was one final job.
Build the album.
These photographs aren’t simply being dumped into a generic photo-sharing service.
They’re being added to the custom album system on Andysworld.
That meant going back into the code and creating the Sri Lanka 2025 album.
The photographs had to be incorporated into the various locations, the album structure had to be created, and the website code had to be updated.
Then came the testing.
And finally…
Upload everything to Andysworld.
Why not just upload the photographs to Facebook, Google Photos or one of the many other photo-sharing services?
Because that’s not really what I wanted.
These are our memories of a fantastic trip, and I wanted to create a proper photographic record that we could come back to in the future.
The Synology gives us the local archive.
Synology Photos gives us the organisation and sorting.
Lindsey helped turn more than 1,500 photographs into a definitive collection.
PowerShell and Python dealt with the repetitive technical work.
And Andysworld gives me complete control over the final album.
It was considerably more work than simply uploading a few photographs.
But it’s also considerably more satisfying.
The trip itself lasted a few weeks.
The photographs took seconds to capture.
Getting them ready for publication took considerably longer.
But finally, 18 months later, the job is done.
More than 1,500 photographs and videos have been downloaded, sorted, culled, organised, converted and processed.
The rubbish has gone.
The good photographs have survived.
The filenames are lowercase.
The HEIC files have become JPGs.
The custom album has been coded.
And the finished collection is now sitting on Andysworld.
So, after all this time…
The Sri Lanka 2025 photographs are finally ready.
And yes, somewhere in that collection there are still probably more photographs of elephants than anyone really needs.
But that’s what holidays are all about.
Memories, photographs, stories…
…and occasionally taking the same photograph twenty times because the elephant moved its trunk.
Sri Lanka 2025 – finally finished, finally published, and finally ready to enjoy.
Welcome to our Sri Lanka 2025 photo album on Andysworld!

 Wow… five months since my last blog post! ?!
I know, I know. Five months is a long time between posts, but I’ve been keeping myself rather busy behind the scenes. So, when I finally sat down to write something, I thought I’d pick a topic that’s a little more… topical.
And what could possibly be more topical than Fortnite Sprites?
Yep — those little things.
If you’ve played Fortnite recently, you’ll know that Sprites have become another little part of the Fortnite experience. They’re small, they’re cute, they’re useful… and, inevitably, you start wanting to catch them all.
It reminds me of Pokémon.
You’ve got to catch them all!
Only this time, rather than wandering around the Pokémon world throwing Poké Balls at everything that moves, you’re running around Fortnite looking for Sprites.
And, of course, once you find one, you can’t just leave it there.
You have to catch it.
Well, partly because it’s something completely different from my usual posts.
Those who know me will know that most of my blog posts tend to involve VMware, Proxmox, OpenNebula, Linux, networking, storage, scripting or some other form of infrastructure that inevitably involves staring at a terminal window.
Sometimes it’s nice to write about something that doesn’t involve a command prompt.
And let’s be honest — Fortnite is fun.
There’s something strangely satisfying about exploring the map, finding things you weren’t necessarily looking for and discovering another Sprite along the way.
It’s actually made me realise just how quickly time disappears.
Five months ago I was writing my previous blog post, and since then there’s been a whole load of projects, changes, experiments and general IT madness going on.
I’ve still got plenty of technical subjects I’d like to write about, particularly some of the work I’ve been doing around infrastructure automation and self-service.
But for now…
I’m going hunting.
Sprites, here I come.
? Got to catch them all!
And perhaps, after another five-month gap, I’ll even write another blog post before Christmas. ?
#Fortnite #Sprites #Gaming #GotToCatchThemAll


This should be called OOONO I purchased it !!!!
So lets just start by stating Amazon UK
WOULD NOT PUBLISH MY REVIEW OF THIS PRODUCT which I returned for a REFUND! – but I can review it here!
Because it’s crap and a “scam” in my opinion! They state
“We could not post your review because it does not meet our community guidelines” – odd when so many other fake reviews, telling you how good it is!
it’s called the
OOONO Co-Driver NO2 (2024 model)
So here’s the thing…
Amazon UK refused to publish this review — the exact one below — after I returned the product for a refund.
Apparently it “does not meet community guidelines.”
You can make your own mind up…
So I was intrigued — so many TikTok, Instagram, Facebook, and YouTube reviews — which I assume are clickbait and monetised.
It’s called Ooo No — because that’s what you say when you’ve wasted your money.
All these reviews on Amazon must be bots — because I genuinely don’t understand how this gets rated so highly.
Value for money? Waste of money.
Why is this even needed? You still have to pair it with your phone via Bluetooth and run the app! So why not just use Waze, Google Maps, Apple Maps, or even an old-school TomTom with the PocketGPS database — far cheaper and far more accurate.
In use, it warns far too early about cameras, isn’t accurate, and even warns about cameras on the wrong side of the road.
Yes, it’s community-driven — but there’s clearly very little verification of camera positions.
I’ve used it over ~700 miles across villages, towns and cities:
I would give this zero stars if I could.
Final comment: £50 paid — complete waste of money.
Just use your phone. If it’s in a hands-free dock, run Waze — don’t waste your cash.
I’m returning this for a refund.
It’s a social media–driven scam in my opinion.
Product: OOONO Co-Driver NO2 (2024 model)
So there you go — that’s the review Amazon didn’t want you to read.
Take those 5? reviews with a pinch of salt…
Minisforum MS-A2 HOW TO: Fix the Failed to Update CPU#0 Microcode PSOD with ESXi 8.0.3i ESXi 8.0u3i

In this guide from Hancock’s VMware Half Hour, I demonstrate how to fix the
Purple Screen of Death (PSOD) error:
“Failed to update CPU#0 microcode”
This issue occurs when installing or booting VMware ESXi 8.0 Update 3i (ESXi 8.0.3i)
on the Minisforum MS-A2 mini workstation.
ESXi 8.0.3i, released on 2 March 2026, includes security fixes for
CVE-2025-15467, an OpenSSL vulnerability. If you are running ESXi and have not
patched yet, you should update as soon as possible.
However, this update also includes new AMD CPU microcode updates, which currently
appear to trigger a PSOD during boot on the Minisforum MS-A2 platform.
When booting the ESXi 8.0.3i installer (for example from Ventoy) on the
Minisforum MS-A2, the system may fail during boot with the following PSOD message:
The system has found a problem on your machine and cannot continue.

Failed to update CPU#0 microcode
This prevents ESXi from completing the boot process or installer launch.
The ESXi 8.0.3i update includes newer AMD microcode updates intended to improve
security and stability. Unfortunately, these updates currently appear to be
incompatible with the MS-A2 platform, which results in the microcode update failing
during boot.
When the microcode update fails, ESXi halts the boot process and displays the PSOD.
Until VMware releases a permanent fix, the issue can be worked around by using a
kernel boot option during ESXi startup.
With the boot option applied, ESXi should boot successfully on the Minisforum MS-A2.
Watch the full walkthrough below where I demonstrate the issue and apply the workaround.
Huge thanks to members of the VMware community who investigated and documented this issue:
Their research and testing helped identify the workaround shown in this video.
Resources:
? Enjoying the content? Support the channel with an espresso!
If you’d like to support British beekeeping, you can purchase
raw pure honey from my apiaries.
Meltonby Honey – Raw Pure Honey
UK shipping currently only.
Author: Andy – Andysworld.org.uk
Good news for homelab enthusiasts! We finally have a working Realtek network driver for ESXi 9.0. In this guide, I’ll show you step-by-step how to create a customised VMware ESXi 9.0 ISO for VCF 9.0 with the Realtek driver injected (slipstreamed) using PowerShell 7 and VMware PowerCLI.
If you’re running ESXi in a homelab environment using consumer hardware, Mini PCs, or whitebox builds, Realtek NIC support has historically been a challenge. With the latest Realtek driver available, we can now build a custom ESXi 9.0 ISO that works perfectly in lab environments.
This process allows you to:
ESXi 9.0 depot files require a valid Broadcom contract. I do not distribute depot files, customised ISOs, or any Broadcom software. Please obtain required files through official channels.
Add-EsxSoftwareDepot .\VMware-ESXi-9.0.0.0.24755229-depot.zipAdd-EsxSoftwareDepot .\VMware-Re-Driver_1.101.01-5vmw.800.1.0.20613240.zipGet-EsxImageProfile | Select Name
$newProfile = New-EsxImageProfile `
-CloneProfile 'ESXi-9.0.0-14755229-standard' `
-Name 'ESXi-9.0.0-14755229-standard-Realtek-nic' `
-Vendor "Andysworld.org.uk"
Add-EsxSoftwarePackage -ImageProfile $newProfile -SoftwarePackage "if-re"Export-ESXImageProfile -ImageProfile $newProfile -ExportToIso -FilePath "$($newProfile.Name).iso"Export-ESXImageProfile -ImageProfile $newProfile -ExportToBundle -FilePath "$($newProfile.Name).zip"dirYou should now have both a customised ISO and ZIP bundle ready for deployment in your homelab.
If you prefer automation, you can use a PowerShell script to perform the entire process in one go. The script automates:
This method is ideal for repeat builds or lab rebuilds.
This guide is intended for lab and educational use only, not production environments.
Creating a custom ESXi image is a valuable skill for anyone running a VMware homelab. With the Realtek driver now available for ESXi 9.0, lab builders can continue using affordable hardware while staying current with VMware releases.
If you found this guide helpful, check out more VMware content here at Andysworld.org.uk.




![[Valid RSS]](http://andysworld.org.uk/images/valid-rss.png "Validate my RSS feed")