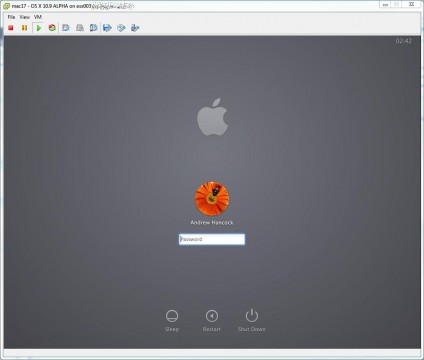
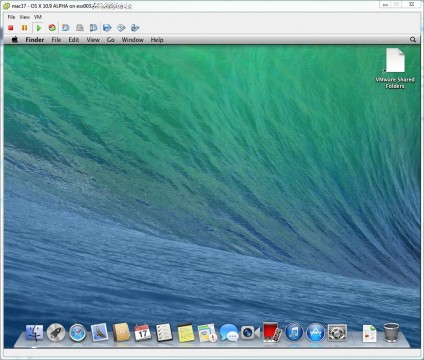
Yesterday, I managed to get Apple OS X Mavericks (OSX 10.9) Developer Preview 3 installed and working on VMware vSphere 5.1 (ESXi 5.1).
Posts Tagged ‘VMware vSphere 5.1’
Apple OS X Mavericks (OSX 10.9) Developer Preview 3 on VMware vSphere 5.1 (ESXi 5.1)
Tuesday, July 9th, 2013HOW TO: Enable SSH Remote Access on a VMware vSphere Hypervisor 5.1 (ESXi 5.1)
Tuesday, May 28th, 2013If you would like to read the other articles in this series, they are listed here for your convenience.
HOW TO: Install and Configure VMware vSphere Hypervisor 5.1 (ESXi 5.1)
HOW TO: Connect to the VMware vSphere Hypervisor 5.1 (ESXi 5.1) using the vSphere Client
In this series of basic VMware articles for the Novice, I’ll be showing you the basic VMware skills required to install, configure and deploy virtual machines using VMware’s FREE VMware vSphere Hypervisor (ESXi).
In this article we will show you HOW TO: Enable SSH Remote Access on a VMware vSphere Hypervisor 5.1 (ESXi 5.1) so you can remotely connect to the VMware vSphere Hypervisor 5.1 (ESXi 5.1) server remotely via SSH (PuTTY).
- 1
-
Connect to the VMware vSphere Hypervisor 5.1 (ESXi 5.1) or vSphere vCenter Server using the vSphere Client
Please refer to my Andysworld! article on HOW TO: Connect to the VMware vSphere Hypervisor 5.1 (ESXi 5.1) using the vSphere Client
. Click OK to continue, and Click OK to return to Inventory.
Confirm using PuTTY, you can connect to the server successfully.
In vSphere 4 1, 5.0 and 5.1, when you have enabled Remote SSH management of hosts from the vSphere Client, you may notice that that a Configuration Issues warning yellow box appears on the Summary page of the host ESXi server.
This Configuration Issues warning yellow box only appears when Remote SSH and/or ESXi shell has been enabled.
Please refer to my Andysworld! Article on HOW TO: Suppress Configuration Issues and Warnings Alert displayed in Summary status for ESXi 4.1 U2 or ESXi 5.0 after enabling SSH or ESXi Shell
Congratulations, you have successfully Enable SSH Remote Access on a VMware vSphere Hypervisor 5.1 (ESXi 5.1)
HOW TO: Upload an ISO CD-ROM/DVD-ROM image to a VMware datastore for use with VMware vSphere Hypervisor 5.1 (ESXi 5.1) using the vSphere Client, and checking its MD5 checksum signature is correct.
Tuesday, May 28th, 2013HOW TO: Install and Configure VMware vSphere Hypervisor 5.1 (ESXi 5.1)
HOW TO: Connect to the VMware vSphere Hypervisor 5.1 (ESXi 5.1) using the vSphere Client
In this series of basic VMware articles for the Novice, I’ll be showing you the basic VMware skills required to install, configure and deploy virtual machines using VMware’s FREE VMware vSphere Hypervisor (ESXi).
In this article we will show you HOW TO: Upload an ISO CD-ROM/DVD-ROM image to a VMware datastore for use with VMware vSphere Hypervisor 5.1 (ESXi 5.1) using the vSphere Client, and checking its MD5 checksum signature is correct. There are other third party tools, that can be used to upload ISO image files, these include:-
The above applications, require additional installation and configuration, in this article we will use the VMware vSphere Client.
- 1
-
Connect to the VMware vSphere Hypervisor 5.1 (ESXi 5.1) or vSphere vCenter Server using the vSphere Client
Please refer to my EE article on HOW TO: Connect to the VMware vSphere Hypervisor 5.1 (ESXi 5.1) using the vSphere Client
- 2
-
Uploading the ISO CD-ROM/DVD-ROM image to the datastore ‘datastore1’
Please refer to my Andysworld! Article HOW TO: Create an ISO CD-ROM/DVD-ROM image (*.iso), and MD5 checksum signature, for use with VMware vSphere Hypervisor 5.1 (ESXi 5.1)
- 3
-
Confirming the upload of the ISO image file has been transferred successfully using the MD5 checksum signature
To complete the following step SSH must be enabled and running on your VMware vSphere Hypervisor 5.1 (ESXi 5.1) host server, if SSH is not running you will receive a connection refused message.
To Enable SSH on your VMware vSphere Hypervisor 5.1 (ESXi 5.1) host server, please see my Andysworld! article HOW TO: Enable SSH Remote Access to a VMware vSphere Hypervisor 5.1 (ESXi 5.1)
Connect to the VMware Hypervisor ESXi server via SSH. Using PuTTY a free telnet and SSH client or another SSH client Login and Connect to the VMware Hypervisor ESXi server, using IP address or hostname of the VMware Hypervisor ESXi server, using root username and password credentials. This can also be performed if you have access to the console.
cd /vmfs/volume/<datastore name>/<folder name>
type cd /vmfs/volumes/datastore1/isos in the SSH session window.
md5sum <filename>
example md5sum Ubuntu 12.10 amd.iso
type md5sum Ubuntu 12.10 amd.iso in the SSH session window. After several minutes, and the time taken, depends on the size of the ISO image file, and speed of host processor and storage, a MD5 checksum signature will be displayed. The number displayed next to the filename – 7ad57cadae955bd04019389d4b
HOW TO: Create an ISO CD-ROM/DVD-ROM image (*.iso), and MD5 checksum signature, for use with VMware vSphere Hypervisor 5.1 (ESXi 5.1)
Wednesday, May 22nd, 2013If you would like to read the other articles in this series, they are listed here for your convenience.
HOW TO: Install and Configure VMware vSphere Hypervisor 5.1 (ESXi 5.1)
HOW TO: Connect to the VMware vSphere Hypervisor 5.1 (ESXi 5.1) using the vSphere Client
In this series of basic VMware articles for the Novice, I’ll be showing you the basic VMware skills required to install, configure and deploy virtual machines using VMware’s FREE VMware vSphere Hypervisor (ESXi).
This article will show you how to create an ISO CD-ROM/DVD-ROM image (*.iso), and MD5 checksum signature, for use with VMware vSphere Hypervisor 5.1 (ESXi 5.1).
What is an ISO? (Andy’s Laymen Definition)
An ISO is an image or bit copy of a CD-ROM/DVD-ROM, the ISO is a file, similar to a compressed archived file, this *.iso file contains the data from a CD-ROM/DVD-ROM. The ISO file is a virtual CD-ROM/DVD-ROM. Using an *.iso file has many advantages, some are listed below:-
- The original CDROM/DVD-ROM can be stored securely, and is no longer required, after an ISO image has been created.
- Multiple virtual machines can use the same *.iso concurrently.
- Computers without a CD-ROM/DVD-ROM reader can use the data stored on the *.iso file.
- Installing OS (operating systems) or transferring data is faster.
- 1
-
Prerequisites
- An original operating system CD-ROM/DVD-ROM
- Download ISO Recorder from http://alexfeinman.com/isorecorder.htm
- 2
-
Install ISO Recorder
Download ISO Recorder from http://alexfeinman.co/isorecorder.htm We like to use ISO Recorder, because it is a small lightweight application, which integrates into the shell of your OS (operating system). e.g. you right click the CD-ROM/DVD-ROM reader and the option is there to create an ISO.
There are several versions of ISO Recorder to download, ensure you download the correct version for your OS, and the correct version for your processor, as there are 32-bit and 64-bit versions available.
After you have downloaded the correct version, Double-Click the installer program (*.msi) you have download, we will install the Windows 7 64 bit version, which has the filename ISORecorder31x64.msi
- 3
-
Create an ISO image file
- 4
-
Creating a MD5 checksum signature of the ISO image file
We will use the MD5 & SHA-1 Checksum Utility to create a MD5 checksum signature for our freshly created ISO image file. This is important, so we can compare these signatures, once we have completed the transfer to our VMware host servers, and confirm the ISO image file has not been corrupted in transfer.
The MD5 checksum for my Ubuntu 12.10 amd.iso is:-
MD5 Checksum: 7AD57CADAE955BD04019389D4B9C1DCB
SHA-1 Checksum: 8618058554FFD11E317356EC25885BCB8C1D0B36
Generated by MD5 & SHA-1 Checksum Utility @ http://raylin.wordpress.com/downloads/md5-sha-1-checksum-utility
Please note the MD5 checksum value for use with the VMware vSphere Hypervisor 5.1 (ESXi 5.1)
Congratulations you have successfully created your first ISO (*.iso), and created a MD5 checksum signature for use with VMware vSphere Hypervisor 5.1 (ESXi 5.1).
In my next Article in this series, we will show you HOW TO: Upload and Check the MD5 signature of an ISO CD/DVD image to a VMware datastore using the vSphere Client, for use with VMware vSphere Hypervisor 5.1 (ESXi 5.1)
HOW TO: Tag and Configure a storage device as a Solid State Disk (SSD) in VMware vSphere 5.0 or 5.1 (ESXi 5.0 or ESXi 5.1)
Thursday, November 29th, 2012The same procedure can be followed to tag a SSD, correctly, if it’s not recognized by the VMware ESXi server.
With the current fall in prices for consumer SSDs, it can give a real performance boost to a VMware ESXi 5.x server which is short on memory. Consumer SSDs e.g. Kingston SSDNow V+200 Drive Model SVP200S37A/60G are generally cheaper than server memory. We recently purchased this model for £29.99 GBP.
The commands we will be using in this Tutorial, are the esxcli commands, these commands can be executed on the ESXi shell, through the vMA or PowerCLI esxcli remote version. In this tutorial I’ll be logging into the ESXi server, and executing the commands on the ESXi shell.
-
1. Connect to the VMware vSphere Hypervisor (ESXi) or VMware vSphere vCenter Server
Using the VMware vSphere Client, Login and Connect to the ESXi server, using IP address or hostname of the ESXi server, using root username and password credentials. If you have a VMware vSphere vCenter server, you could also specify IP address or hostname of the vCenter server.
-
2. Check and record the storage device name to be tagged as a SSD
Check there is a VMFS volume already formatted on the storage device, you want to present to the Host ESXi server, as a SSD and record the device name for later in Step 4.
Select Host > Configuration > Storage
In the example above, the local storage device mpx.vmhba1:C0:T0:L0 is a local disk, formatted with the datastore name datastore1 as VMFS5. Record the storage device name mpx.vmhba1:C0:T0:L0.
-
3. Logon to ESXi console (shell) via PuTTY
Using PuTTY a free telnet and SSH client or another SSH client Login and Connect to the VMware Hypervisor ESXi server, using IP address or hostname of the VMware Hypervisor ESXi server, using root username and password credentials.
-
4. Create a new SATP rule
At the console or SSH session type the following commands to create a new SATP rule.
confirming the creation of the rule.
-
5. Claim storage device
At the console or SSH session type the following commands
I have seen the following error messages when trying to claim devices, either restart the server or use the “unclaim” device command.
you can unclaim the device by specifying the device name.
-
6. Reload the claim rules
I usually reload the claim rules and run the rules using the following commands:
-
7. Confirm device is Tagged as SSD
Use the following command at the console, to check if the device has successfully been tagged as a SSD
Check the output states “Is SSD: true”
You have successfully configured and tagged a local device as a SSD. If you now repeat Step 2 above, you will see the device now states SSD.
In my next Article, I show you how to configure Host Cache Configuration.
Further reading can be found here in the VMware
vSphere 5 Documentation Center :- Tag Devices as SSD


![Validate my RSS feed [Valid RSS]](http://andysworld.org.uk/images/valid-rss.png)