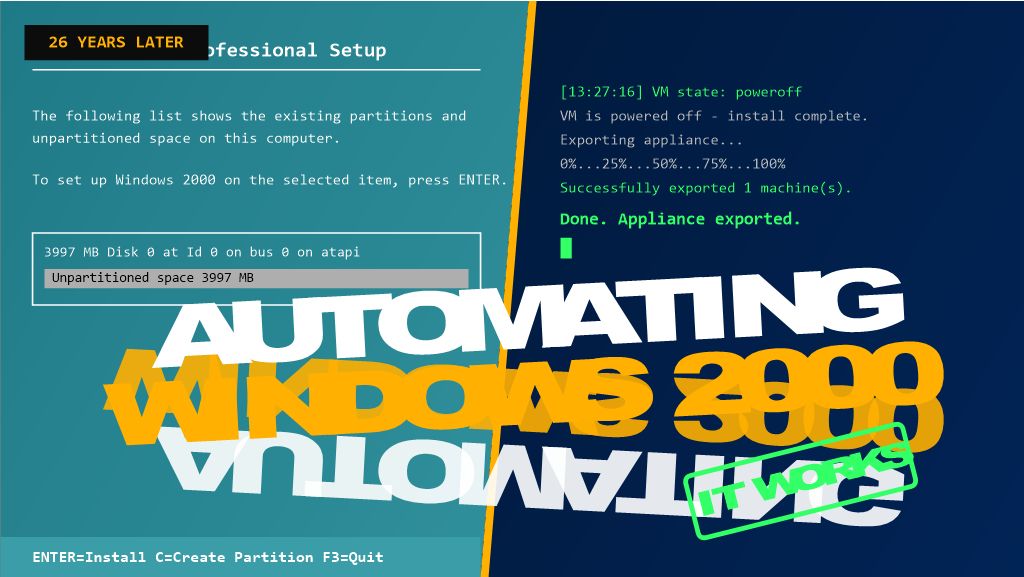
26 years after its release, Windows 2000 Professional still has a place in testing, legacy support, and retro-computing labs — but building a VM for it by hand, every single time, gets old fast. In my latest video, “HOWTO VirtualBox: How to Automate the Creation of an Appliance File,” I walk through a PowerShell script that does the whole job unattended: create the VM, install Windows 2000 Pro with zero clicking through Setup, power it off automatically, and export the finished appliance as a portable .ova file.
Here’s the write-up, including a couple of the gotchas that tripped the script up along the way.
Why Automate This?
A VirtualBox appliance file (.ova) packages a fully configured VM — OS, disk, settings, all of it — into a single portable file you can import anywhere. Building one by hand through the GUI is fine once. Needing a fresh Windows 2000 Pro VM repeatedly for a lab or test environment is a different story, and that’s where scripting the whole pipeline with VBoxManage.exe through PowerShell pays off.
The Twist With Windows 2000
Windows 2000 predates the autounattend.xml mechanism that later Windows versions use, so the assumption going in was that VBoxManage unattended install — the built-in facility that auto-generates a Windows answer file — wouldn’t support it, and that a hand-built winnt.sif + floppy would be needed instead.
Turns out that’s not the case. VBoxManage unattended install does support Windows 2000 — it builds its own answer file, auxiliary ISO, and floppy internally, no manual winnt.sif or floppy-writing tool required. That’s the route this script uses.
What the Script Does
At a high level, Deploy-Win2kProVM.ps1 handles the whole pipeline in one run:
Prompts for a VM name and cleans up any existing VM with that name.
Creates a new VirtualBox VM (Windows2000 guest type, PIIX4 IDE controller, 1 CPU — matches what this OS actually needs).
Creates and attaches a virtual hard disk.
Kicks off VBoxManage unattended install pointed at a standard Windows 2000 Pro install ISO — VBoxManage handles the answer file, auxiliary ISO, and floppy itself, and installs Guest Additions in the same pass.
Polls the VM’s state until it powers itself off.
Exports the finished VM to a .ova appliance file.
The full script is available on GitHub: [link to your GitHub repo]
Gotchas Worth Knowing About Before You Run This
A few things that came up while getting this working, in case they save you the same troubleshooting:
Flag names for unattended install are strict and easy to get wrong. It’s --key, not --product-key. It’s --user-password (or --admin-password, depending on the account type), not --password. VBoxManage errors out immediately with an “Unknown option” message if you get these wrong — worth double-checking against VBoxManage unattended install --help for your installed version.
Windows 2000 needs 1 CPU and --ioapic off. This matches a manually-built VM confirmed to install and boot reliably — modern virtual chipset defaults can trip up an OS this old.
Setup won’t shut down on its own. Without a shutdown command, the VM finishes install and just sits at the desktop, so the polling loop in the script would wait forever. The fix is VBoxManage’s own --post-install-command="shutdown -s -t 0" flag, which runs inside the guest automatically once Setup completes (via the Guest Additions execution channel — hence --install-additions needs to run first).
Downloaded scripts get blocked by Windows. If you see “not digitally signed” when running the .ps1 file, it’s the Mark of the Web from a browser download. Fix it with:
powershell
Unblock-File -Path '.\Deploy-Win2kProVM.ps1'
A genuine product key is required. There’s no way around supplying a real one in the unattended install parameters.
What You End Up With
Run the script, type a VM name, and walk away — no manual clicking through Setup, no hand-built floppy images. A few minutes later, you’ve got a fully installed, Guest-Additions-equipped Windows 2000 Professional VM exported as a ready-to-share .ova.
That exported file also becomes a reusable template — importing it for a fresh copy is far faster than rerunning the whole install.
Watch the Full Video
This post covers the highlights, but the video walks through the whole process live — including the actual errors we hit and fixed along the way. Check it out here: https://youtu.be/Nz2vhgU01qM
If you’ve automated your own VirtualBox workflows, I’d love to hear how — drop a comment on the video or below!
Lets start this by saying….As a “HiFi snob”! With lots of audio equipment!Apart from the obvious difference — one has a black spine and the other has a clear spine — what’s the difference between these two compact discs?That was the question that started this little investigation.At first glance, both CDs contain the same Fleetwood Mac album. One is an early West German Target CD and the other is the 2004 remastered and expanded edition.But are the original album tracks actually the same?Does the 2004 version simply contain the same digital master at a higher volume?Or did the mastering change?I decided to find out.
The Two CDs
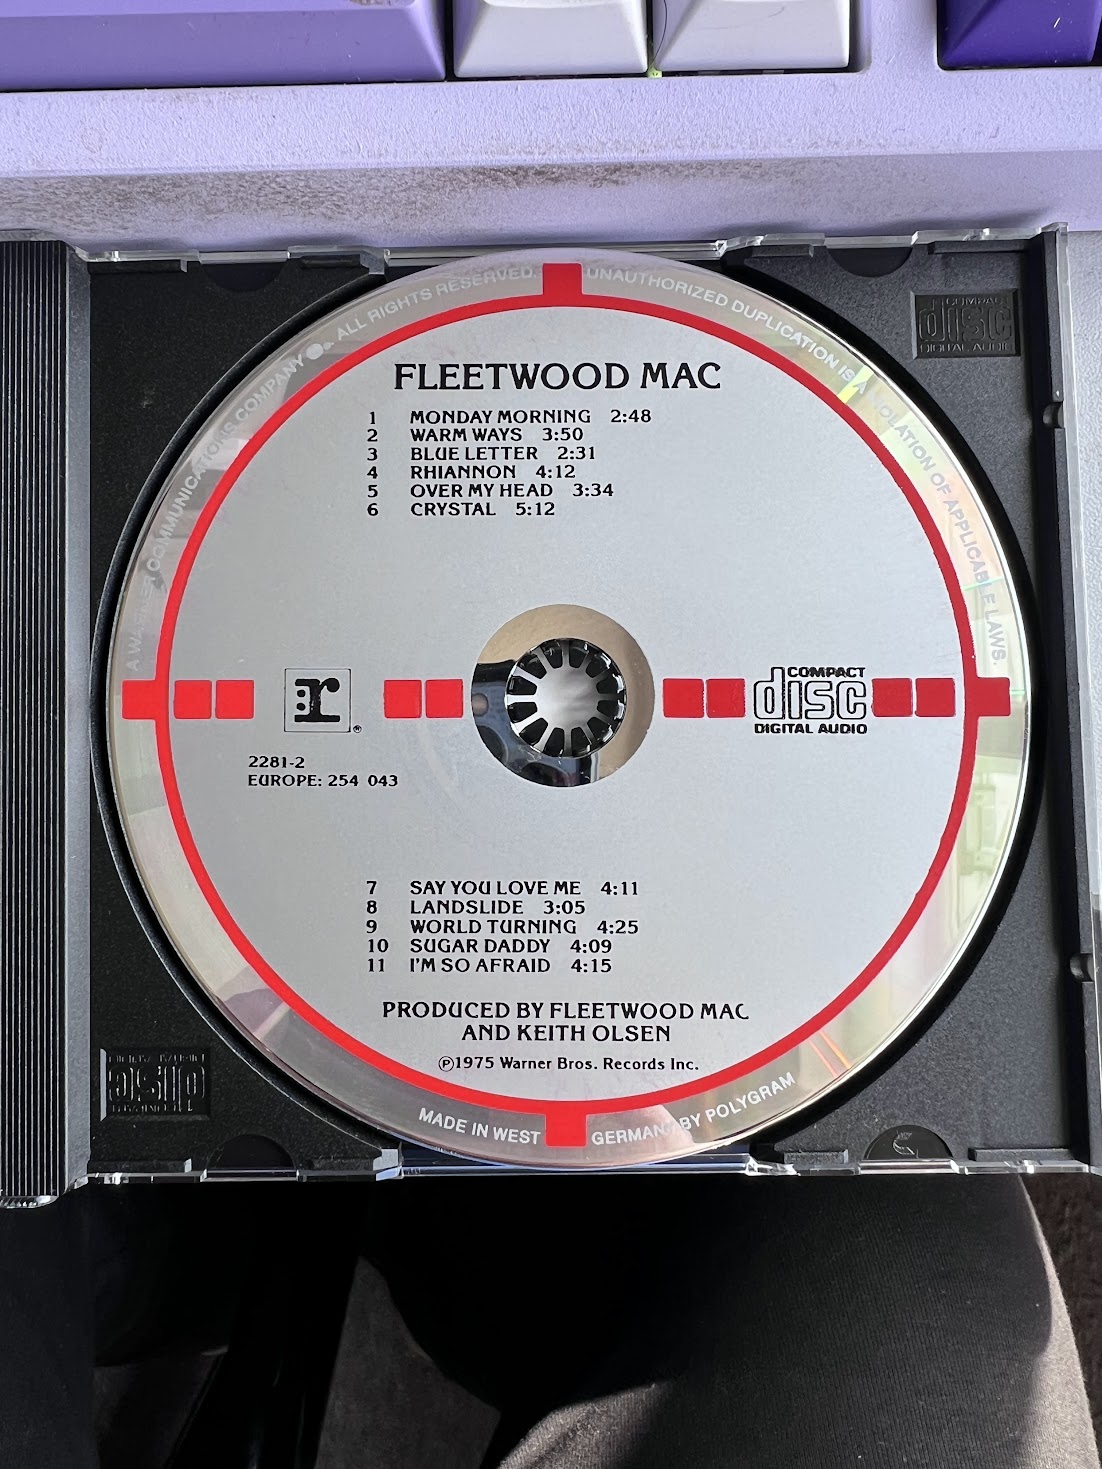
The 1994 West German Target CD
The first CD is the West German Target pressing.
The most immediately noticeable feature is the black spine, along with the distinctive Target-style disc design associated with these early CD releases.
The disc contains the original 11-track album:
Monday Morning
Warm Ways
Blue Letter
Rhiannon
Over My Head
Crystal
Say You Love Me
Landslide
World Turning
Sugar Daddy
I’m So Afraid
The disc was manufactured in West Germany and is one of the early Target-style compact discs associated with the original CD era.
There is something rather special about these early Target CDs. They belong to the first generation of commercially produced CDs and have become collectible in their own right.
But I wasn’t interested in the Target CD simply because it looks good.
I wanted to know how it sounds.
The 2004 Edition
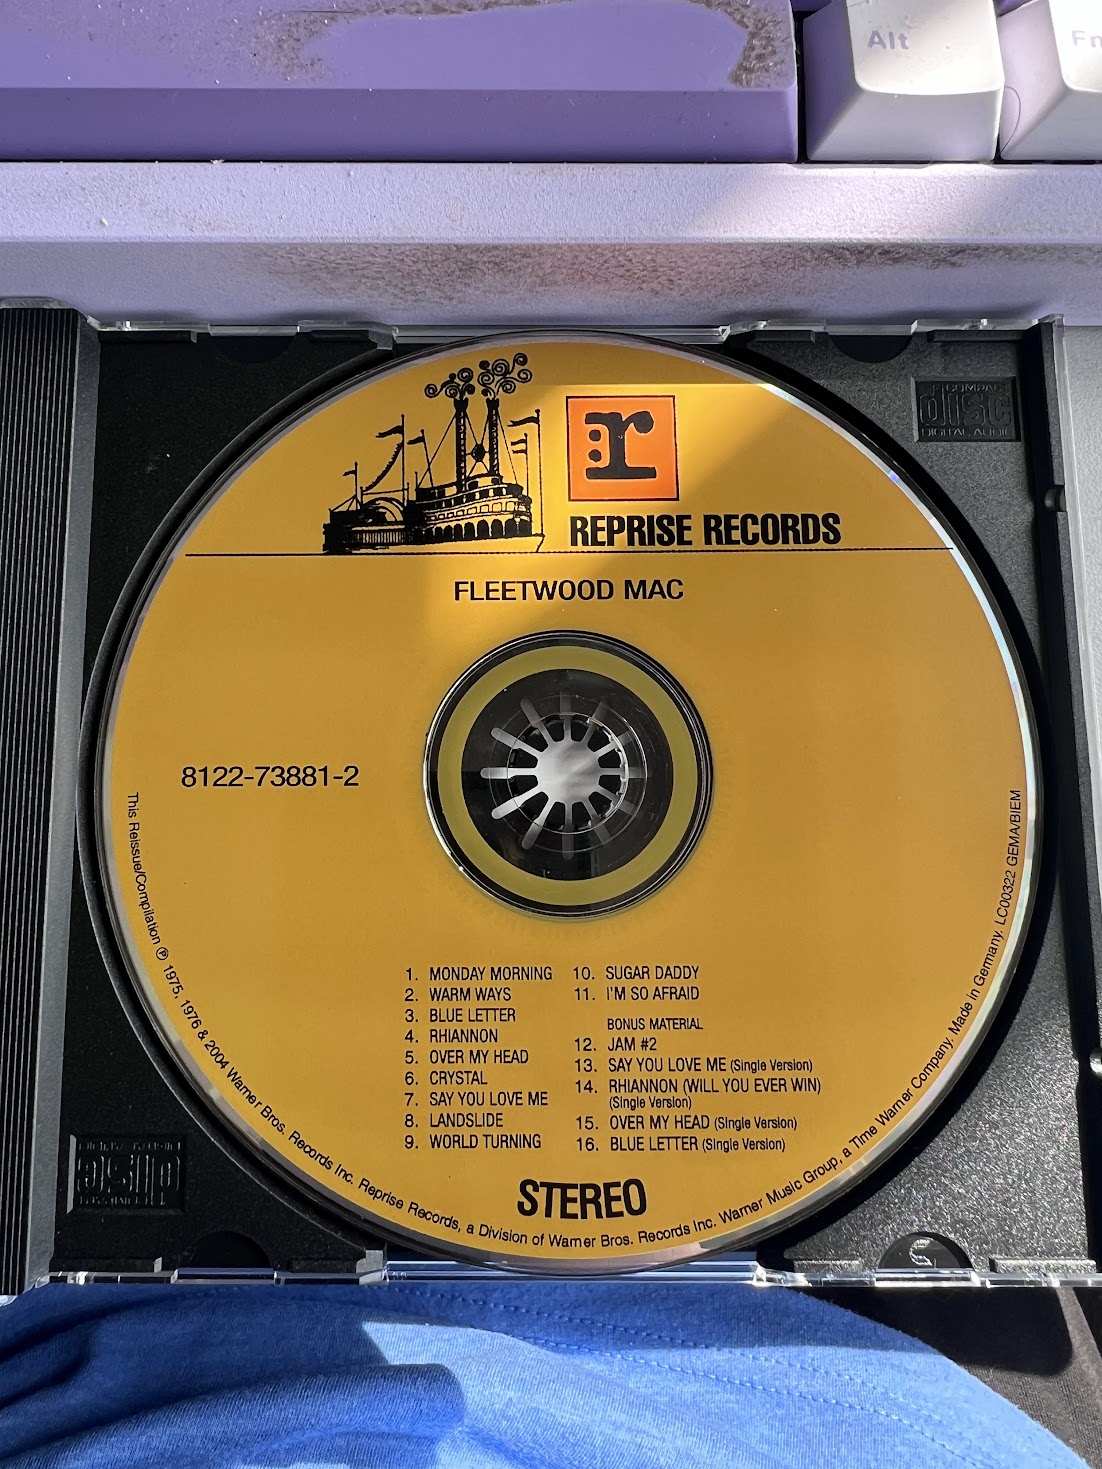
The second disc is the 2004 remastered and expanded edition.
And immediately there is another obvious physical difference.
The spine is clear rather than black.
But the differences go much further than that.
The 2004 edition contains 16 tracks, rather than the original 11.
The five additional recordings are:
Jam, No. 2
Say You Love Me
Rhiannon (Will You Ever Win)
Over My Head
Blue Letter
So before we even listen to the two CDs, we already know that the 2004 edition is more than a simple reissue.
It is an expanded and remastered edition.
But what happened to the original 11 tracks?
Let’s Rip the CDs
Rather than relying on my ears alone, I wanted to make this as objective as possible.
Both CDs were ripped using Exact Audio Copy (EAC), using secure extraction, and saved as lossless FLAC files.
The EAC results were then checked against AccurateRip and the CUETools Database.
The results were excellent.
1994 West German Target
All 11 tracks were reported as accurately ripped.
No errors occurred.
2004 Edition
All 16 tracks were also reported as accurately ripped.
No errors occurred.
The 2004 tracks had an AccurateRip confidence of 200, providing extremely strong confirmation of the extraction.
This means we weren’t comparing two recordings made from a CD player.
We were comparing the actual digital audio data extracted from the CDs.
The First Track: Monday Morning
I started with the opening track, Monday Morning.
And this is where things immediately became interesting.
The 1994 CD has a peak level of approximately:
-2.47 dBFS
The 2004 version reaches:
-0.10 dBFS
So the 2004 version is getting extremely close to digital full scale.
But peak level alone doesn’t tell the whole story.
The average level is even more revealing.
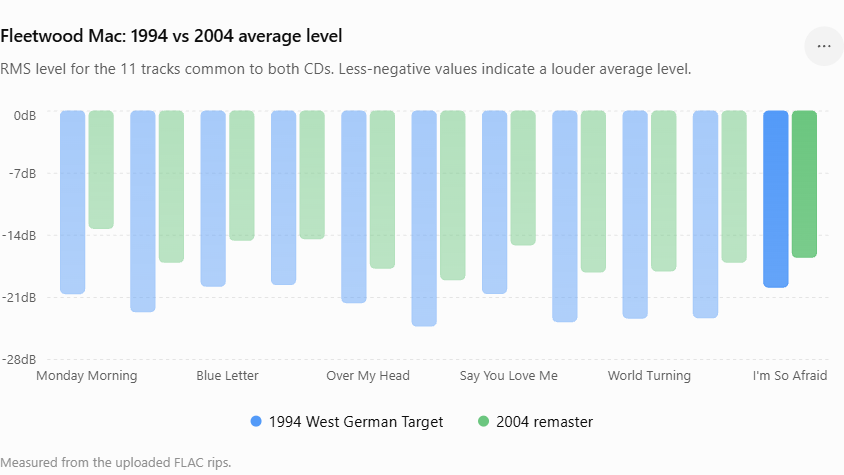
The 1994 version measures approximately –20.6 dBFS RMS.
The 2004 version measures approximately –13.2 dBFS RMS.
That’s roughly a 7.3 dB increase in average level.
In simple terms, the 2004 version is substantially louder.
But I wanted to know whether that was the whole story.
Is the 2004 Version Simply Louder?
This was the obvious question.
If the 2004 CD was simply the 1994 mastering with the volume turned up, reducing the 2004 version by the appropriate amount should make the two recordings essentially identical.
It doesn’t.
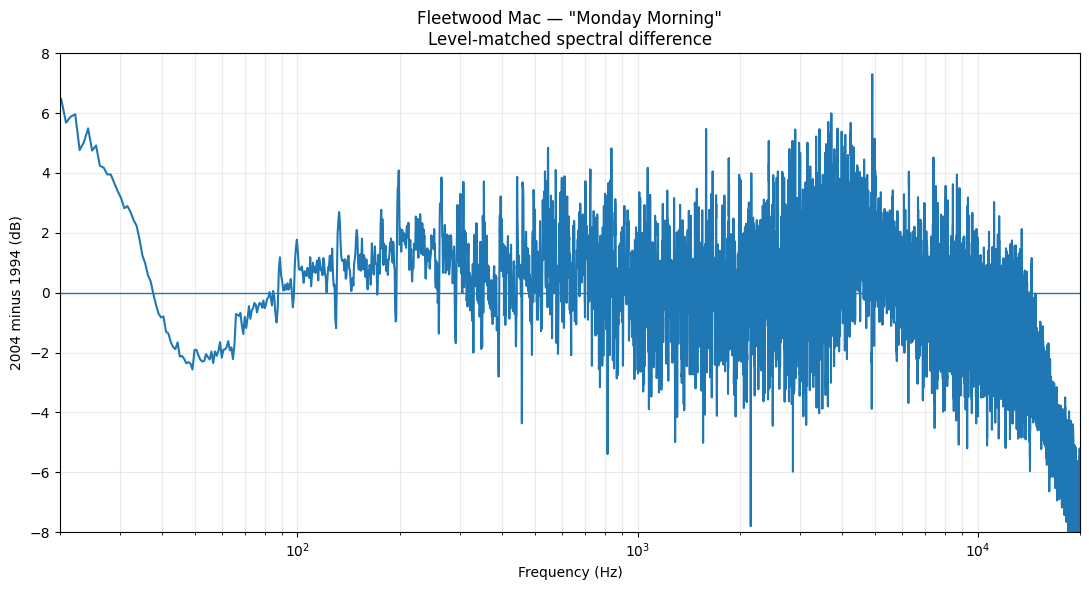
I level-matched the two versions, removing the large difference in overall volume, and then compared them again.
There were still measurable differences.
That means the 2004 version isn’t simply the 1994 master with the volume increased.
The mastering has changed.
The Dynamic Range Difference
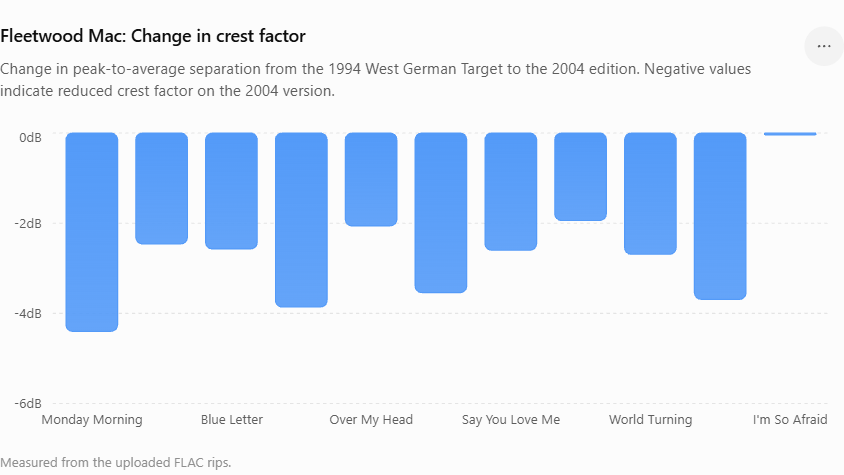
One of the measurements we can use to examine this is crest factor — the difference between the average level of a recording and its peaks.
A higher crest factor generally means greater separation between the average level and the peaks.
For Monday Morning:
1994: approximately 17.6 dB
2004: approximately 13.1 dB
That’s a difference of approximately 4.5 dB.
And this wasn’t unique to Monday Morning.
When all 11 tracks appearing on both CDs were analysed, 10 of the 11 tracks showed a reduction in crest factor on the 2004 version.
That is a significant pattern.
It tells us that the 2004 mastering has generally been made louder and denser.
It does not, by itself, mean that the CD is clipped. High peak levels and clipping are two different things.
Change in crest factor between the 1994 West German Target and 2004 editions. Negative values indicate reduced peak-to-average separation on the 2004 version.
The Whole Album Tells the Story
This is where the comparison becomes much more convincing.
Rather than looking at one song, I analysed all 11 tracks that appear on both CDs.
The average RMS difference across the album is approximately:
5.3 dB louder on the 2004 edition
Every single one of the 11 common tracks is louder on the 2004 CD.
The graph makes the pattern very easy to see.
The 2004 version is consistently louder across the original album.
But What About the EQ?
This was the next question.
Perhaps the 2004 mastering was simply compressed and made louder.
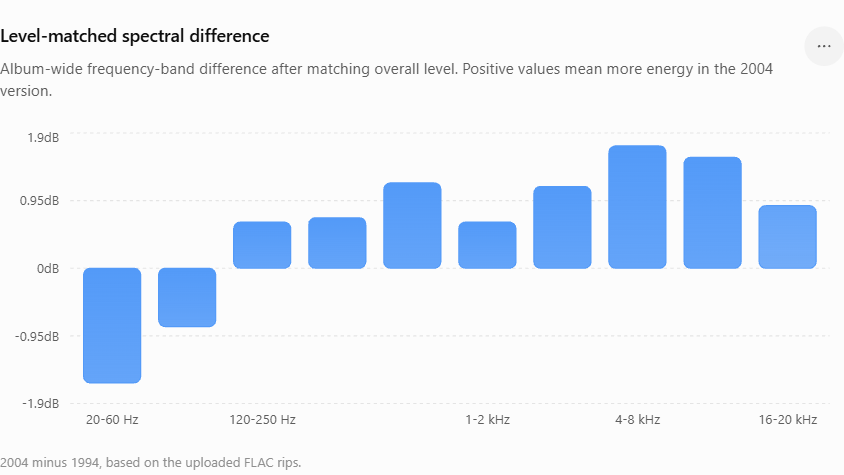
To test that, I removed the volume difference by level-matching the two versions.
Then I compared their frequency spectra.
And again, the results showed that the two CDs aren’t identical.
The broad album-wide differences were approximately:
Frequency range
2004 compared with 1994
20–60 Hz
-1.6 dB
60–120 Hz
-0.8 dB
120–250 Hz
+0.7 dB
250–500 Hz
+0.7 dB
500 Hz–1 kHz
+1.2 dB
1–2 kHz
+0.7 dB
2–4 kHz
+1.2 dB
4–8 kHz
+1.7 dB
8–16 kHz
+1.6 dB
16–20 kHz
+0.9 dB
The important point isn’t each individual number.
It’s the overall shape.
After the overall volume difference was removed, the 2004 mastering still showed less energy in the very lowest frequencies and more energy through much of the midrange and upper frequencies.
So the tonal balance has changed too.
A Picture Tells a Thousand Words
Put the two discs next to each other and the physical differences are immediately obvious.
The black spine and clear spine are only the beginning.
The artwork, disc design, catalogue information, packaging and track content all provide clues that these aren’t simply two identical CDs from different production runs.
But the really interesting difference is something you can’t see by looking at the discs.
It’s in the audio data.
Eleven Tracks, Same Conclusion
The strongest evidence comes from looking at all 11 tracks common to both editions.
Every track is louder on the 2004 CD.
Ten out of eleven have a lower crest factor.
The frequency analysis also shows a different tonal balance after level matching.
This means we can confidently say that the 2004 edition is not simply the 1994 mastering with the volume turned up.
There has been a change in the mastering.
And Then There Are the Five Bonus Tracks
The 2004 edition adds five additional recordings.
These aren’t relevant when comparing the mastering of the original 11 tracks, because there is no corresponding recording on the 1994 disc.
But they are still an important part of the comparison.
The 2004 CD therefore offers something the 1994 Target doesn’t:
additional material.
So Which One Is Better?
Now we get to the difficult question.
Which CD sounds better?
The measurements can tell us what changed.
They can’t tell us what you will personally prefer.
The 1994 West German Target
Lower overall mastering levels
Greater peak-to-average separation
More headroom
A different tonal balance
The original 11-track album
The 2004 Edition
A substantially higher average level
Peaks much closer to digital full scale
Reduced peak-to-average dynamics on most tracks
A different tonal balance
Five additional recordings
If you prefer a mastering with greater dynamic headroom and less aggressive level management, the 1994 Target is likely to be the more interesting choice.
If you prefer a louder, more forward presentation and want the bonus material, the 2004 edition has obvious advantages.
The Conclusion
So, what’s the difference between these two compact discs?
Quite a lot.
It started with something as simple as noticing that one had a black spine and the other had a clear spine.
But once the discs were ripped and analysed, the differences became much more substantial.
The 2004 edition isn’t simply the 1994 CD with the volume turned up.
Across all 11 tracks common to both editions, the 2004 version is approximately 5.3 dB louder on average.
Ten of the 11 tracks show reduced crest factor.
And after level-matching the recordings, there are still measurable differences in frequency balance.
In other words, these are different masterings.
The 1994 West German Target represents a much more conservatively mastered presentation, with greater peak-to-average separation.
The 2004 edition offers a louder, more forward mastering, a different tonal balance and five additional recordings.
So the answer to the question I started with is:
The difference isn’t just the spine.
The two CDs may contain the same Fleetwood Mac album, but they don’t contain exactly the same sound.
And now that we’ve got the measurements, the question becomes a much more interesting one:
We travelled to Sri Lanka in January and February 2025, and I can finally say:
The photographs are done!
Don’t want to read all the technical waffle? No problem. You can jump straight to the Andysworld! Holiday Photograph Album and select Qatar & Sri Lanka, and/or visit YouTube to watch lots of clips, I rendered into a 32 minute video, just in case your tempted to visit Sri Lanka!
Youtube video is here –
After more than a year of sitting on the original collection, sorting through photographs, removing the rubbish, organising everything, converting file formats, writing scripts and re-coding the website album, the Sri Lanka 2025 photographs are finally ready and published on Andysworld!
And it turns out that getting a holiday photo album published is considerably more complicated than simply clicking the “Upload” button.
1,500+ Photographs and Videos
When we came home from Sri Lanka, we had managed to accumulate more than 1,500 photographs and videos.
And all of them were taken using just two phones:
iPhone 8
iPhone 13 Pro Max
No SLR.
No DSLR.
No expensive lenses.
No professional photography equipment.
Just two iPhones.
And between them, they managed to capture more than 1,500 photographs and videos during our Sri Lankan adventure.
Looking back through them, I’m genuinely impressed by just how good some of the photographs are.
Of course, not all of them made the final cut.
In fact, the original collection of more than 1,500 eventually became a much more manageable collection of around 1,000 photographs to work through.
First Stop – iCloud
The first challenge was simply getting everything together.
The photographs had been taken on two different iPhones and stored in iCloud, so the first job was to download the complete collection.
From there, everything was moved onto our Synology NAS, giving us a proper local copy of the photographs and videos.
That gave us somewhere sensible to work from and, importantly, somewhere to keep the original collection safely stored.
Synology Photos
Once everything was on the NAS, the photographs were loaded into Synology Photos.
This is where the serious sorting began.
Lindsey worked through the collection and organised the photographs by location, while at the same time identifying the photographs that simply weren’t worth keeping.
And there were plenty of those.
Duplicates
Blurry photographs
Accidental photographs
People blinking
People looking the wrong way
Photographs that were almost identical
Photographs where we still don’t know why we took them
And then there was the wildlife.
If an elephant moves its trunk slightly, that’s obviously a completely different photograph.
Apparently.
At one point we had an impressive collection of photographs of essentially the same elephant.
Eventually, the great Sri Lankan photograph cull was complete.
What remained was our definitive collection.
Then I Had To Download Them Again!
With the final collection selected, the photographs were downloaded from the Synology onto a PC for the final preparation.
And this is where things got a little more technical.
The iPhones had produced photographs in HEIC format.
For Andysworld, I wanted standard JPG files.
So the next step was:
HEIC -> JPG
But that wasn’t enough.
I also wanted a consistent file naming convention.
That meant dealing with the various possible file extensions:
.HEIC
.JPEG
.jpeg
.JPG
.jpg
Everything needed to end up as:
.jpg
And the filenames themselves needed to be lowercase.
So something like:
SriLanka-IMG_1234.JPEG
became:
srilanka-img_1234.jpg
PowerShell and Python To The Rescue
There was absolutely no way I was going to manually rename hundreds of photographs.
That’s what scripting is for.
I used a combination of PowerShell and Python to automate the repetitive parts of the process.
The scripts handled the file preparation, including:
Converting HEIC photographs to JPG
Renaming JPEG files
Standardising file extensions
Converting filenames to lowercase
Applying a consistent naming convention
Preparing the final collection for the website
It’s a simple rule:
If you have to do something hundreds of times, write a script.
And Finally – Andysworld
With the photographs finally sorted, culled, converted and renamed, there was one final job.
Build the album.
These photographs aren’t simply being dumped into a generic photo-sharing service.
They’re being added to the custom album system on Andysworld.
That meant going back into the code and creating the Sri Lanka 2025 album.
The photographs had to be incorporated into the various locations, the album structure had to be created, and the website code had to be updated.
Then came the testing.
Check the thumbnails
Check the full-size photographs
Check the navigation
Check the location structure
Check the album layout
Check everything works on different devices
And finally…
Upload everything to Andysworld.
Why Go To All This Trouble?
Why not just upload the photographs to Facebook, Google Photos or one of the many other photo-sharing services?
Because that’s not really what I wanted.
These are our memories of a fantastic trip, and I wanted to create a proper photographic record that we could come back to in the future.
The Synology gives us the local archive.
Synology Photos gives us the organisation and sorting.
Lindsey helped turn more than 1,500 photographs into a definitive collection.
PowerShell and Python dealt with the repetitive technical work.
And Andysworld gives me complete control over the final album.
It was considerably more work than simply uploading a few photographs.
But it’s also considerably more satisfying.
18 Months Later…
The trip itself lasted a few weeks.
The photographs took seconds to capture.
Getting them ready for publication took considerably longer.
But finally, 18 months later, the job is done.
More than 1,500 photographs and videos have been downloaded, sorted, culled, organised, converted and processed.
The rubbish has gone.
The good photographs have survived.
The filenames are lowercase.
The HEIC files have become JPGs.
The custom album has been coded.
And the finished collection is now sitting on Andysworld.
So, after all this time…
Welcome Back To Sri Lanka!
The Sri Lanka 2025 photographs are finally ready.
And yes, somewhere in that collection there are still probably more photographs of elephants than anyone really needs.
But that’s what holidays are all about.
Memories, photographs, stories…
…and occasionally taking the same photograph twenty times because the elephant moved its trunk.
Sri Lanka 2025 – finally finished, finally published, and finally ready to enjoy.
Welcome to our Sri Lanka 2025 photo album on Andysworld!
I know, I know. Five months is a long time between posts, but I’ve been keeping myself rather busy behind the scenes. So, when I finally sat down to write something, I thought I’d pick a topic that’s a little more… topical.
And what could possibly be more topical than Fortnite Sprites?
Yep — those little things.
Got to catch them all!
If you’ve played Fortnite recently, you’ll know that Sprites have become another little part of the Fortnite experience. They’re small, they’re cute, they’re useful… and, inevitably, you start wanting to catch them all.
It reminds me of Pokémon.
You’ve got to catch them all!
Only this time, rather than wandering around the Pokémon world throwing Poké Balls at everything that moves, you’re running around Fortnite looking for Sprites.
And, of course, once you find one, you can’t just leave it there.
You have to catch it.
Why am I talking about Fortnite?
Well, partly because it’s something completely different from my usual posts.
Those who know me will know that most of my blog posts tend to involve VMware, Proxmox, OpenNebula, Linux, networking, storage, scripting or some other form of infrastructure that inevitably involves staring at a terminal window.
Sometimes it’s nice to write about something that doesn’t involve a command prompt.
And let’s be honest — Fortnite is fun.
There’s something strangely satisfying about exploring the map, finding things you weren’t necessarily looking for and discovering another Sprite along the way.
Five months later…
It’s actually made me realise just how quickly time disappears.
Five months ago I was writing my previous blog post, and since then there’s been a whole load of projects, changes, experiments and general IT madness going on.
I’ve still got plenty of technical subjects I’d like to write about, particularly some of the work I’ve been doing around infrastructure automation and self-service.
But for now…
I’m going hunting.
Sprites, here I come.
? Got to catch them all!
And perhaps, after another five-month gap, I’ll even write another blog post before Christmas. ?
Social Media Hyped – Rubbish – Don’t Waste Your Money
So here’s the thing…
Amazon UK refused to publish this review — the exact one below — after I returned the product for a refund.
Apparently it “does not meet community guidelines.”
You can make your own mind up…
My rejected Amazon review:
So I was intrigued — so many TikTok, Instagram, Facebook, and YouTube reviews — which I assume are clickbait and monetised.
It’s called Ooo No — because that’s what you say when you’ve wasted your money.
All these reviews on Amazon must be bots — because I genuinely don’t understand how this gets rated so highly.
Value for money? Waste of money.
Why is this even needed? You still have to pair it with your phone via Bluetooth and run the app! So why not just use Waze, Google Maps, Apple Maps, or even an old-school TomTom with the PocketGPS database — far cheaper and far more accurate.
In use, it warns far too early about cameras, isn’t accurate, and even warns about cameras on the wrong side of the road.
Yes, it’s community-driven — but there’s clearly very little verification of camera positions.
I’ve used it over ~700 miles across villages, towns and cities:
False warnings
Cameras flagged where none exist
Misses common mobile camera locations (compared to PocketGPS)
Incorrect speed limits
I would give this zero stars if I could.
Final comment: £50 paid — complete waste of money.
Just use your phone. If it’s in a hands-free dock, run Waze — don’t waste your cash.



![[Valid RSS]](http://andysworld.org.uk/images/valid-rss.png "Validate my RSS feed")