Posts Tagged ‘DIY’

Consumer Unit Cupboard

Thursday, October 19th, 2006

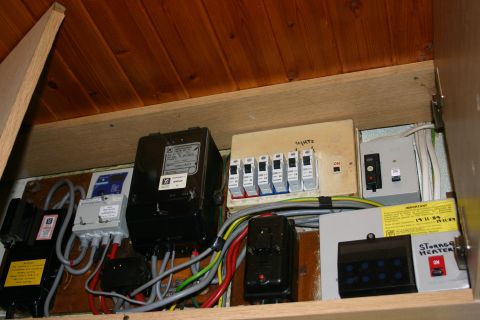
The consumer unit cupboard in the kitchen hides the following items:-

  1. Incoming electric armoured cable.
  2. 100 Amp fuse. (protects the local substation or transformer from my household electrics!)
  3. Siemens Digital Electricity Meter.
  4. Horstmann Radio Teleswitch – this switches on “day” and “night” rates on Economy 7.
  5. Henley bakelite junction box.
  6. Henley bakelite Earth Leakage Current Breaker. (This actually works, but probably should be in a museum, it also has a patent number on it).
  7. Wylex six fuse consumer unit (fuse box). I’ve replaced all the wired fuses, with Wylex circuit breakers, handy when I’m completing DIY electrics in the house! No longer need to re-wire fuses with fuse wire.
  8. Mem four 15 Amp cartridge fuse consumer unit. (fuse box). This supplies four storage heaters on Economy 7.
  9. Mem single 15 Amp cartridge fuse consumer unit. (fuse box). This supplies one storage heater on Economy 7 – I don’t know which one yet!
  10. A few connectors, earth straps etc

You are probably asking yourself, why I’m detailing such a boring item, a sparky-friend has offered in the future to replace my consumer unit and wanted to know the details of what’s currently in the cupboard, there’s alot in the cupboard. I’m looking to replace all the consumer units and earth leakage current breaker with a modern Dual/Split bus, RCD/MCB MK unit, space permitting, because I cannot move any of the other items without gettting the supplier to move them! I’m also thinking of having a Generator Transfer panel installed, so I can connect my 3.5kW Petrol generator to the house supply, when the power dies, throw the switch, connect my 3.5kW Petrol generator and I’ve got power for the entire house. Just need to work out the Grounds!

Here are the pictures

Fusebox One

Fusebox Two

Fusebox Three
Original larger image

October 2006 Update

Sunday, October 15th, 2006

It’s been a few months, since I last posted to this blog. I’ve been very busy with the new house and the fish house, has taken second place to the new hobby of DIY.

The fish house moved successfully to the new house and garage, I’ve started to insulate part of the garage which has a flat roof, using Jablite Squeeze, fantastic stuff, this deserves a design award!

I just wanted to let you all know, I’m still here, but just a bit busy to post regular items.

PVAed ceiling (almost!)

Wednesday, August 9th, 2006

We’ve spent a few hours this evening, sealing the ceiling with PVA (4 parts water to 1 part PVA), to prevent us using gallons of matt emulsion, when we come to paint shortly. The ceiling in the dining room, is still a little damp, so we just completed the lounge area.

PVA No.1
Freshly PVAed ceiling No.1

PVA No.2
Freshly PVAed ceiling No.2

PVA No.4
Freshly PVAed ceiling No.3

PVA No.5
Freshly PVAed ceiling No.4

PVA No.3
Wot No PVA, waiting for the ceiling to dry.

If you look carefully in the pictures you can see the reflection in the PVA on the ceiling. So it looks like it’s working!

I didn’t say, this blog was ever going to be exciting! Carpet fitters are booked to complete quotations for new carpet tomorrow (Thursday) and Saturday.

Ceiling’s been re-skimmed

Tuesday, August 8th, 2006

The ceiling in the lounge/dining room has now been re-skimmed with plaster. “Joe” has done an excellent job. If you would like his details contact me. I can certainly recommend him.

I don’t have any pictures at present, we are waiting for it to dry, so we can apply a watered-down solution of PVA before painting. (otherwise it will suck like mad!).

I’ve been busy arranging House Removal quotations, Carpet fitters, emptying the current loft and Esme our eldest cat, is not very well at present, she’s just finished her medication, to stop her being sick, and now she’s developed “double breath”. She goes to the vets at Battleflatts tomorrow again, to be scanned and checked.

No pictures of the house today, so here are some pictures of the cats!

Esme & Esther
Esme and Esther

Esme
Esme asleep

Found a Master Blaster!

Thursday, August 3rd, 2006

After many quotations and “interviews” with local “plasterers” I eventually found a “Master Plasterer” with many years of experience to skim the ceilings in the lounge and dining room downstairs. We’ll call him “Joe”, as he’s Internet shy, but let me know if you would like his details. Joe was recommended to me by a few people I know.

The ceiling is to be plastered at 10.00am Sunday 6th August 2006.

I’ve not joined NASA or Portland Down!

Wednesday, August 2nd, 2006

After removing all the woodchip wallpaper from the walls and ceilings in the lounge/dining room, it has revealed many large cracks in the ceilings and walls. We’ve been discussing whether to re-wallpaper or re-skim the walls and ceilings with plaster, so there’s a decent crack-free surface to paint.

I’ve been searching for a plasterer to do the work, I’ve had several quotations from 600, 350, 220 and 150GBP to re-skim the ceiling, lots of variation and ideas that they’ve run by me. I’m meeting a plasterer tomorrow night which has been recommended to me to discuss the requirements, the issues seem to be the cracks may come back, because the existing ceiling is lath and plaster. Cracks are often caused by lath movement. Because it absorbs moisture from the air, wood lath expands and contracts as humidity rises and falls. This can cause cracks to appear year after year. A nail holding the edge of a piece of lath may rust or loosen, or structural movement in the wood framing behind the lath may cause a seam to open.

When the ceiling is re-skimmed, tape can be used to “seal” these cracks, which may prevent re-cracking.

or have the entire ceiling re-boarded and skimmed

or wallpaper!

If we decide to re-skim, one job I’ve got to do is sand-off the gloss paint of the dining room ceiling, or ensure a rough surface for the plaster to stick to. I tried sanding last night, but my face mask and goggles, weren’t up to the job.

It’s not often I star in my own blog, so this is a rare chance to see me in action…doing DIY!

Andy No.1
Nasty job sanding off gloss paint!

Andy No.2
It helps to have the right safety gear!

Wallpaper stripped and false beams removed

Tuesday, August 1st, 2006

A series of pictures after my partner has spent many hours wallpaper stripping the woodchip wallpaper from lounge/diner and ceiling areas in the house. You’ll notice the false beams have also been removed and chopped up for firewood and moved to the dry wood store.

We now need to find a good plasterer to skim the lounge ceiling and a decorater to re-wallpaper the walls before painting.

The false beams were the wrong period for the house, which is Victorian.

Wallpaper removed 1
A mountain of stripped wallpaper.

Wallpaper removed 2
Those wall lights need to go to the tip as well. Who painted the ceiling with gloss paint, now I’ve got to sand it!

Wallpaper removed 3
No beams

Wallpaper removed 4
No beams

Wallpaper removed 5
Beam me up Scotty!

Final skim of plaster…

Tuesday, July 18th, 2006

Today the builders returned to apply the final skim of plaster to the freshly rendered dry walls.

Plaster 1

Plaster 2

Plaster 3

Plaster 4

Looks much better! Just await the fitting of new wooden skirting boards and the job is complete.

Render applied

Tuesday, July 18th, 2006

The render was applied before last weekend. The living/dining room looks like a room once again. The specialists tell me that gypsum based plaster (pink plaster) is not used to render the walls because it’s a moisturer absorber, and attracts moisture through the walls, so a sand/cement mix is used, which will be rendered with a thin skim of “pink plaster” so it can be painted.

Render 2

Render 3

Render 4

Render 5

End of First Day

Wednesday, July 12th, 2006

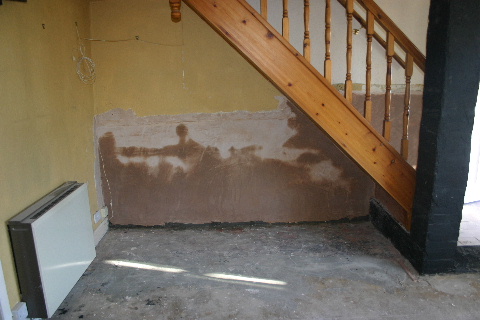
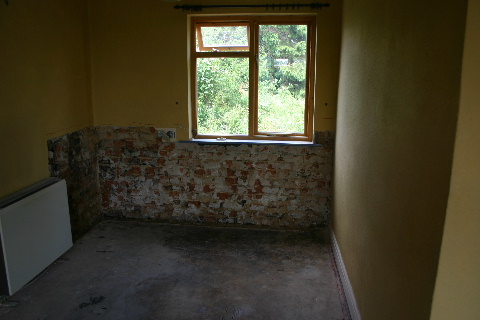
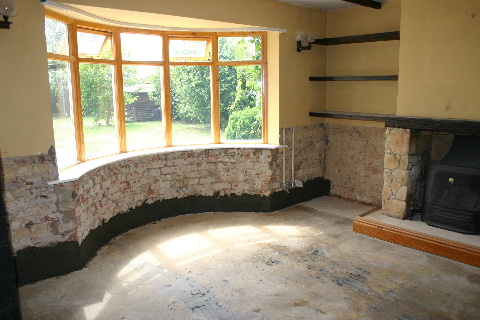
All the plaster has been removed in the areas that require a lateral and vertical dpc.

Works After 1
lateral and vertical dpc installed. The dpc installed is a newer type being used in the last five years, which is a gell base, which is injected into the mortar, rather drilling into bricks and pressurising and pumping in.

Works After 3
partial rendering for tanking under stairs. This is required because the garage floor is higher than the lounge floor.

Works After 4
partial rendering for tanking in the bay window. This is required because the garden is higher than the lounge floor.

A very productive first day.