Minisforum MS-A2 Hyper-V to Proxmox 9.0 Migration Minisforum MS-A2 Series Part 15 Ultimate #homelab
In this episode of Hancock’s VMware Half Hour, I walk you through migrating Hyper-V virtual machines to Proxmox 9.0 on the Minisforum MS-A2.
We’ll cover connecting to the Proxmox server via SSH, exploring datastores, working with VHDX files, and running migration demos—including moving a full VM in under 60 seconds! This step-by-step guide shows how easy it is to transition workloads from Hyper-V into Proxmox for your #homelab or production environment.
Whether you’re testing, learning, or planning a migration, this video gives you the tools and knowledge to make it happen smoothly.
Scripts are here on GitHub – https://github.com/einsteinagogo/Hyper-VtoProxmoxMigration.git
Hello everyone! I’m Andrew Hancock, a seasoned VMware Technical Architect from Yorkshire, UK. Over the past 23 years, I’ve accumulated a wealth of experience with VMware products and have written over 100 articles on Experts Exchange. Today, I’m sharing some valuable tips on handling VMware ESXi configuration issues, focusing on warning alerts after enabling SSH or the ESXi shell. Let’s dive in!
Understanding Configuration Issues after Enabling SSH
Common Configuration Warnings
Enabling SSH or ESXi shell on your VMware environment is a bit like setting up an alarm system at home. It keeps your house safe, but you’ll get some annoying beeps now and then. When you enable SSH, common warnings appear. They serve as reminders that you’ve opened a potential door to your system.
Immediately after enabling, you’ll notice these warnings. Personally, I like to leave these warnings in place as reminders. They remind me: “Hey, you’ve enabled SSH for troubleshooting or system checks.” Among these configuration warnings, the most common are:
Increased resource consumption
Potential security vulnerabilities
System performance impact
Why do they matter? Well, like a constantly beeping alarm can drive you nuts, these warnings can help you stay alert and handle issues promptly.
Impact on System Performance
Ever tried running a marathon with a sprained ankle? That’s how enabling SSH can impact your system’s performance! Your system has to work harder, and it might slow things down.
Not all systems will show a noticeable change, but it’s worth keeping an eye on these potential impacts:
Memory usage increases
CPU load may spike
I/O operations might slow down
For example, when I enable SSH on my ESXi host, I notice a small spike in memory usage. It’s like adding a new app to your smartphone – just another layer of demand.
Reasons for Enabling SSH on ESXi
Why would you want to enable SSH, anyway? Why open this potential can of worms? Well, it’s essential for troubleshooting.
For 23 years, I’ve worked with VMware, and for 11 of those years as a VMware vExpert. When things go wrong, SSH access can be your best friend. Here are a few reasons why you might enable SSH on an ESXi host:
Running scripts and commands that aren’t available via the GUI
System troubleshooting and diagnostics
Checking the signatures of ISOs uploaded to a datastore
In the words of a fellow expert, “If you cut Andy in half, it reads VMware like a sticker rock from Blackpool.” That’s how integral SSH can be.
Potential Security Risks
Here’s where the rubber meets the road. Enabling SSH opens up potential security risks. It’s like leaving a side window open for a bit of fresh air – good in the short term, risky long-term.
When you leave SSH enabled beyond what’s necessary, you might face:
Unauthorized access attempts
Data breaches
Malicious attacks on your network
Understanding these risks is key to balancing functionality with security. Always disable SSH when not in use. Consider additional protection measures like firewall rules or key-based authentication for heightened security.
Data Over the Years
Years
Experience
23
Working with VMware
11
As VMware vExpert
Being vigilant about warnings and understanding the implications of enabling SSH on your ESXi is critical. Here’s a pie chart to visualize the common configuration warnings triggered by enabling SSH on ESXi:
In the next sections, we’ll dive deeper into each topic, exploring practical solutions to mitigate these issues.
Suppressing Configuration Warnings on ESXi
Suppressing configuration warnings on ESXi can help streamline your workflow. But let’s face it, it can also bring dangers. Ignoring critical alerts can lead to serious problems. It’s all about balance and knowing when and how to suppress these warnings.
Steps to Suppress Warnings
Here, I’ll explain how you can suppress those pesky warnings on your ESXi host.
Log in to your ESXi host client.
Navigating to Manage and then Advanced Settings.
Search for the suppress shell warning option.
Set the value to 1.
Click Save and exit.
That’s it! A few clicks and that annoying warning is gone. But wait, there’s more to know.
Using ESXi Host Client
Using the ESXi host client makes life easier. And I trust you’ll find it more straightforward than ever before. In newer versions of ESXi, VMware has simplified the process drastically. Instead of diving into advanced settings, you can:
Click Actions from your host client.
Select Dismiss Notification.
Or simply hit the big X next to the warning.
As quoted correctly, “VMware made it a lot easier for us now, to suppress these warnings.” No more intricate steps, and no more digging through endless settings. It’s as simple as a click.
Changes in Newer Versions of ESXi
Suppressing warnings is easier in newer ESXi versions. Why? Because VMware has listened to its users. They’ve streamlined the process, eliminating the more tedious steps we used to navigate through. Now, even those less tech-savvy can manage it with ease.
Back in the day, in older versions of ESXi, we had to:
Step
Description
1
Navigate to Manage in the ESXi host client.
2
Select Advanced Settings.
3
Scroll to find the suppress shell warning setting.
4
Change the value to 1 and save.
Manual and Automated Suppression Techniques
You have manual and automated options for suppression. The manual approach, as we discussed, involves navigating to Manage and making changes in Advanced Settings. It’s straightforward, but could be time-consuming if you’re doing this on many hosts.
Automated options are available through the ESXi host client. These can save you a lot of time:
Automate using scripts or tools available in the community.
Leverage built-in automation features within VMware.
Beware of Ignoring Warnings
Suppressing warnings can mask other critical alerts. For instance, you could have a RAID failure on a disk, or a fan overheating. It’s essential to not blindly suppress all warnings. Always, always make sure you’re aware of what you’re silencing.
“Sometimes that actually can mask, another warning that may be actually present on the server for instance you could have a raid failure on a disk or you could have a fan failure or an overheat failure or temperature issue with the server, which would also give a warning as well and it’s somewhat masked.”
So remember: Be cautious and make sure you understand the implications of suppressing these alerts.
Flowchart of Steps to Suppress Warnings in ESXi
By following these steps and understanding the implications, suppressing configuration warnings on ESXi can be an effective tool in your IT arsenal. Stay informed, and manage your warnings wisely!
Balancing Security and Operational Efficiency
Importance of Monitoring Security Alerts
When managing server infrastructure, keeping an eye on security alerts is critical. Without monitoring, key issues may go unnoticed, leading to security breaches or operational downtime. Does it seem overwhelming to constantly track these alerts? Maybe. But it’s a necessary part of maintaining a secure and efficient environment.
Immediate response: Early detection allows for quick action.
Compliance: Some industries require stringent security practices, including alert monitoring.
Personally, I prefer to leave warnings enabled to remind me of active SSH or ESXi shell states. This way, I can remain vigilant about the status of my server’s security.
Risks of Disabled Alerts
Ignoring or disabling these alerts can be tempting, especially when dealing with a high volume of notifications. However, doing so can introduce significant risks. Without these alerts, one might miss critical warnings that could prevent a security incident.
“Leaving SSH open on an ESXi host server is paramount to reducing security.” This statement underscores the severity of ignoring such alerts. If SSH remains enabled without oversight, it opens a window to potential attacks and vulnerabilities.
Just imagine: would you leave your home with the front door unlocked? Disabling important security alerts is akin to doing just that. You’re creating an unnecessary risk for your server.
Best Practices for Enabling and Disabling SSH
Managing SSH access is a balancing act between security and operational needs. Here are some best practices that I follow:
Enable SSH only when necessary: Limit the duration SSH is enabled to reduce exposure.
Use strong authentication: Implement strong passwords or key-based authentication.
Log and monitor: Keep detailed logs of SSH access and review them regularly.
Restrict access: Limit which IP addresses can use SSH to connect to the server.
By following these steps, one can ensure that SSH access is as secure as possible without sacrificing the ability to manage the server effectively.
Personal Stance on Leaving Alerts Active
Let’s get a bit personal. Do you often dismiss alerts just to keep the dashboard clean? I used to do the same. Over time, though, I realized this was not the most prudent approach. When you dismiss alerts, they disappear from view. Out of sight, out of mind, right? But what if they alert you to something critical?
So now, I prefer keeping the warnings active. This way, I won’t forget to address any issues later. It’s like having a post-it note on your fridge reminding you of something important. You wouldn’t just throw it away, would you?
“Leaving SSH open on an ESXi host server is paramount to reducing security.”
This quote resonates with me. It serves as a constant reminder of why I keep those alerts visible. It’s a small inconvenience for greater peace of mind.
Impact of Leaving SSH Enabled
To better understand the implications of leaving SSH enabled, let’s look at a comparison:
Scenario
Security Risk
Operational Efficiency
SSH Disabled
Low
Moderate
SSH Enabled (Unmonitored)
High
High
SSH Enabled (Monitored)
Moderate
High
As you can see, enabling SSH increases operational efficiency but at a cost to security unless you actively monitor it. This data reinforces the idea that a balanced approach is necessary.
In summary, staying on top of security alerts and carefully managing SSH settings can provide both security and efficiency. This approach ensures that your server remains protected while still being accessible for critical tasks.
Real-Life Examples and Anecdotes
My Own Experiences with Configuration Issues
Configuration issues can be a real headache. I’ve learned this the hard way over my 11 years as a vExpert. Sometimes, it’s the small things that creep up on you. Like that one time when a simple misconfiguration masked critical alerts, causing an extremely stressful environment.
I remember vividly setting up a new environment and thinking everything was going smoothly. But, a few hours later, alerts began to blast, and no matter what I did, they wouldn’t stop. Frustrating, right? Little did I know, these were being masked by improper configurations.
Specific Examples from Professional Life
During one of my gigs, I was managing a large-scale VMware deployment. Imagine dealing with hundreds of VMs and then suddenly, critical alerts just vanished. Panic set in. After hours of trying to troubleshoot the issue, I discovered that the misconfigured thresholds and incorrect settings were hiding the alerts.
Another instance was when SSH was left enabled on several ESXi hosts. This led to a security vulnerability. A simple oversight, you might think, but the consequences could have been severe.
Solutions Implemented
So, how did I fix these issues? Well, practice and a bit of trial and error played a major role. Here’s what I did:
Thorough Monitoring: I ensured that all alerts and notifications were configured correctly. No stone left unturned.
Proper Configuration Management: Implementing a configuration management tool to automate and verify settings was crucial. This saved a lot of headaches.
Regular Audits: Regular system audits helped catch these issues before they blew up into bigger problems.
In reference to specific articles and guides, such as the one discussed in the VMware half-hour series: “Following the article that I’ve actually basically written, shows you how to suppress configuration issues and warnings.”
Lessons Learned
Failure is often the best teacher. Here are some lessons I took away from these experiences:
Never overlook the small stuff. Even minor configurations can lead to significant issues.
Document everything. Having thorough documentation makes it easier to backtrack and identify where things went wrong.
Stay updated. Technology evolves, and so should your knowledge and practices.
Real-life examples make the content relatable and sharing both successes and failures adds a touch of authenticity.
Examples from 11 Years as a vExpert
Being a vExpert for 11 years has provided me with numerous examples of how configuration issues can impact performance and security. Here’s a summary:
Year
Issue
Solution
2010
Masked alerts due to improper settings
Thorough reconfiguration and constant monitoring
2013
SSH left enabled, causing security risk
Implemented automated checks
2017
Incorrect thresholds on VM performance
Regular audits and updates
“I’ve faced several situations where configuration issues masked critical alerts, teaching me the importance of thorough monitoring.”
In conclusion, learning from real-life experiences helps in avoiding common pitfalls. No matter how small a configuration issue might seem, it can have a significant impact.
Looking Ahead: Future Topics in VMware ESXi
Introduction to Upcoming VMware Topics
If you’ve been following along with our previous discussions, you’re probably eager for what’s next. Buckle up! “In the next articles, we actually really start having some fun with virtual machines.” This is where things get truly exciting for all VMware enthusiasts.
Now, let’s dive into the juicy details of what’s ahead.
Installing Virtual Machines
Installing virtual machines is a critical step in mastering VMware ESXi. This process helps you to create isolated environments tailored to different projects or testing needs. To put it simply, think of it as creating multiple computers within a single physical machine. It’s a powerful capability that opens doors to endless possibilities.
Downloading the necessary ISO files.
Uploading those ISO files to the ESXi host server.
Creating virtual machine configurations.
Installing the operating systems within those virtual environments.
Each step is essential, and we’ll break them all down in Parts 7-9.
Connecting to ESXi Host Server
One of the fundamental skills you need is connecting to your ESXi host server. This might sound technical and a bit intimidating, but don’t worry. With a little guidance, you’ll master it in no time.
Connection involves:
Authenticating your credentials.
Navigating the ESXi web interface.
Manipulating host and virtual machine settings.
Think of this as the backbone of your VMware experience. Without mastering this, you’ll find it hard to manage and interact with your virtual machines.
Practical Applications of Learned Techniques
What’s theory without practice? The upcoming tutorials will not just tell you what to do but also why you’re doing it—and more importantly, how to apply these techniques in real-world scenarios.
Some Practical Application Examples Include:
Setting up a virtualized lab environment for software testing.
Creating isolated development environments within a single physical server.
Testing new software or patches in a safe, virtual sandbox.
By the end of parts 7-9, you’ll not only have created your virtual machine but also understood how to effectively utilize it.
Future Content Aims and Coverage
As we push forward, we aim to build on the foundation we’ve set in parts 1-6. Here’s a sneak peek at what to expect in the upcoming sections:
VMware Topics in Parts 7 to 9
Part
Topics
Goal
Part 7
Introduction and Preparation
Understand the prerequisites for installing VMs
Part 8
Uploading ISO Files and Initial Setup
Learn to upload and configure virtual machine components
Part 9
Final Configuration and VM Installation
Complete your VM setup and install the operating system
Conclusion
In summary, the upcoming sections aim to deepen your understanding of VMware ESXi, starting from the basics and moving towards more advanced topics. You’ll master the art of installing virtual machines, connecting to your ESXi host server, and applying these techniques in practical scenarios.
As a TL;DR: Expect hands-on instructions, practical insights, and a lot of “fun with virtual machines” in the upcoming articles!
“In the next articles, we actually really start having some fun with virtual machines.”
In this video, I will show you HOW TO: Suppress Configuration Issues and Warnings Alert displayed in Summary status for ESXi 7.0 after enabling SSH or ESXi Shell.
In this step by step video tutorial, we will show you HOW TO: Enable SSH Remote Access on a VMware vSphere Hypervisor 7.0 (ESXi 7.0). This is important if you need to enable SSH remote access for additional troubleshooting of the ESXi host.
I logged into LogMeIn Free this morning, and was greeted with:-
Soon LogMeIn Free will no longer be available.
To continue using remote access, you’ll need to purchase an account subscription of LogMeIn Pro. As a loyal user, you’re entitled to discounted introductory pricing, with packages starting at $49/year for two computers.* Your new account includes our signature remote access with premium features like remote printing, file transfer and cloud data access, plus desktop and mobile apps to improve your experience.
Please note:
If you do not take action, the Free computers highlighted in your account will become inaccessible on 28/01/2014. Only 7 days left!
Tags: LogMeIn Free, RDP, SSH, Teamviewer Posted in All, software | Comments Off on GoodBye from Andysworld! – LogMeIn Free will no longer be available starting Jan 21 2014 @LogMeIn, Hello @TeamViewer!
In my previous VMware Articles, most featured Intermediate VMware Topics. My next series of articles will concentrate on topics for the VMware Novice; this is the fifth article in this series.
If you would like to read the other articles in this series, they are listed here for your convenience.
In this series of basic VMware articles for the Novice, I’ll be showing you the basic VMware skills required to install, configure and deploy virtual machines using VMware’s FREE VMware vSphere Hypervisor (ESXi).
In this article we will show you HOW TO: Enable SSH Remote Access on a VMware vSphere Hypervisor 5.1 (ESXi 5.1) so you can remotely connect to the VMware vSphere Hypervisor 5.1 (ESXi 5.1) server remotely via SSH (PuTTY).
1
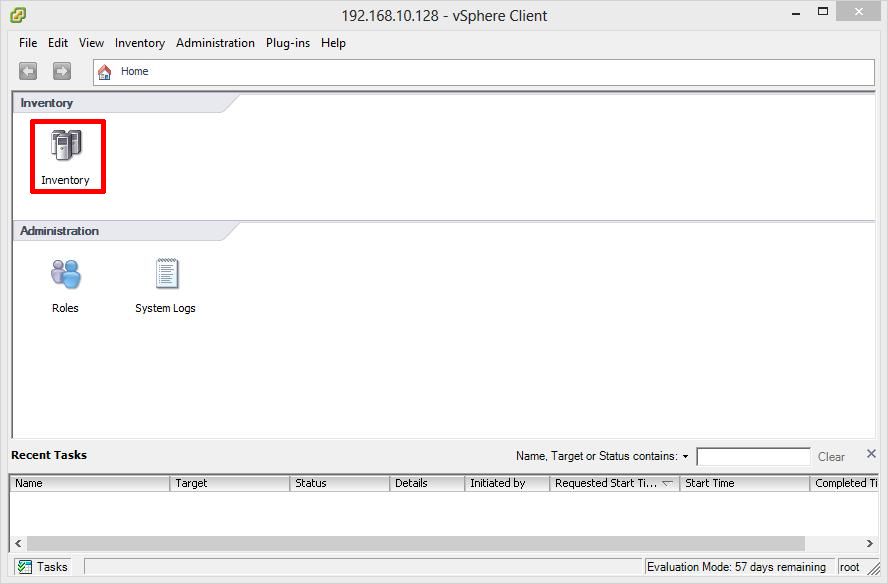
Connect to the VMware vSphere Hypervisor 5.1 (ESXi 5.1) or vSphere vCenter Server using the vSphere Client
Once connected to the “default hypervisor home page”, click the Inventory icon, to see the server’s Inventory.
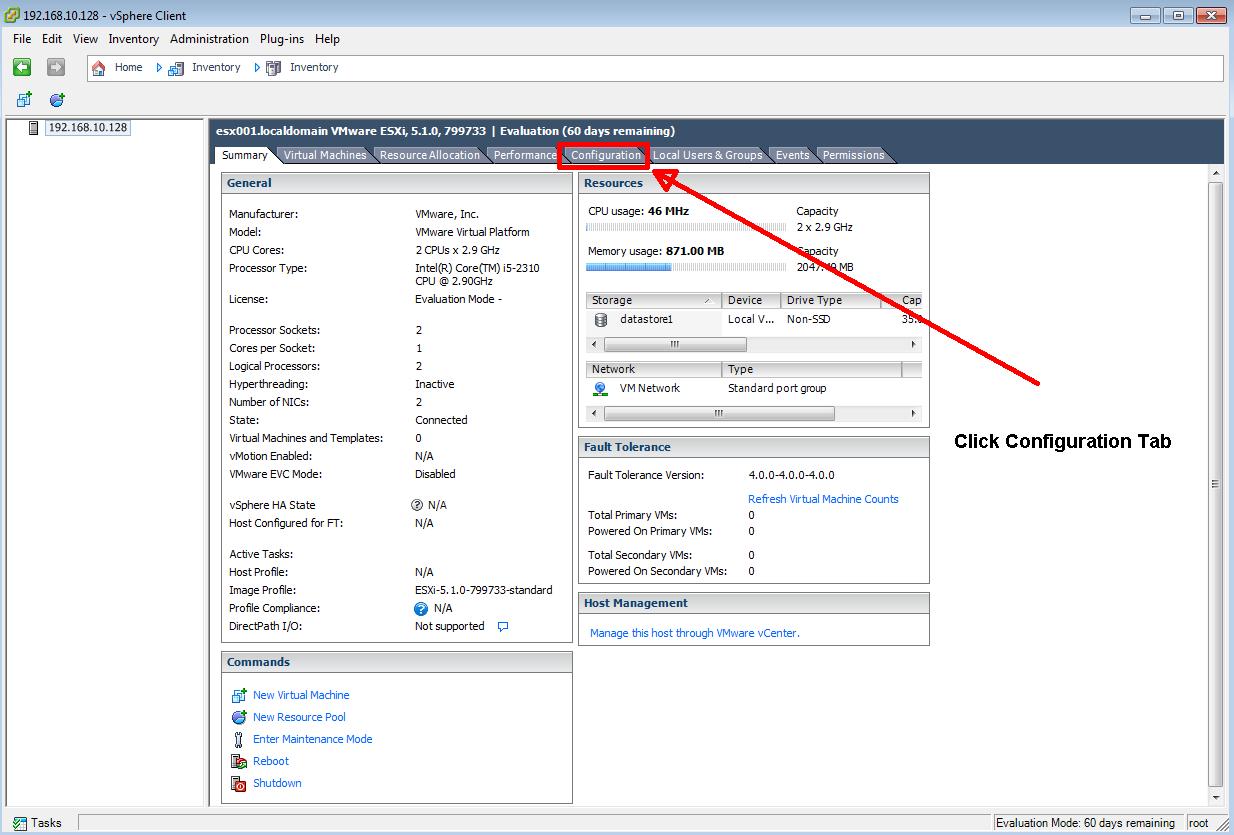
Click Configuration Tab
Click the Configuration Tab.
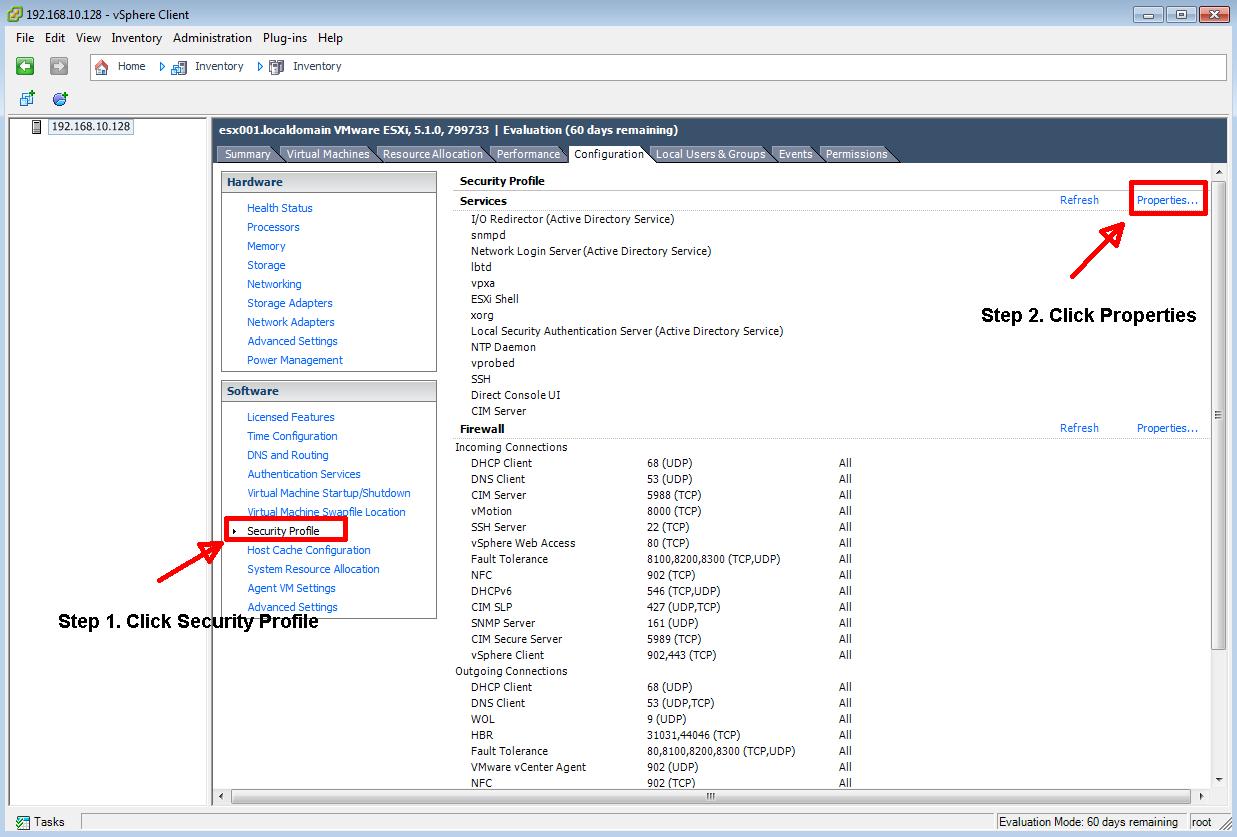
Click Security Profile
Click Security Profile, followed by Properties
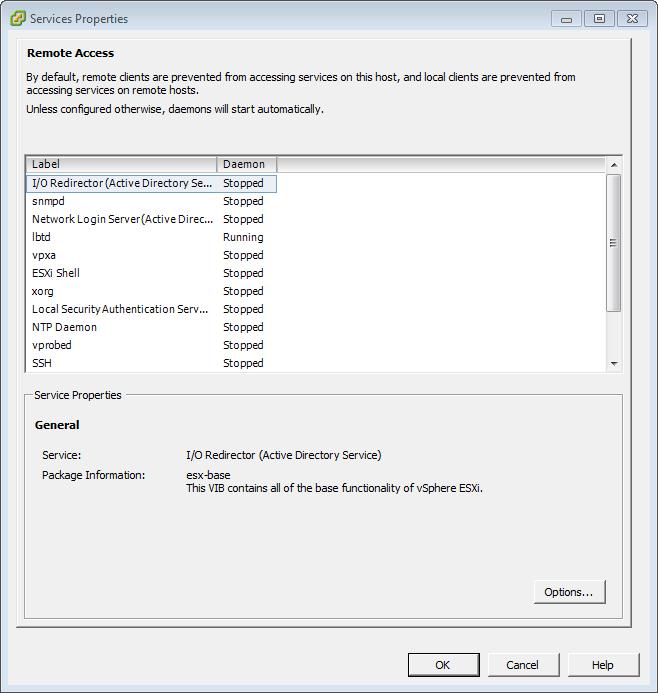
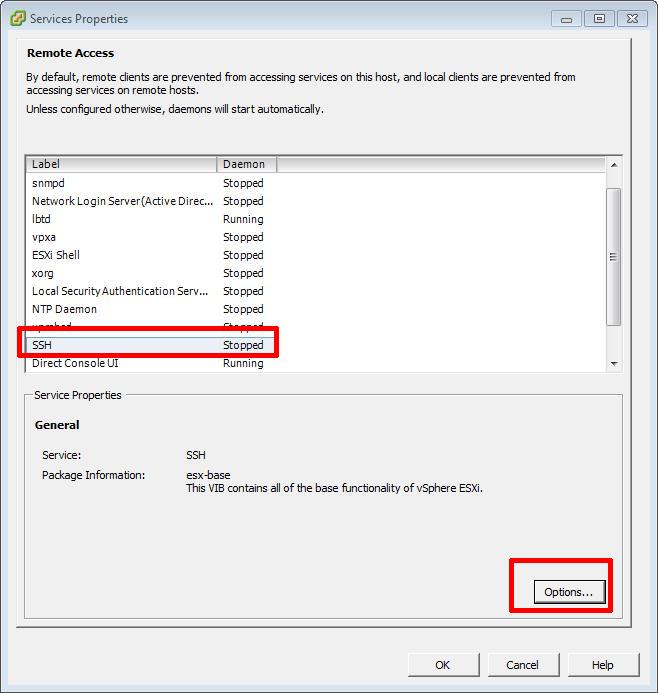
Service Properties
The Security Service Properties will be displayed.
SSH Options
Click the SSH label followed by Options button, you will notice the daemon service is currently stopped, this is the default.
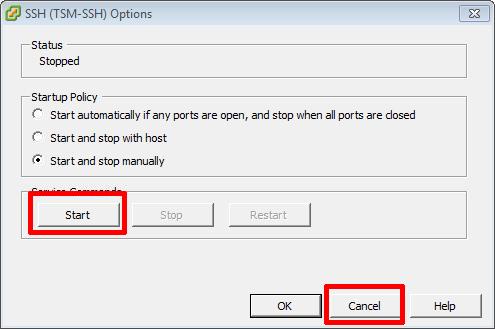
SSH (TSM-SSH) Options – Click Start
The SSH (TSM-SSH) Options will be displayed. Click Start to start the SSH deamon. You can change the options here if you wish to Start and stop the SSH daemon service with the host, or Start automatically if any ports are open, and stop when all ports are closed. Check with your Security IT Policy which is best for you. Opening SSH ports long term can be considered a security risk.
SSH Daemon Running
You will notice the SSH Daemon Status has changed to Running . Click OK to continue, and Click OK to return to Inventory.
Confirm using PuTTY, you can connect to the server successfully.
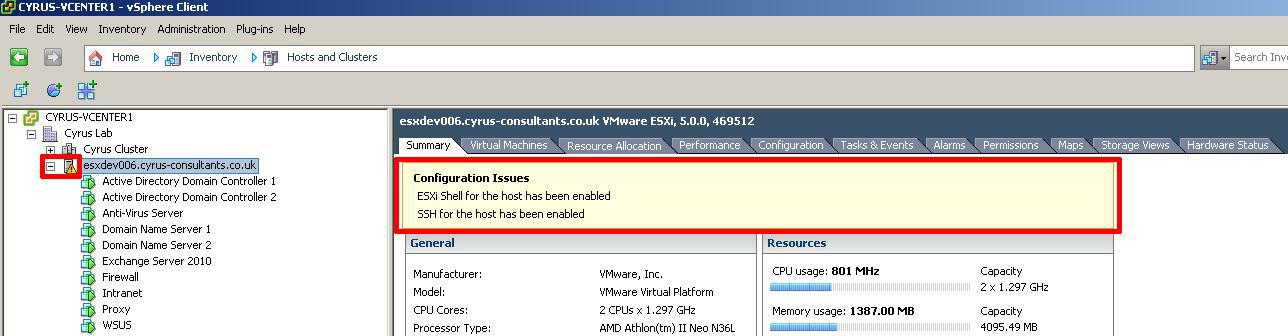
In vSphere 4 1, 5.0 and 5.1, when you have enabled Remote SSH management of hosts from the vSphere Client, you may notice that that a Configuration Issues warning yellow box appears on the Summary page of the host ESXi server.
Configuration Issues, SSH and ESXi shell enabled Configuration Issues, SSH and ESXi shell enabled
This Configuration Issues warning yellow box only appears when Remote SSH and/or ESXi shell has been enabled.
In vSphere 4 1 and 5.0, you can enable both Remote SSH and the ESXi Shell for management of hosts from the vSphere Client and from the Direct Console User Interface.
You may have noticed that on enabling both Remote SSH and the ESXi Shell for management of hosts from the vSphere Client and from the Direct Console User Interface that a Configuration Issues warning yellow box appears on the Summary page of the host ESXi server.
This Configuration Issues warning yellow box only appears when Remote SSH and/or ESXi shell has been enabled.
Configuration Issues, SSH and ESXi shell enabled
If you are also connected to a Windows vCenter Server using the vSphere Client, you will also notice there is also a yellow/orange warning triangle displayed on the host server.
vCenter Configuration Issue
There is no vSphere ESXi configuration issue, VMware vSphere Hypervisor (ESXi) and VMware vSphere vCenter server are indicating there is a possible security issue with your installation, you may not be aware that SSH and ESXi shell have been enabled.
VMware state “This message is a proactive security measure designed to ensure that administrators are aware that remote access has been enabled for the server.”
The only issue, is that the Warning triangle displayed in VMware vSphere vCenter can mask real warning events.
These configuration issues and warnings alert triangle, can be suppressed as follows
1
Connect to the VMware vSphere Hypervisor (ESXi) or VMware vSphere vCenter Server
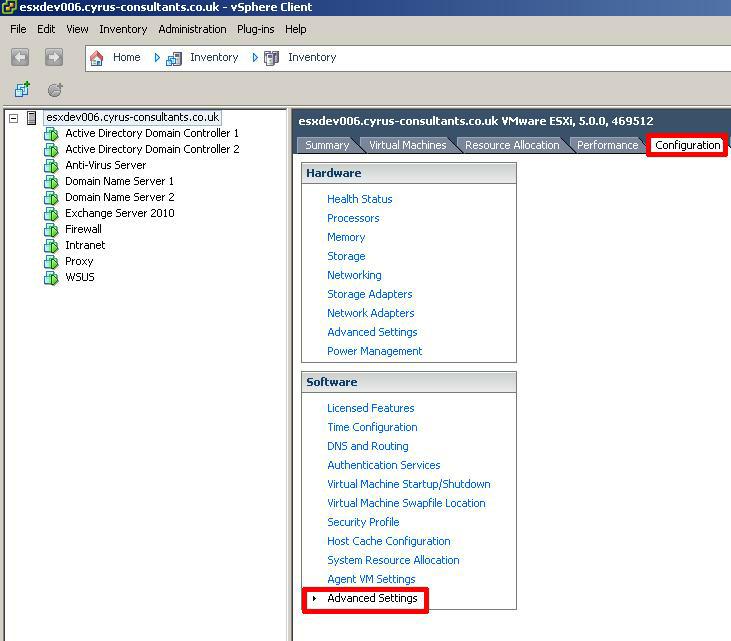
Using the VMware vSphere Client, Login and Connect to the ESXi server, using IP address or hostname of the ESXi server, using root username and password credentials. If you have a VMware vSphere vCenter server, you could also specify IP address or hostname of the vCenter server.
Using the VMware vSphere Client, Login and Connect to the ESXi server
2
Select the Configuration Tab
Once you are logged into and connected to the host ESXi or vCenter server, Select the host ESXi server, followed by the Configuration Tab.
Configuration Tab
3
Select the Advanced Settings option
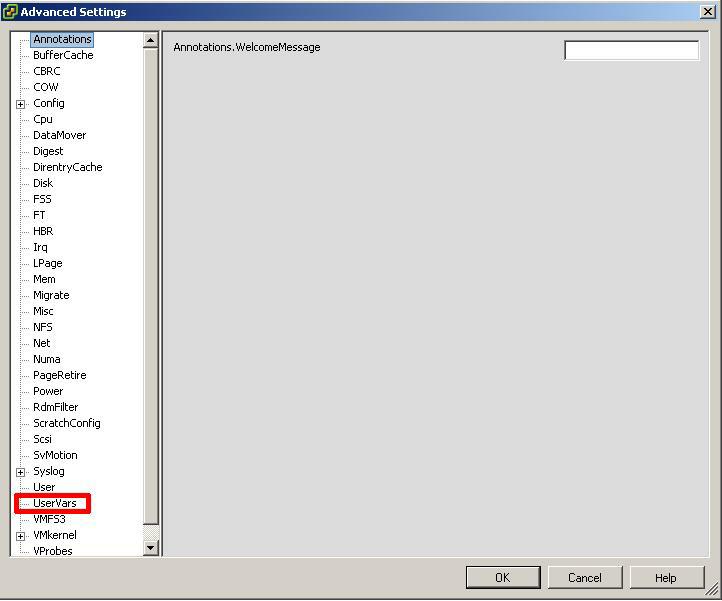
Click the Advanced Settings option at the bottom of the list.
Advanced Settings
After Clicking Advanced Settings the following Advanced Settings dialogue box will open as shown in the following screenshot.
UserVars
4
Navigate to the UserVars variable
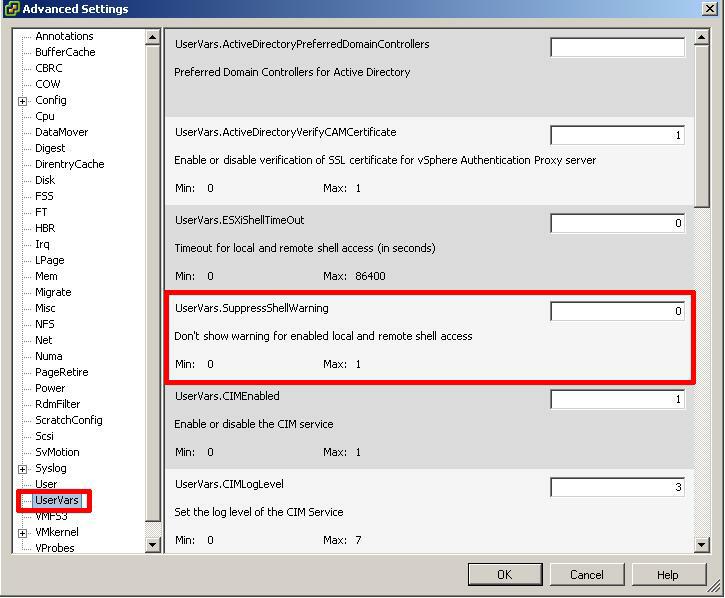
Navigate to and Click the UserVars section.
Set the value of UserVars.SuppressShellWarning from 0 to 1.
Set the value of UserVars.SuppressShellWarning from 0 to 1.
UserVars.SuppressShellWarning set to 1
Click OK.
The Configuration Issues yellow box in the Summary Page and Warning Triangle will disappear immediately.
Please note: the variable UserVars.SuppressShellWarning is only available in ESXi 4.1 U2, ESXi 5.0 and vCenter Server 4.1 U2 and 5.0 only.


![[Valid RSS]](http://andysworld.org.uk/images/valid-rss.png "Validate my RSS feed")