Archive for the ‘computing’ Category

I’m now a VMware Savant at @ExpertsExchange

Saturday, May 18th, 2013

It finally happened on the 1st May 2013. In the Gaming-World, I’ve leveled-up!

vmwaresavant

My Experts Exchange Savant Certificate

ee-1stmay2013

Before 1st May 2013: - VMware Prodigy

ee-3rdmay2013

After 1st May 2013: Note change! VMware Savant

I’ve now joined a very exclusive club, it was going to happen sooner or later, I’m now a VMware Savant at Experts-Exchange.com. As of this post, there are only 11 out of 119,793, and I’m now number 12! Here are the other Experts and their Zones.

angelIII – MS SQL Server

capricorn1 – Microsoft Access Database

Sembee – Exchange Email Server

mlmcc – Crystal Reports Software

objects – Java Programming Language

Ray_Paseur – PHP Scripting Language

rorya – Microsoft Excel Spreadsheet Software

CEHJ – Java Programming Language

zorvek – Microsoft Excel Spreadsheet Software

CodeCruiser – Microsoft Visual Basic.Net

DatabaseMX– Microsoft Access Database

and finally me!

hanccocka – VMware (yes the 1st VMware Savant!)


HOW TO: Add a Dell EqualLogic PS Series Array (SAN) to System Center Virtual Machine Manager 2012 SP1 as a SMP Provider

Saturday, May 18th, 2013
In my previous Virtualisation Articles, most have featured Basic and Intermediate VMware Topics.  As a Virtualisation Consultant, we implement many different virtualisation solutions using VMware vSphere, Citrix XenServer and Microsoft Hyper-V, as per client requirements. Most fall into the VMware vSphere camp, but that does not prohibit us, from using equally good Corporate Enterprise Hypervisors from Microsoft or Citrix, as both are now “considered equal”.

In this article, we will show you HOW TO:  Add a Dell EqualLogic PS Series Array (SAN) to System Center Virtual Machine Manager 2012 SP1 as a SMP Provider.

System Center Virtual Machine Manager (SCVMM) 2012 SP1 supports the same storage arrays that were supported in SCVMM 2012, plus the SMP provider. For more information see this SCVMM 2012 Storage and Load Balancer Provider Downloads

Why and What is a SMP Provider? (Andy’s Laymans Definition)

It provides the ability to integrate SCVMM and your storage array, e.g. the ability to create logical units (LUNs) from within SCVMM, traditionally you would login to your SAN, via command line or Dell PS Group Manager using a browser. Integrating into SCVMM, you can create and manage Pools and LUNs from within SCVMM.

1

Prerequisites

  • Compatible Dell EqualLogic PS Series Array (SAN) running 5.2.4 FW or higher
  • Microsoft Windows Server 2012
  • Microsoft System Center Virtual Machine Manager 2012 SP1 (SCVMM)
  • Dell EqualLogic Host Integration Tools 4.5.0
  • SCVMM 2012 SP1 Host with access to your iSCSI storage network or subnet

To obtain the Dell EqualLogic Host Integration Tools 4.5.0, requires registration of your Dell EqualLogic PS Series Array with the Dell EqualLogic website, and obtaining a username and password. Then you can proceed and download the required software.

It is beyond the scope of this document, to show how to install Microsoft System Center Virtual Machine Manager 2012 SP1 (SCVMM) on Microsoft Windows Server 2012, and connect to your Dell EqualLogic PS Array. It is assumed that you have already installed Microsoft System Center Virtual Machine Manager 2012 SP1 (SCVMM) on Microsoft Windows Server 2012, and connected to your Dell EqualLogic PS Series Array.

Dell Equallogic Support Web Site (requires login)

  • Dell Equallogic Support WebSite

Dell Equallogic Support WebSite

Click the Software/Firmware, View Recommended Releases Here link on the Support Homepage.
  • HIT Kit for Microsoft

HIT Kit for Microsoft

Click the HIT Kit for Microsoft link.
  • HIT Kit for Microsoft

HIT Kit for Microsoft

Click the links and download the following package
Host Integration Tools for Microsoft® v4.5 – 64-bit – EXE

2

Installation of Host Integration Tools for Microsoft® v4.5 – 64-bit

In this tutorial we will complete a very quick and basic setup and by no means exhaustive. Refer to the Dell PS documentation that comes with the HIT KIT for all the available options.

  • Install HiT 4.5 on the Windows 2012 Server

Install HiT 4.5 on the Windows 2012 Server

Install Host Integration Tools (HIT) 4.5 on the Windows 2012 server that runs SCVMM 2012 SP1, The installation program will complete all the set up required.

If the server is not accessing the storage directly, DSM installation can be skipped. PowerShell and SMP are required, it can work without ASM but then all configuration must be done through Powershell. It’s probably unlikely that your SCVMM 2012 SP1 server needs to access any VM LUNs.

We have discovered recently that if configuration is performed through the Auto Snapshot Manager GUI there is an issue, with the group admin credentials being correctly parsed to the configuration, and therefore we would recommend ALL configuration to be performed via Windows Powershell

  • Start Windows Powershell

Start Windows Powershell

Start Windows PowerShell from the New Windows 2012 UI or start EqualLogic Powershell Tools, if you start the later you don’t have to import the EqualLogic PowerShell Snapin. (EqlPSTools.dll), and you can skip the step below.
  • Starting Windows Powershell

Starting Windows Powershell

Starting Windows Powershell
  • Find the Path to EqlPSTools.dll

Find the Path to EqlPSTools.dll

Find the path to EqlPSTools.dll, the default location for the powershell snapin is C:Program FilesEqualLogicbin.
  • Import-Module -Name ‘C:Program FilesEqualLogicbinEqlPSTools.dll’

Import-Module -Name 'C:Program FilesEqualLogicbinEqlPSTools.dll'

Type Import-Module -Name ‘C:Program FilesEqualLogicbinEqlPSTools.dll’ in the Powershell window.
  • Check the Snapin is Registered

Check the Snapin is Registered

You can check the EqualLogic PowerShell Snapin is registered by typing
Get-PSSnapin -Registered

Create a new group and assign access, using the PS Group Name, Group IP Address, Management IP Address and grpadmin credentials.  The new group name is not to be confused with the group name, that’s already been created on the Array. This is a “label” for the powershell creation process, so its good idea to use the same group name, but the two are not connected in anyway.

The syntax and command to use is

New-EqlGroupAccess -groupname GROUPNAME -GroupWKAddress 10.10.1.1 -MgmtWKAddress aaa.bbb.89.176 -username grpadmin -Password password

It is recommended to have a Group IP Address, in the example above 10.10.1.1, and a Dedicated Management IP Address – aaa.bbb.89.176

Type the following in the Windows Powershell window.

New-EqlGroupAccess -GroupName Group -GroupWKAddress 10.10.1.1 -MgmtWKAddress aaa.bbb.89.176 -UserName grpadmin -Password grpadmin

  • New-EqlGroupAccess -groupname [b]GROUPNAME[/b] -GroupWKAddress 10.10.1.1 -MgmtWKAddress aaa.bbb.89.176 -username grpadmin -Password password

New-EqlGroupAccess -groupname [b]GROUPNAME[/b] -GroupWKAddress 10.10.1.1 -MgmtWKAddress aaa.bbb.89.176 -username grpadmin -Password password

  • Dell EqualLogic Auto Snapshot Manager

Dell EqualLogic Auto Snapshot Manager

In Dell EqualLogic Auto Snapshot Manager, PS Group Access can be checked and modified if required. (please see note above about issues with the ASM GUI)
  • Update-StorageProviderCache

Update-StorageProviderCache

Restart the server running SCVMM 2012 SP1 or type the following cmdlet in the Windows Powershell window.
Update-StorageProviderCache

3

Start the SCVMM 2012 SP1 client and connect to the SCVMM 2012 SP1 server

  • SCVMM Client

SCVMM Client

Start the SCVMM 2012 SP1 client and connect to the SCVMM 2012 SP1 server
  • Click Fabric Resources

Click Fabric Resources

The first panel which is displayed is the VMM Home page, Click Fabric Resources
  • Storage Providers

Storage Providers

The Dell EqualLogic PS Array provider (SMP) will show up under Storage / Providers.
Before the provider will be available in SCVMM, another cmlet needs to be typed into the Windows Powershell window.
  • Import-SCStorageProvider

Import-SCStorageProvider

Type Import-SCStorageProvider in the Windows Powershell window. Depending upon the number of pools this could take quite a while to complete. Restart or refresh SCVMM 2012 SP1 client. This is how the SMP will look, status should be ‘Responding’.
  • Providers Added

Providers Added

If you click Arrays, you will see your PS Array Group, it should be Responding, and report Manufacturer and Model of Array, Total and Used Capacity.
  • Arrays

Arrays

Congratulations, you have successfully Added a Dell EqualLogic PS Series Array (SAN) to System Center Virtual Machine Manager 2012 SP1 as a SMP Provider.

In my next article in this series, we will show you how to assign VMM managed pools, and created logical units in the pools.

References
White paper on Windows Server 2012 Storage. Great resource to get more information on new features Storage Spaces, ReFS, SMB 3.0, CSV2, Hyper-V Storage. You can see where the SMP provider sits in the storage stack on page 39

Overview of SCVMM 2012 SP1

What’s new in SCVMM 2012 SP1

Virtual Machine Manager in depth

You can download evaluation System Center trial and Windows 2012 server VHD’s from here

Barclaycard! What is this PayTag crap?

Friday, May 3rd, 2013

It’s Friday, the end of the week, Bank Holiday Weekend, and I’m going to have a RANT!

In the post the other day I received this item from Barclaycard, it’s called a PayTag.

paytag

It’s a contact-less payment system,

the instructions state “Just snap off your PayTag sticker and remove the protection backing. Then, just stick it onto the back of your mobile”.

Hang on, lets just rewind there…..Then, just stick it onto the back of your mobile..

WHAT, Why would I stick this crap, on the back of my nice new shiny Nexus 4!

I do wonder if Barclaycard had surveyed it’s customer asking them if they wanted to stick this crap, on their new shiny “eye-candy” expensive mobile phone!

A comment from one colleague “why would I stick that on my phone worth a couple of hundred quid!”

Not very scientific, but I surveyed 6 colleagues in my department, ALL of which have just purchased new shiny mobile phones

  • Google Nexus 4 (4)
  • iPhone 5 (1)
  • White Nokia Lumia 920 (1)
  • HTC (something) (1)

Not one of the above people, after showing them the PayTag, wanted to stick this crap on their shiny new mobile phone!

My phone shares the same pocket as my wallet, so why would I not just get my wallet out with my Barclaycard!

Barclaycard, here’s a thought, why not just Develop an iPhone or Android App!

HOW TO: Synchronize changes when completing a P2V or V2V with VMware vCenter Converter Standalone 5.1

Friday, May 3rd, 2013
HOW TO:  Synchronize changes when completing a P2V or V2V with VMware vCenter Converter Standalone 5.1

OR

“Poor Man’s Replication of a Physical or Virtual machine to a VMware vSphere Hypervisor Host (ESXi) for FREE”

I have already written three articles on the use of VMware vCenter Converter Standalone 5.x.

VMware vCenter Converter Standalone primary function is to create physical to virtual copies or conversions of physical computers, we often abbreviate this to P2V. VMware vCenter Converter Standalone can also be used on computers that have already been converted to virtual computers, or virtual computers that already exist in a “Cloud Space”, so we can create copies or conversions of an existing virtual computer, we often  abbreviate this to V2V

VMware vCenter Converter Standalone is an excellent FREE software tool for creating P2Vs or V2Vs, but there is another often “hidden function” which is rarely used by VMware Administrators. The function is called Synchronize. This function can be used to Synchronize changes between a physical or virtual computer, which has already been P2Ved (V2Ved) to another virtual machine on another VMware vSphere Hypervisor (ESXi) host. The same function can be used, to help unattended “cut over times” when completing a P2V (V2V) in Production, you could create the original P2V (V2V) at 9.00am, and then using synchronize, finally sync all changes made during the day, and “cut over” to the virtual machine out of hours, at 23.00pm.

Some of our clients use this software and function, as a free alternative to replication to a second DR site and ESXi host. The ESXi host could be using the FREE VMware vSphere Hypervisor.

In this article, I’ll show you HOW TO:  Synchronize changes when completing a P2V or V2V with VMware vCenter Converter Standalone 5.1. In the example below I’ll be using a virtual machine, creating a V2V and then synchronizing additional changes made to the source virtual machine to the destination VM (our DR copy).

1

Install VMware vCenter Converter Standalone 5.1

Install VMware vCenter Converter Standalone 5.1 on the computer to be synchronized. In this example, I will be installing VMware vCenter Converter Standalone 5.1  on the virtual machine.

  • VMware vCenter Converter Standalone 5.1 – Installing

VMware vCenter Converter Standalone 5.1 - Installing

It is a very easy installation, click Next and follow the wizard, agreeing to the terms of the license agreement, select the default installation folder, and select Local installation
  • VMware vCenter Converter Standalone 5.1 – Local Installation

VMware vCenter Converter Standalone 5.1 - Local Installation

Click Next, and follow the installation wizard to the end, and Click Finish.
  • VMware vCenter Converter Standalone 5.1 – Finish

VMware vCenter Converter Standalone 5.1 - Finish

If you left the Tick in the Box for Run Converter Standalone Client now. VMware vCenter Converter Standalone will start, otherwise you will need to click the icon on your desktop.

2

Creating a P2V (V2V in this example) for synchronization

  • VMware vCenter Converter Standalone 5.1 – Welcome Screen

VMware vCenter Converter Standalone 5.1 - Welcome Screen

At the Welcome to VMware vCenter Converter Standalone, welcome screen click the Convert machine button. (This machine could be a physical or virtual machine, VMware vCenter Converter Standalone does not care what machine type it is.)
  • VMware vCenter Converter Standalone 5.1 – Convert Machine

VMware vCenter Converter Standalone 5.1 - Convert Machine

Select the Default option

Select source type: Powered-on-machine

Specify the powered-on machine: This local machine

followed by Next to continue, converter will identify the source machine.

  • VMware vCenter Converter Standalone 5.1 – Specify vCenter Server

VMware vCenter Converter Standalone 5.1 - Specify vCenter Server

Select destination type: VMware Infrastructure machine

Enter the destination server, username and password, in this example, I’m using our VMware vSphere vCenter server details, but if you wanted to synchronize/replicate to a standalone VMware vSphere Hypervisor (ESXi) host, you would enter the VMware vSphere Hypervisor (ESXi)  host details here, e.g. root username and password.

  • VMware vCenter Converter Standalone 5.1 – Specify Destination Machine name

VMware vCenter Converter Standalone 5.1 - Specify Destination Machine name

Specify the destination name of the machine followed by Next
  • VMware vCenter Converter Standalone 5.1 – Specify Destination Location

VMware vCenter Converter Standalone 5.1 - Specify Destination Location

Specify the destination location for the machine followed by Next, if you are using a VMware vSphere vCenter Server and have a VMware Cluster created, you will have additional options to specify which VMware vSphere Hypervisor (ESXi) host to create the new virtual machine, also specify the datastore location. Ensure the virtual machine version matches the original VM, in this example v8.0.
  • VMware vCenter Converter Standalone 5.1 – Enable Synchronize

VMware vCenter Converter Standalone 5.1 - Enable Synchronize

If you click Next at this point, the P2V (V2V) will complete as normal.

To enable the Synchronize function, you MUST select Edit

  • VMware vCenter Converter Standalone 5.1 – Enable Synchronise

VMware vCenter Converter Standalone 5.1 - Enable Synchronise

Ensure Synchronize changes is selected and ticked.

Ensure Perform final synchronization is Un-ticked.

If you wanted to perform, a Scheduled Synchronize, select and set the Schedule Option. Select Next to continue, review the Summary screen, and select Finish.

  • VMware vCenter Converter Standalone 5.1 – Summary Screen

VMware vCenter Converter Standalone 5.1 - Summary Screen

A P2V job will be submitted and the P2V conversion will start.
  • VMware vCenter Converter Standalone 5.1 – P2V Job Submitted

VMware vCenter Converter Standalone 5.1 - P2V Job Submitted

If you click the Task Id, you can check on the Task Progress.
  • VMware vCenter Converter Standalone 5.1 – Task Progress

VMware vCenter Converter Standalone 5.1 - Task Progress

3

Synchronize Changes

Once the initial P2V (V2V) conversion has completed, or “seeded” a new virtual machine, you can use the Synchronize function to replicate any changes that occur on the source machine to the virtual machine, the source machine could be a physical or virtual machine. (You can check the virtual machine by disconnecting networking, and powering up the virtual machine).

  • VMware vCenter Converter Standalone 5.1 – Job Status

VMware vCenter Converter Standalone 5.1 - Job Status

The Job Status should state Completed. Right Click the Task Id and select Go to job
  • VMware vCenter Converter Standalone 5.1 – Go to Job

VMware vCenter Converter Standalone 5.1 - Go to Job

You will notice that the Status states Not Scheduled, this is because we did not set a schedule.
  • VMware vCenter Converter Standalone 5.1 – Not Scheduled

VMware vCenter Converter Standalone 5.1 - Not Scheduled

Right Click the Job Id, and select Synchronize.
  • VMware vCenter Converter Standalone 5.1 – Synchronize

VMware vCenter Converter Standalone 5.1 - Synchronize

Click Next
  • VMware vCenter Converter Standalone 5.1 – Synchronize changes

VMware vCenter Converter Standalone 5.1 - Synchronize changes

Check the Summary page and Click Finish
  • VMware vCenter Converter Standalone 5.1 – Finish

VMware vCenter Converter Standalone 5.1 - Finish

Click the View by Jobs
  • VMware vCenter Converter Standalone 5.1 – Synchronize Task Progress

VMware vCenter Converter Standalone 5.1 - Synchronize Task Progress

You will notice your Synchronize Job is Running, and it will have a new Synchronize icon, next to the job. All changes in the source machine will be synchronized or replicated to the virtual machine.

Congratulations you have successfully created a P2V (V2V) and Synchronized (replicated) your machine to a virtual machine.

HOW TO: P2V, V2V for FREE – VMware vCenter Converter Standalone 5.1

Thursday, May 2nd, 2013

HOW TO:  P2V, V2V for FREE – VMware vCenter Converter Standalone 5.1

If you need to complete a Physical to Virtual (P2V), Virtual to Virtual (V2V) conversion to a VMware product (VMware Workstation, Player or vSphere) for FREE, then there is some good news…VMware vCenter Converter Standalone 5.1 was released on 25 April 2013, and this latest version has new support for the following:-

  • Support for virtual machine hardware version 9
  • Guest operating system support for Microsoft Windows 8 and Microsoft Windows Server 2012
  • Guest operating system support for Red Hat Enterprise Linux 6
  • Support for virtual and physical machine sources with GUID Partition Table (GPT) disks
  • Support for virtual and physical machine sources with Unified Extensible Firmware
  • Interface (UEFI)
  • Support for EXT4 file system

Also fixes numerous issues with crashing and conversion issues, when converting physical or virtual computers to VMware vSphere vCenter Server 5.1 and VMware Hypervisor ESXi 5.1.

  • VMware vCenter Converter Standalone v5.1

VMware vCenter Converter Standalone v5.1

While I would recommend and use VMware vCenter Converter Standalone 5.1, there are other commercial products that do exist, and I have used.

If you have a large estate of physical machines to migrate, these products have a scheduler and can perform automated workflows, but these are commerical products and not FREE like VMware vCenter Converter Standalone 5.1

NETIQ Platespin Migrate

Acronis vmProtect

Storagecraft Shadow Protect

Symantec System Recovery Server Edition

If the operating system is Windows 2003, Windows 2000 or Windows NT 4.0, select and earlier version of VMware vCenter Converter Standalone version 3.0.3 or 4.0, support for early operating systems has been removed now from v5.1.

if you have recently upgraded to vSphere vCenter Server 5.1, and are looking for the Convert/Import vCenter plugin which existed with 4.x, it’s now longer available, and has been removed, and you will need to use  VMware vCenter Converter Standalone 5.1 for your conversions.

Download VMware vCenter Converter 5.1 here
VMware vCenter Converter Standalone 5.1 Documentation
VMware vCenter Converter Standalone 5.1 User Guide


If you have issues, you may want to consult the following articles and guides

Best Practice Video Guide here

Some Videos I’ve develeoped to show the VMware vCenter Converter process.

A Tutorial video by me:- Restore a Virtual Machine using the FREE VMware vCenter Converter to VMware vSphere 4.x, 5.0 ESXi 4.x, ESXi 5.0, ESX 4.0

A Tutorial video by me:- Backup VMware vSphere 4.x, 5.0 ESXi 4.x, ESXi 5.0, ESX 4.0 for FREE using VMware vCenter Converter

A Tutorial video by me:- VMware vCenter Converter Standalone 5.0 Convert monolithic sparse to monolithic flat for use with VMware vSphere 4.x 5.0 ESXi 4.x 5.0

What’s your Cloud Cred?

Monday, April 15th, 2013

VMware have launched a CloudCredibility website, what’s your Cloud Cred?, you get points for completing various Cloud Tasks (some with a VMware twist!).

I’m currently in team vExperts2 – (there are only 6 of us at present, hopefully more will join!)

My Team Members are:-

LucD – http://lucd.info

Andreas Peetz – http://www.v-front.de

Ed Czerwin

nielsengelen – http://foonet.be

Chris …

Update: I got 50 Cloud Cred Points for blogging this!

Completed Windows Server 2012 “Early Experts” Knowledge Quests

Monday, March 25th, 2013

Why not try the Windows Server 2012 “Early Experts”  Challenge

The Windows Server 2012 “Early Experts” Challenge provides a FREE online study group with certification exam preparation materials for quickly learning about the latest version of Windows Server! The Challenge involves a series of Knowledge Quests – starting with the Apprentice Quest – and each Quest ends with a special completion certificate for you to promote your new knowledge! To make it easy to participate, each Quest is developed in a modular format that you can complete based on your own schedule and availability.

The first six Knowledge Quests are available now – Apprentice, Installer, Explorer, Networker, Virtualizer and Cloud.

After you’ve completed the “Early Experts” Apprentice Quest, keep going with these additional Knowledge Quests to continue your preparation for the MCSA on Windows Server 2012 Exams:

  • Installer Quest: Targeting the Install, Configure and Active Directory exam objectives on Exams 70-410 and 70-417.
  • Explorer Quest: Targeting the Group Policy and Server Management exam objectives on Exam 70-410.
  • Networker Quest: Targeting the Core Network Services exam objectives on Exam 70-410.
  • Virtualizer Quest: Targeting the Hyper-V Server Virtualization exam objectives on Exam 70-410.
  • Cloud Quest: Build a Windows Server 2012 Study Lab network in the Cloud.

I’ve completed all six Knowledge Quests, and here are my Certificates, it takes a few days to complete all the Knowledge Quests, and boosts your overall knowlegde of Windows Server 2012, the Cloud Quest is very good. – Highly Recommended and FREE!

Thanks to Keith Mayer and Microsoft.

windows-server-2012-early-experts-cloud-certificate

windows-server-2012-early-experts-virtualizer-certificate

windows-server-2012-early-experts-networker-certificatewindows-server-2012-early-experts-explorer-certificate

windows-server-2012-early-experts-installer-certificate

windows-server-2012-early-experts-apprentice-certificate

No.22 @ExpertsExchange

Thursday, February 28th, 2013

ee-28-feb-2013-no22 Climbing the ladder, slowly….

HOW TO: Connect to the VMware vSphere Hypervisor 5.1 (ESXi 5.1) using the vSphere Client

Tuesday, February 26th, 2013
In my previous VMware Articles, most featured Intermediate VMware Topics. My next series of articles will concentrate on topics for the VMware Novice; this is the second article in this series.

In this series of basic VMware articles for the Novice, I’ll be showing you the basic VMware skills required to install, configure and deploy virtual machines using VMware’s FREE VMware vSphere Hypervisor (ESXi).

This article will show you how to connect and complete some basic configuration of the VMware vSphere Hypervisor 5.1 on a computer. VMware vSphere Hypervisor 5.1 is also known as ESXi 5.1.

If you have missed the first article in the series, it’s here: HOW TO: Install and Configure VMware vSphere Hypervisor 5.1 (ESXi 5.1)

1

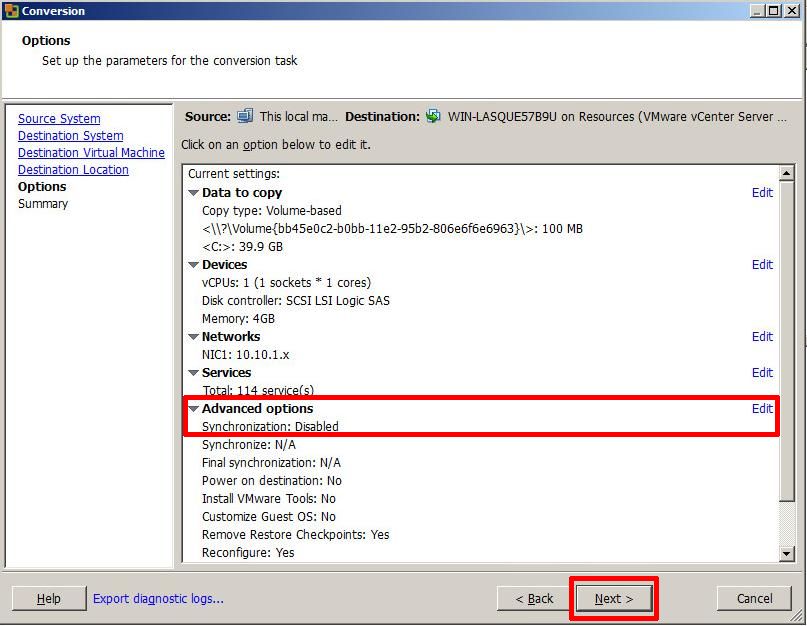
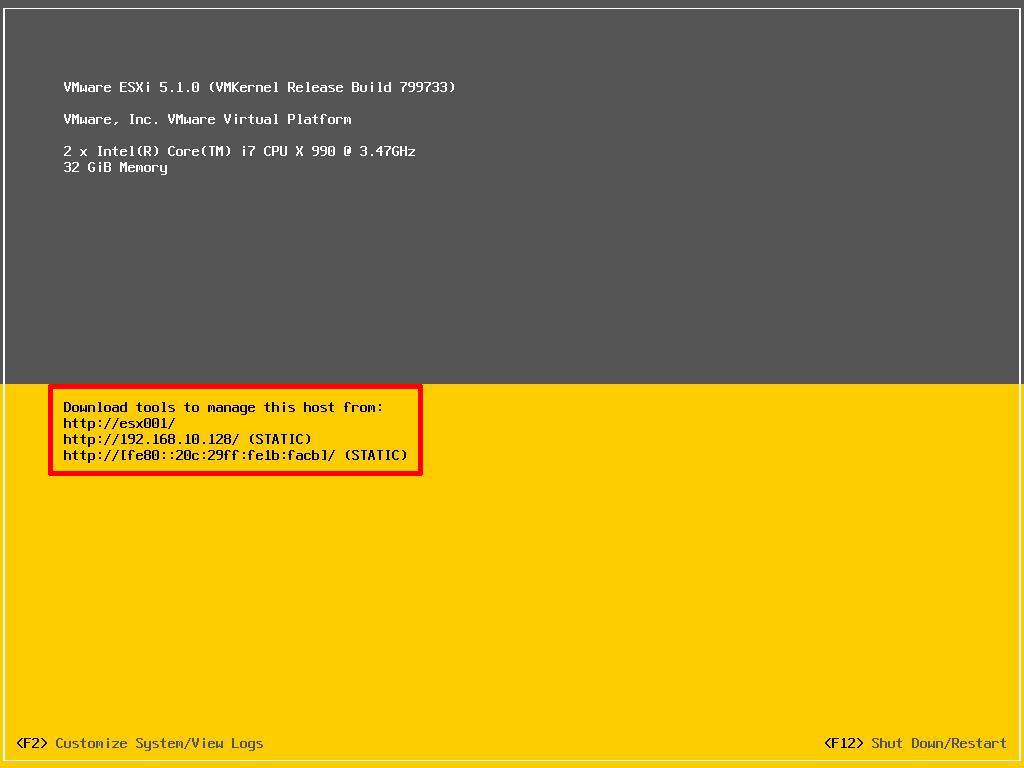
Download Tools to Manage the ESXi Host Server

  • ESXi 5.1 DCUI (console) when Server has completed the Boot process

ESXi 5.1 DCUI (console) when Server has completed the Boot process

When the VMware vSphere Hypervisor (ESXi 5.1) server is fully BOOTED and started the above screen is displayed. This screen is called the Direct Console User Interface (DCUI). The majority of the management is performed remotely from another Windows computer using software tools called the VMware vSphere Client. You cannot manage or install virtual machines from the ESXi 5.1 server console; this must be completed remotely from another computer.

You can obtain the VMware vSphere Client software package (VMware-viclient-all-5.1.0-786111.exe) from the VMware website, as detailed in the first article of this series:
HOW TO: Install and Configure VMware vSphere Hypervisor 5.1 (ESXi 5.1) or you can download the software from the VMware vSphere Hypervisor (ESXi 5.1) .

Make a note of the IP Address of the server which is displayed on the console, and using a web browser, browse to the web URL http://192.168.10.128. (This is the IP Address displayed on the console screen; your IP address will be different).

The following screen will be displayed, because VMware’s SSL certificate has been “self-signed” the warning is normal. Click Continue to this website. In this example we are using Internet Explorer 10.

  • Connecting to vSphere Hypervisor ESXi 5.1

Connecting to vSphere Hypervisor ESXi 5.1

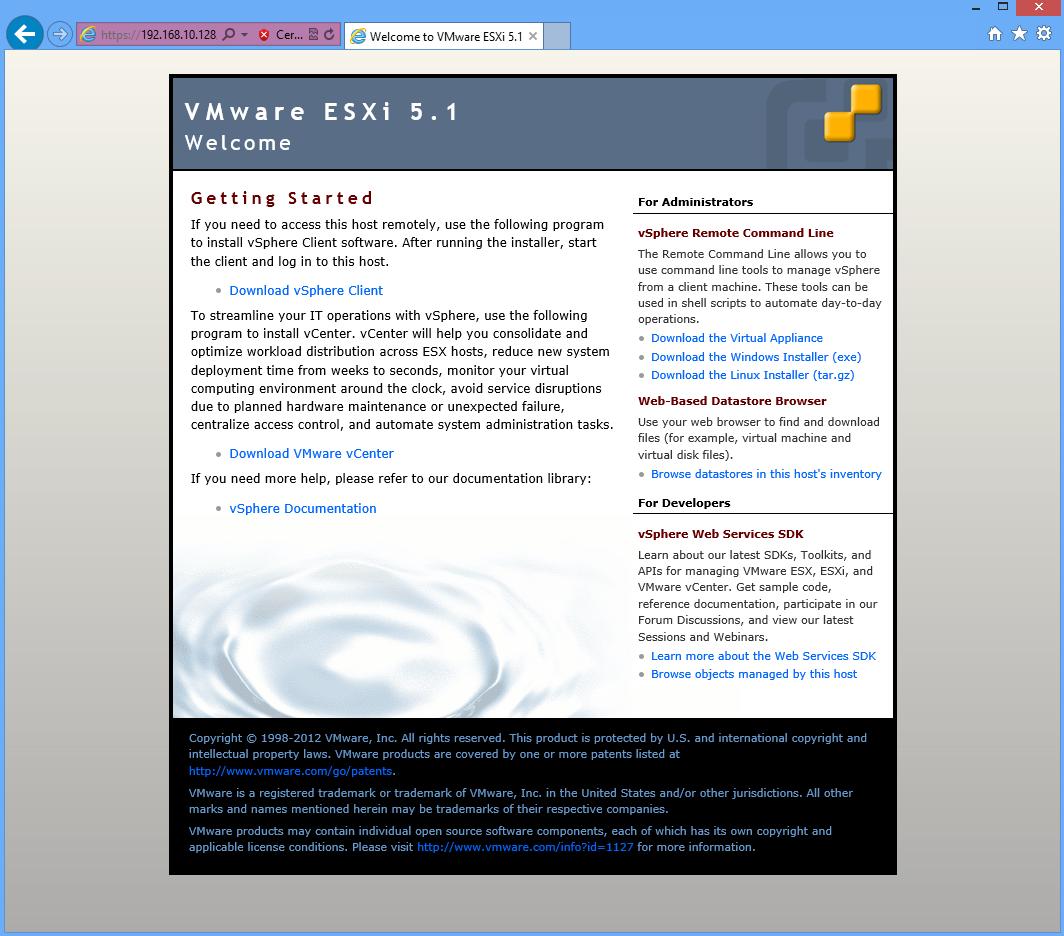
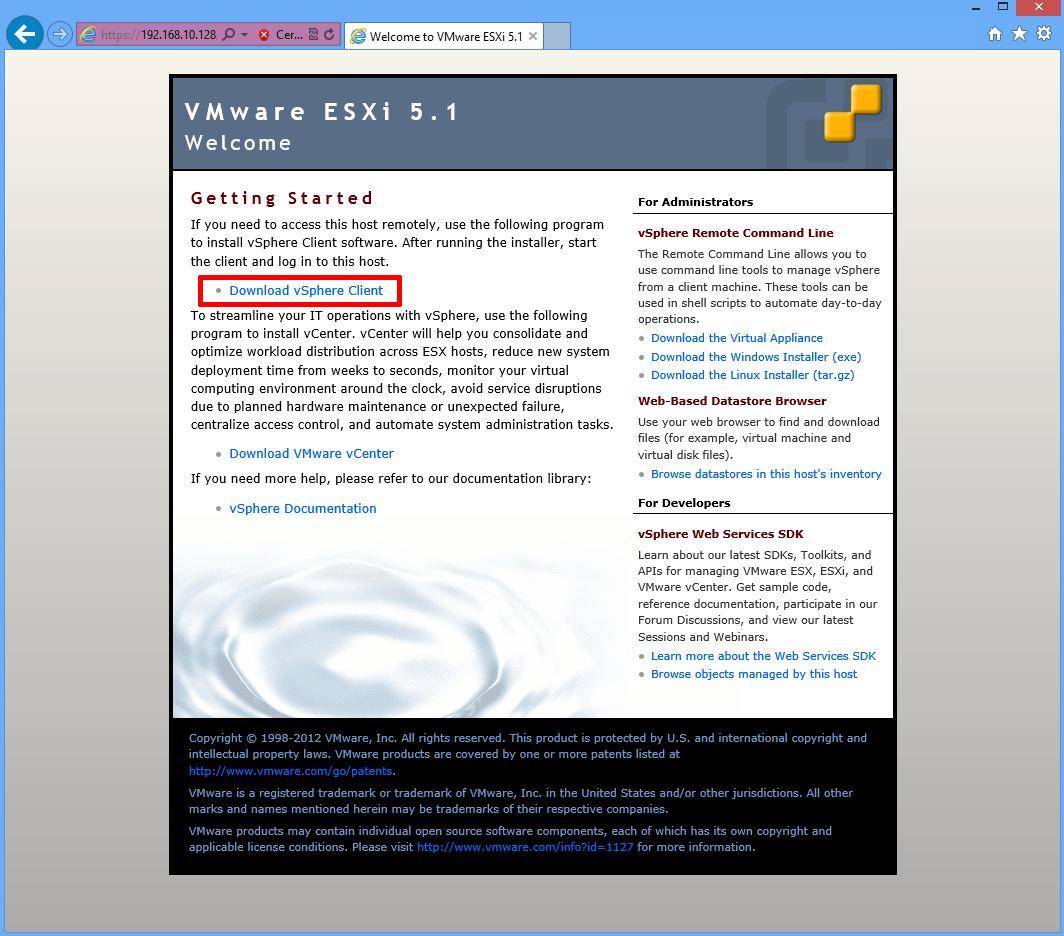
After clicking continue, the Welcome to VMware ESXi 5.1 screen will be displayed:
  • Welcome to VMware ESXi 5.1 screen

Welcome to VMware ESXi 5.1 screen

Click Download vSphere Client
  • Click Download vSphere Client

Click Download vSphere Client

This link used to download the vSphere Client from the ESXi Host server, but has recently been replaced to a VMware Link (http://vsphereclient.vmware.com/vsphereclient/7/8/6/1/1/1/VMware-viclient-all-5.1.0-786111.exe), so you can either download direct from VMware, or find the link through your ESXi 5.1 server. This does test that your ESXi 5.1 Host basic networking is working correctly.

For the sake of this article, we are going to download the vSphere Client from VMware, using the web link included on the Welcome to VMware ESXi 5.0 page. At the following prompt click Save.

  • Do you want to run or save VMware-viclient-all-5.1.0-786111.exe 347MB from vsphereclient.vmware.com?

Do you want to run or save VMware-viclient-all-5.1.0-786111.exe 347MB from vsphereclient.vmware.com?

Depending upon your Internet download speed, this can take between two and 30 minutes, as it is approximately 350MB in size.

2

Installing the VMware vSphere Client

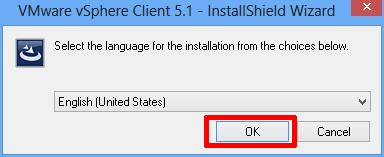
Once the download has been completed click Run. The setup files will be extracted, and the VMware vSphere 5.1 Client InstallShield Wizard will appear.

  • VMware vSphere 5.1 Client InstallShield Wizard

VMware vSphere 5.1 Client InstallShield Wizard

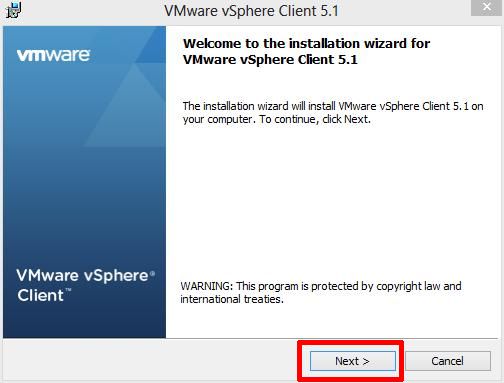
Click OK to Continue. The following Welcome screen will appear, Click Next to Continue.
  • Welcome to the installation wizard for VMware vSphere Client 5.1

Welcome to the installation wizard for VMware vSphere Client 5.1

That is followed by Next to Continue on the End-User Patent Agreement screen
  • End-User Patent Agreement screen

End-User Patent Agreement screen

Select “I agree to the terms of the license agreement” on the VMware End User License Agreement screen and Click Next to Continue.
  • VMware End User License Agreement

VMware End User License Agreement

Select the Destination Folder. We recommend the Default location C:\Program Files (x86)\VMware\Infrastrucuture\ followed by Next to Continue. (The VMware vSphere Client in this Tutorial is being installed on a 64-bit version of Windows, so this is the reason for the x86 reference. Your location could read C:\Program Files\VMware\Infrastrucuture\).
  • Select Destination Folder

Select Destination Folder

Click Install to Continue at the Ready to Install the Program screen
  • Ready to Install the Program

Ready to Install the Program

Click Finish to Complete the installation of the VMware vSphere Client.
  • Installation Completed

Installation Completed

3

Connecting to the VMware vSphere Hypervisor ESXi 5.1 server

Click the VMware vSphere Client icon on your computer Desktop, or click Start > Programs > VMware > VMware vSphere Client icon

  • VMware vSphere Client icon

VMware vSphere Client icon

Using the VMware vSphere Client, login and connect to the VMware vSphere Hypervisor ESXi 5.1 server, using the IP address or hostname of the ESXi server, using the root username and password credentials.

In this tutorial the IP address of the ESXi 5.1 server is displayed on the console in Step 1. The IP address is 192.168.10.128. Enter the IP address, and username root, followed by the password. Click Login.

  • VMware vSphere Client logon.jpg

VMware vSphere Client logon.jpg

A Security Warning will appear, stating an untrusted SSL certificate is installed on your server. This is normal, because it’s a VMware “self-signed” certificate and can be replaced. (We will cover this in a later article in the series). Click Ignore and Tick the box to Install.
  • Security Warning

Security Warning

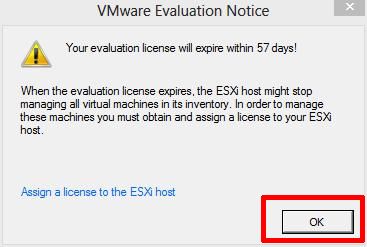
Click OK to acknowledge the VMware Evaluation Notice
  • VMware Evaluation Notice

VMware Evaluation Notice

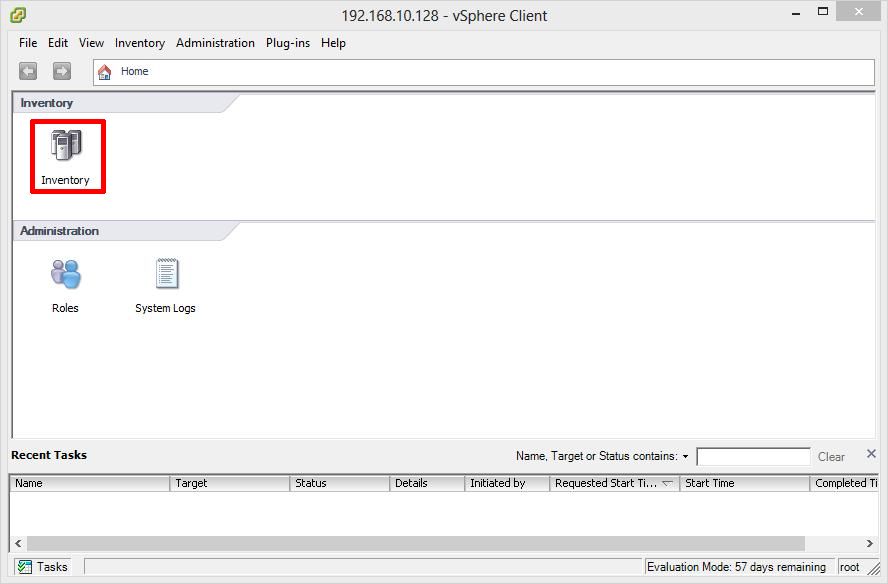
You are now connected to the VMware vSphere Hypervisor ESXi 5.1 Server. Click the Inventory icon, to see the server’s Inventory.
  • vSphere Client Connected to ESXi 5.1 Server

vSphere Client Connected to ESXi 5.1 Server

The following Inventory is displayed. You will notice it states The ESXi host does not have persistent storage. To store virtual machines (often referred to as Guests or VMs, the VMs must be stored and reside on an ESXi host datastore. The VMware vSphere Hypervisor ESXi server has a compatible filing system called VMFS (similar to Microsoft Windows NT/2000/XP/2003/2008/2012/7/8, which has its own filing system called NTFS). There are two versions of VMFS: VMFS-3 for earlier versions of vSphere e.g. 3.x and 4.x, and WMFS-5 for vSphere 5.x.

4

Conducting a simple task using the VMware vSphere Client

In this step, we will complete a simple task using the vSphere Client, this task is to Create a new VMFS datastore, so we can store VMs. This is the minimum configuration requirement for your ESXi host.

  • Click here to create a datastore

Click here to create a datastore

Click “Click here to create a datastore…”

At the Add Storage screen select Disk/LUN followed by Next to Continue, personally we feel the dialgoue box should be called Add New Storage e.g. it’s storage which has never been allocated or presented for use with a VMware server.

  • Select Disk/LUN

Select Disk/LUN

At the next screen select the actual Disk or LUN, pay special attention to the sizes shown. The size should match the size of disk, LUN or array size you have created for your VMFS datastore, followed by Next to Continue. In this tutorial we are going to select the 40GB Disk/LUN, the first entry in the list.
  • Select the Disk or LUN

Select the Disk or LUN

At the VMFS file system version select VMFS-5. Only select VMFS-3 if you require mixed-mode support with versions of ESX/ESXi less than 5.0. Click Next to Continue.
  • File System version

File System version

The Current Disk Layout will be shown. If this is a used disk, it could show other partition types. (NTFS, FAT32, Linux, Swap, ext2, ext3) Click Next to Continue. This is a new disk in this tutorial, so A new partition will be created and used.
  • Current Disk Layout

Current Disk Layout

At the next screen enter the name for the datastore (do not use / \ * # ! @ (non-alpha numeric characters); it will accept them, but you will have issues later. The dash and underscore are okay.) followed by Next to Continue
  • Enter datastore name

Enter datastore name

There are many different types of naming conventions. We like to use name of the server followed by underscore (_) local for local disk, iscsi for iscsi disk, nfs for nfs storage, fibre for fibre channel, a number to indicate disk or LUN id number, followed by VMFS type, e.g. 3 or 5. For example: esxdev009_local1_vmfs5
  • Enter datastore name

Enter datastore name

At the Disk/LUN – Formatting screen, select Maximum available space, and click Next to Continue.
  • Maximum Available Space

Maximum Available Space

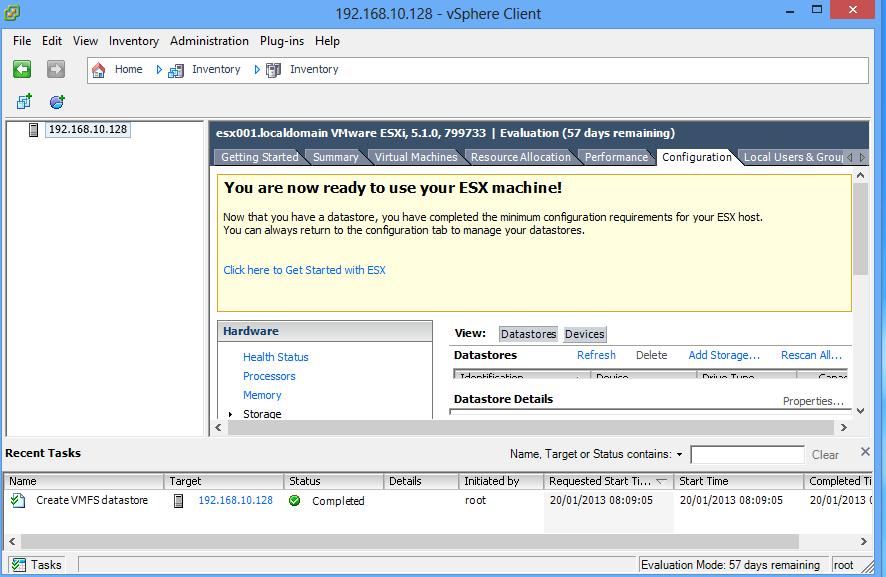
Check the Summary screen for the datastore you are about to create and Click Finish to create the datastore.
  • Datastore Summary

Datastore Summary

You are now ready to use your ESXi server.

  • Ready – ESXi

Ready - ESXi

Congratulations you have successfully installed the VMware vSphere Client, Connected to your VMware vSphere Hypervisor 5.1 server, and Created your first VMware VMFS-5 datastore ready to store Virtual Machines.

In the next article in the series, we will connect and continue to configure the VMware vSphere Hypervisor 5.1.

No.23 @ExpertsExchange

Tuesday, February 26th, 2013

ee-26-feb-2013-no23 Climbing up the ladder…..