Archive for November, 2012

HOW TO: Tag and Configure a storage device as a Solid State Disk (SSD) in VMware vSphere 5.0 or 5.1 (ESXi 5.0 or ESXi 5.1)

Thursday, November 29th, 2012
In VMware vSphere 5.x (ESXi 5.x) there is a new feature called Host Cache Configuration. This new feature allows the VMware vSphere Administrator to configure the VMware vSphere 5.x (ESXi 5.x) host server to use a cache on a Solid State Disks (SSD) for the virtual machine’s swapfile for better performance, because the SSD has much faster latency than a traditional mechanical disk. This is also known in VMware Administrator circles as Swap to Host Cache or Swap to SSD. Once Host Cache Configuration has been enabled, the virtual machines will be swapping to SSD, but this swapfile is not a true swap file, and the entire virtual machine swap file (.vswp)  is not stored on the SSD.However, not all SSD devices are correctly tagged as SSD. This tutorial shows how to tag a Non-SSD storage device as SSD, if you want to experiment with Host Cache Configuration but do not have a SSD to hand. This is not supported by VMware, tagging a non-SSD as a SSD.

The same procedure can be followed to tag a SSD, correctly, if it’s not recognized by the VMware ESXi server.

With the current fall in prices for consumer SSDs, it can give a real performance boost to a VMware ESXi 5.x server which is short on memory. Consumer SSDs e.g. Kingston SSDNow V+200 Drive Model SVP200S37A/60G are generally cheaper than server memory. We recently purchased this model for £29.99 GBP.

The commands we will be using in this Tutorial, are the esxcli commands, these commands can be executed on the ESXi shell, through the vMA or PowerCLI esxcli remote version. In this tutorial I’ll be logging into the ESXi server, and executing the commands on the ESXi shell.

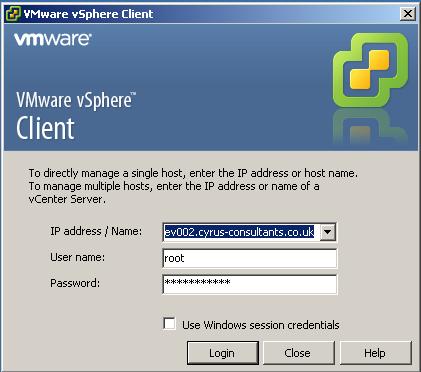
1. Connect to the VMware vSphere Hypervisor (ESXi) or VMware vSphere vCenter Server

Using the VMware vSphere Client, Login and Connect to the ESXi server, using IP address or hostname of the ESXi server, using root username and password credentials. If you have a VMware vSphere vCenter server, you could also specify IP address or hostname of the vCenter server.

  • Using the VMware vSphere Client, Login and Connect to the ESXi server

Using the VMware vSphere Client, Login and Connect to the ESXi server

2. Check and record the storage device name to be tagged as a SSD

Check there is a VMFS volume already formatted on the storage device, you want to present to the Host ESXi server, as a SSD and record the device name for later in Step 4.

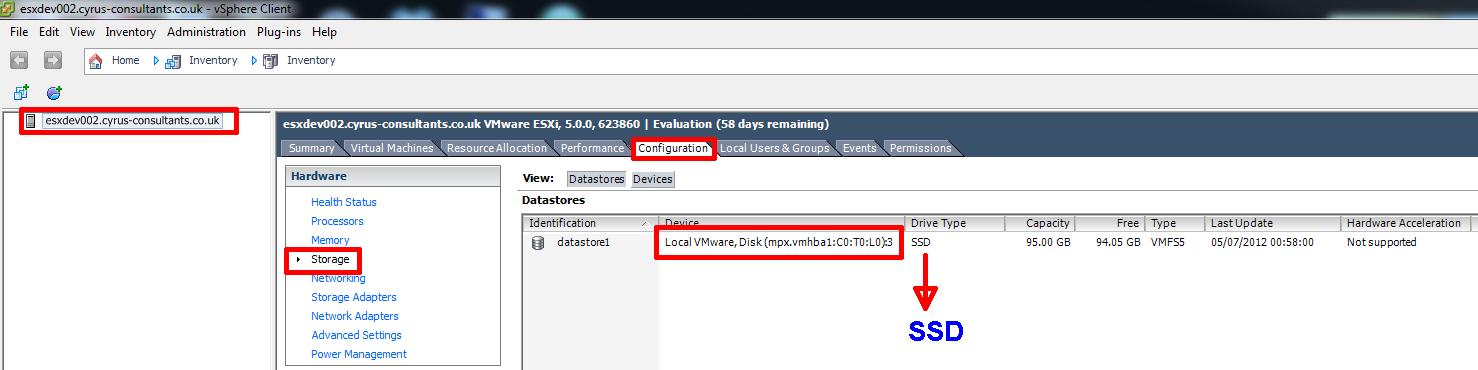
Select Host > Configuration > Storage

  • storage device to configure as SSD

storage device to configure as SSD

In the example above, the local storage device mpx.vmhba1:C0:T0:L0 is a local disk, formatted with the datastore name datastore1 as VMFS5. Record the storage device name mpx.vmhba1:C0:T0:L0.

3. Logon to ESXi console (shell) via PuTTY

Using PuTTY a free telnet and SSH client or another SSH client Login and Connect to the VMware Hypervisor ESXi server, using IP address or hostname of the VMware Hypervisor ESXi server, using root username and password credentials.

  • putty SSH terminal session

putty SSH terminal session

  • logged in as root to ssh terminal session

logged in as root to ssh terminal session

4. Create a new SATP rule

At the console or SSH session type the following commands to create a new SATP rule.

esxcli storage nmp satp rule add --satp VMW_SATP_LOCAL --device mpx.vmhba1:C0:T0:L0 --option=enable_ssd

using the device name recorded in Step 2 above. The console will return a new line. To check the rule has been created correctly type the following commands

esxcli storage nmp satp rule list | grep enable_ssd

the following screenshot should be displayed

  • Confirmation of rule creation

Confirmation of rule creation

confirming the creation of the rule.

5. Claim storage device

At the console or SSH session type the following commands

esxcli storage core claiming reclaim -d mpx.vmhba1:C0:T0:L0

using the device name recorded in Step 2 above.

I have seen the following error messages when trying to claim devices, either restart the server or use the “unclaim” device command.

  • Unable to unclaim path vmhba1:C0:T0:L0 on device mpx.vmhba1:C0:T0:L0. Some paths may be left in an unclaimed state. You will need to claim them manually using the appropriate commands or wait for peri

Unable to unclaim path vmhba1:C0:T0:L0 on device mpx.vmhba1:C0:T0:L0. Some paths may be left in an unclaimed state. You will need to claim them manually using the appropriate commands or wait for peri

you can unclaim the device by specifying the device name.

esxcli storage core claiming unclaim --type device --device device_name

6. Reload the claim rules

I usually reload the claim rules and run the rules using the following commands:

esxcli storage core claimrule load
esxcli storage core claimrule run

7. Confirm device is Tagged as SSD

Use the following command at the console, to check if the device has successfully been tagged as a SSD

esxcli storage core device list --device=mpx.vmhba1:C0:T0:L0

The following output will be displayed for the device.

  • local device tagged as SSD

local device tagged as SSD

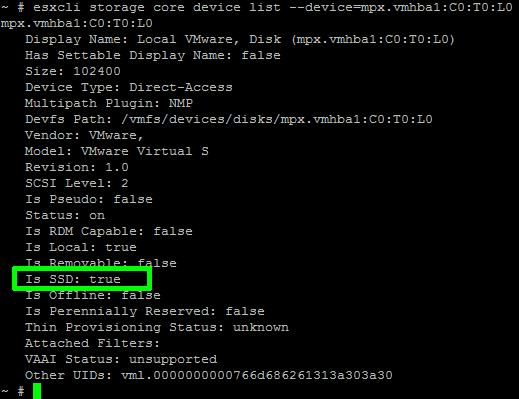
Check the output states “Is SSD: true”

You have successfully configured and tagged a local device as a SSD. If you now repeat Step 2 above, you will see the device now states SSD.

  • storage device to configure or tagged as SSD

storage device to configure or tagged as SSD

In my next Article, I show you how to configure Host Cache Configuration.

Further reading can be found here in the VMware
vSphere 5 Documentation Center :- Tag Devices as SSD

Post to Twitter

Altaro giving all Hyper-V admins 50 free licenses of their desktop backup solution – End December 24th

Thursday, November 29th, 2012

I’ve blogged about the fabulous product earlier, see here https://andysworld.org.uk/2012/08/24/fantastic-altaro-hyper-v-backup-for-windows-2012-because-andy-says-so/

but those nice guys at Altaro are giving away 50 free licenses of their desktop backup solution – End December 24th

Altaro giving all Hyper-V admins 50 free licenses of their desktop backup solution – End December 24th

Altaro, developers of Altaro Hyper-V Backup, are giving something back this holiday season and are giving every Microsoft Hyper-V admin 50 licenses of their desktop backup software, that’s up to $2,000 worth of software.

There’s no catch! All you need to do is send them a screenshot of Hyper-V that proves that you use Hyper-V and they will send you the licenses which you can use on your own machines or give out to friends, family or colleagues, to use at work or home.

The giveaway ends on Dec 24th 2012.

To claim your 50 licenses check out

http://www.altaro.com/hyper-v/50-free-pc-backup-licenses-for-all-hyper-v-admins

To check out their Hyper-V portal check out http://www.altaro.com/hyper-v/

For more info about Altaro Hyper-V Backup check out http://www.altaro.com/hyper-v-backup/?LP=Xmas

Post to Twitter

My Summer Grey Heron

Tuesday, November 27th, 2012

Travelling to the office everyday during the summer months, I regularly spotted a Grey Heron (Ardea cinerea), early morning and afternoon, resident on the Bishop Burton pond, feeding on the many fish present. At first I thought it was a captive bird, that had it’s wings clipped, because despite the amount of traffic that passed everyday, it did not seem to be distracted. When I decided to start putting the camera and tripod in the car, it was never present. Sadly, I no longer see the heron any more, in the early mornings, and I hope it will return in the Spring/Summer next year.

Finally, in September 2012, I managed to capture these photographs in the rain, with my Canon 350D DSLR, and 17-85mm and 75-300mm.

Grey Heron resident on Bishop Burton pond

Grey Heron resident on Bishop Burton pond

Grey Heron on Bishop Burton pond (75-300mm)

Grey Heron on Bishop Burton pond (75-300mm)

Grey Heron on Bishop Burton pond (75-300mm)

Grey Heron on Bishop Burton pond (75-300mm)

Grey Heron on Bishop Burton pond (75-300mm)

Grey Heron on Bishop Burton pond (75-300mm)

Whilst, I was taking these pictures the Heron, was very aware of my presence, and started to move off, shortly after taking these photographs. So it’s clearly got used to the traffic. If you Google, there are photos of a Heron on/in/around the pond, as far back as 2008-2009, I’m not sure if it’s the same bird, they live for approx 5 years, so it could be!

Next time I see Chris Packham or Simon King, I’ll need to ask them if I can borrow their 1500mm lens!

Until next Spring/Summer 2013!

Post to Twitter

Oh dear, removing heat spreader from RAM, goes wrong!

Tuesday, November 27th, 2012
Whoops!

Whoops!

this was a photograph,where someone had removed the heat spreader from some G.Skill RAM incorrectly.

Whoops!

Post to Twitter

New Desktop Computer Part II:- RAM, Motherboard and CPU manual states 24GB, but lets use 48GB!

Monday, November 26th, 2012

Okay, you’ve already met my new processor earlier in Part 1: New Project, so new Desktop Computer! So meet my new Processor! (https://andysworld.org.uk/2012/11/12/new-project-so-new-desktop-computer-so-meet-my-new-processor/). In Andysworld, things always go wrong, and never plan as you would anticpate, the EVGA X58 SLI (132-BL-E758-A1) motherboard I’m using despite the CPU compatibility guide confirming the Intel Core i7 Intel 990x Extreme Edition processor would work in the motherboard, after many Forum Posts, and Technical Support requests logged with EVGA support, it was eventually confirmed, by the EVGA Forums, the Revision 1.0 motherboard would not support the processor, also eventually confirmed by EVGA Technical support, so the motherboard was Advanced RMA-ed to EVGA in Germany.

This may not be the latest and greatest motherboard, but it does have some features I need to exploit, Dual and Tri SLI (verified), and a memory trick! (read on!)

I’ve got a new motherboard, and working processor, so I’ve been experimenting with graphics cards (GPUs), in single and dual (SLI) configurations, and also experimenting with DDR3 RAM configurations. When the motherboard was manufacurered and released 8GB single DDR3 DIMMs did not exist. I could have opted for a 24GB DDR3 kit, as the motherboard and processor were intended, but I wanted to MAX out the motherboard, for my Project, (oh yes – one rule about Andy’s Project, we don’t talk about Andy’s Project!). So now that memory is the cheapest it’s been in years, we remember ordering memory, circa 1998, and 4GB cost approx 25,000 GBP! An 8GB DDR3 DIMM can be purchased today for approx 20 GBP.

The following confirms 48GB of DDR3 memory working in an EVGA X58 SLI (132-BL-E758-A1) Motherboard. Please note, it’s taken me many weeks of research to obtain the correct motherboard and memory combination to get this working, this is unsupported by EVGA and Intel, as both vendors state the maximum memory supported by motherboard and processors is 24GB. Usual disclaimers apply, please try at your own risk.

and you are probably thinking what on earth is Andy going to do with 48GB in a Desktop PC!

Come Back and I’ll show you….in New Desktop Computer Part III: What is Andy going to do with 48GB of RAM in his Desktop PC?

in this next collection of photos, I’ve captured some GPUs I’ve been testing in single and dual GPUs (SLI), the single GPU – ATI Radeon 4870X2 is two GPUs in Crossfire on a single card, quite old by todays standards, but still packs a punch! Note the seperate PSU just for the card!

Post to Twitter

I’ve levelled up today @ExpertsExchange, now my Member Rank is a Savant

Sunday, November 25th, 2012

A belated birthday present, and today I became the 33rd Savant at Experts Exchange.

You become a Savant, when you hit 10,000,000 points. No T-Shirt, you only get a T-Shirt for Zones, so I’m a little way off from that prestigious Savant in VMware! Stay tuned!

So my Badge has changed from

hanccocka-ee

to this:-

hanccocka-ee-savant

Some other Experts Exchange statistics, last year my end of year overall point score was 4,688,803, this year I’ve passed that already, and currently at 5,148,594

Not bad, since I started answering questions just under two years ago, in December 2010.

Greetings to @demazter (Glen) at #35, and @alanhardisty (Alan) at #37. Two exceptional UK based Experts!

Post to Twitter

Monster Mash by Evan, Aged 3

Saturday, November 24th, 2012

monstermash-by-evan-aged-3

It was my b’day yesterday, and this is what my Nephew, Evan – Aged 3 sent me, in my b’day card.

Limited Edition prints  are available!

Post to Twitter

New Project, so new Desktop Computer! So meet my new Processor!

Monday, November 12th, 2012

I’ve got a new project to complete, more on that over the next coming months (secret squirrel stuff! cannot say any more at present) , so it’s time to build a new desktop computer, it’s been a while the last desktop computer I purchased was in 2007, and that was an Dell XPS 720 H2C, which had an Intel Core 2 Extreme Processor QX6850.

It’s rather strange building a physical computer, because I deal alot with the virtual.

The processor on the new Desktop computer has an Intel Core i7 990X Extreme Edition (Gulftown)  processor. It has 6 Cores and 12 Threads.

Post to Twitter