Posts Tagged ‘VMware’

Virtualisation Snapshot Hell!

Monday, September 9th, 2013

Whatever you call them in VMware circles, they are known as “Snapshots”, in Microsoft circles, Hyper-V they are known as “Checkpoints”.

Snapshots are evil things, I wrote an Article last year on Experts Exchange called – HOW TO: VMware Snapshots :- Be Patient,

the following two clients, clearly had not read my article, but they have now!

VMware vSphere Exchange Virtual Machine with two snapshots, one snapshot size of 250GB, with a parent disk of 500GB

VMware vSphere Exchange Virtual Machine with two snapshots, one snapshot size of 250GB, with a parent disk of 500GB. Exchange performance would have been poor, this snapshot has been present for many months, and eventually took 33 hours to delete, ,merge and commit the snapshot, with 33 hours of Exchange downtime!

Microsoft Hyper-V Virtual Machine

Microsoft Hyper-V Virtual Machine, with 9 nested snapshots, totally 170GB, more of an issue, performance is poor, and deleting these snapshots will cause issues, and delay!

The one thing you need to know about Snapshots, is if you use them, or find a virtual machine using one is Be Patient, if you decide to delete them!!!

or Ask an Expert First!!!!

It can take a very long time, for the process to complete and merge the child (delta) disk into the parent disk.

I’m now a VMware Savant at @ExpertsExchange

Saturday, May 18th, 2013

It finally happened on the 1st May 2013. In the Gaming-World, I’ve leveled-up!

vmwaresavant

My Experts Exchange Savant Certificate

ee-1stmay2013

Before 1st May 2013: - VMware Prodigy

ee-3rdmay2013

After 1st May 2013: Note change! VMware Savant

I’ve now joined a very exclusive club, it was going to happen sooner or later, I’m now a VMware Savant at Experts-Exchange.com. As of this post, there are only 11 out of 119,793, and I’m now number 12! Here are the other Experts and their Zones.

angelIII – MS SQL Server

capricorn1 – Microsoft Access Database

Sembee – Exchange Email Server

mlmcc – Crystal Reports Software

objects – Java Programming Language

Ray_Paseur – PHP Scripting Language

rorya – Microsoft Excel Spreadsheet Software

CEHJ – Java Programming Language

zorvek – Microsoft Excel Spreadsheet Software

CodeCruiser – Microsoft Visual Basic.Net

DatabaseMX– Microsoft Access Database

and finally me!

hanccocka – VMware (yes the 1st VMware Savant!)


HOW TO: Synchronize changes when completing a P2V or V2V with VMware vCenter Converter Standalone 5.1

Friday, May 3rd, 2013
HOW TO:  Synchronize changes when completing a P2V or V2V with VMware vCenter Converter Standalone 5.1

OR

“Poor Man’s Replication of a Physical or Virtual machine to a VMware vSphere Hypervisor Host (ESXi) for FREE”

I have already written three articles on the use of VMware vCenter Converter Standalone 5.x.

VMware vCenter Converter Standalone primary function is to create physical to virtual copies or conversions of physical computers, we often abbreviate this to P2V. VMware vCenter Converter Standalone can also be used on computers that have already been converted to virtual computers, or virtual computers that already exist in a “Cloud Space”, so we can create copies or conversions of an existing virtual computer, we often  abbreviate this to V2V

VMware vCenter Converter Standalone is an excellent FREE software tool for creating P2Vs or V2Vs, but there is another often “hidden function” which is rarely used by VMware Administrators. The function is called Synchronize. This function can be used to Synchronize changes between a physical or virtual computer, which has already been P2Ved (V2Ved) to another virtual machine on another VMware vSphere Hypervisor (ESXi) host. The same function can be used, to help unattended “cut over times” when completing a P2V (V2V) in Production, you could create the original P2V (V2V) at 9.00am, and then using synchronize, finally sync all changes made during the day, and “cut over” to the virtual machine out of hours, at 23.00pm.

Some of our clients use this software and function, as a free alternative to replication to a second DR site and ESXi host. The ESXi host could be using the FREE VMware vSphere Hypervisor.

In this article, I’ll show you HOW TO:  Synchronize changes when completing a P2V or V2V with VMware vCenter Converter Standalone 5.1. In the example below I’ll be using a virtual machine, creating a V2V and then synchronizing additional changes made to the source virtual machine to the destination VM (our DR copy).

1

Install VMware vCenter Converter Standalone 5.1

Install VMware vCenter Converter Standalone 5.1 on the computer to be synchronized. In this example, I will be installing VMware vCenter Converter Standalone 5.1  on the virtual machine.

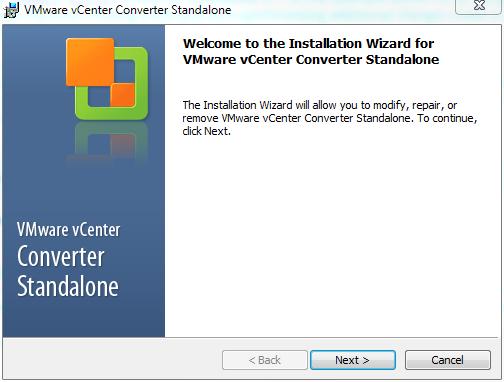
  • VMware vCenter Converter Standalone 5.1 – Installing

VMware vCenter Converter Standalone 5.1 - Installing

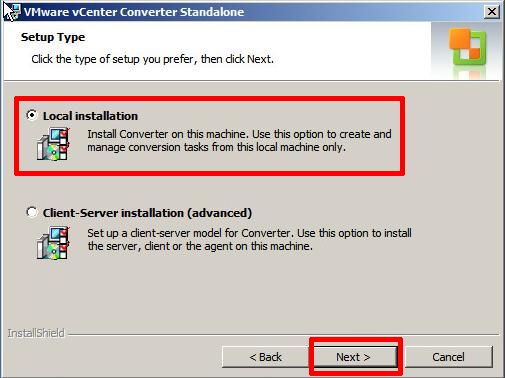
It is a very easy installation, click Next and follow the wizard, agreeing to the terms of the license agreement, select the default installation folder, and select Local installation
  • VMware vCenter Converter Standalone 5.1 – Local Installation

VMware vCenter Converter Standalone 5.1 - Local Installation

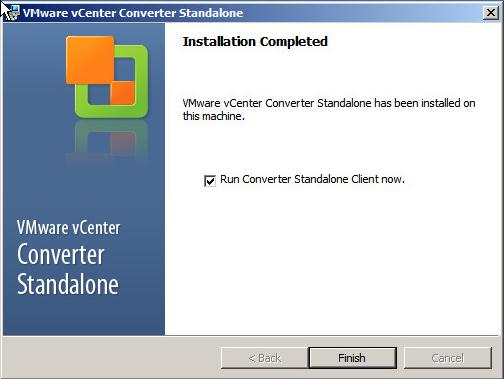
Click Next, and follow the installation wizard to the end, and Click Finish.
  • VMware vCenter Converter Standalone 5.1 – Finish

VMware vCenter Converter Standalone 5.1 - Finish

If you left the Tick in the Box for Run Converter Standalone Client now. VMware vCenter Converter Standalone will start, otherwise you will need to click the icon on your desktop.

2

Creating a P2V (V2V in this example) for synchronization

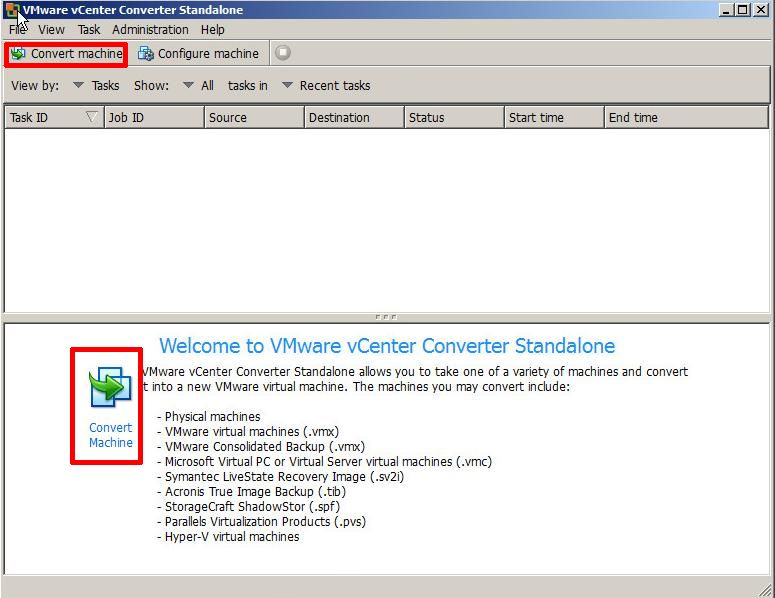
  • VMware vCenter Converter Standalone 5.1 – Welcome Screen

VMware vCenter Converter Standalone 5.1 - Welcome Screen

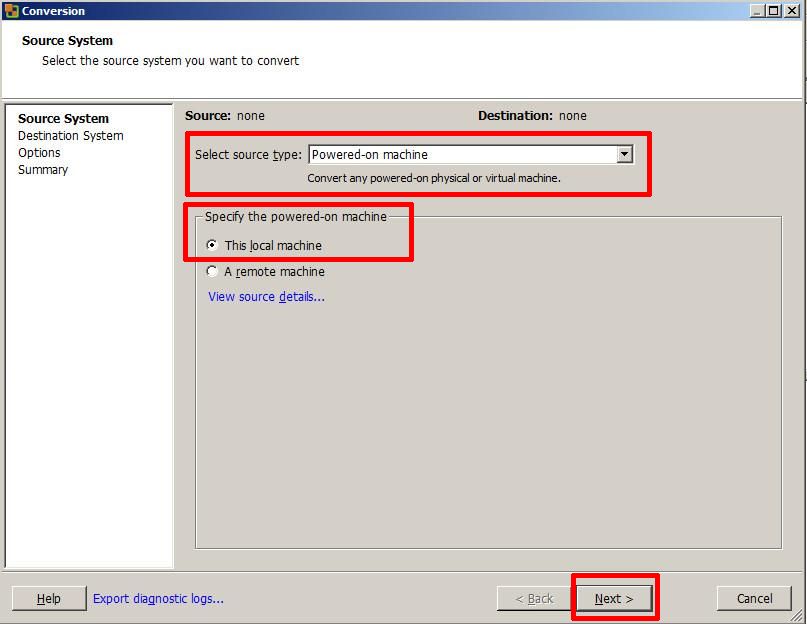
At the Welcome to VMware vCenter Converter Standalone, welcome screen click the Convert machine button. (This machine could be a physical or virtual machine, VMware vCenter Converter Standalone does not care what machine type it is.)
  • VMware vCenter Converter Standalone 5.1 – Convert Machine

VMware vCenter Converter Standalone 5.1 - Convert Machine

Select the Default option

Select source type: Powered-on-machine

Specify the powered-on machine: This local machine

followed by Next to continue, converter will identify the source machine.

  • VMware vCenter Converter Standalone 5.1 – Specify vCenter Server

VMware vCenter Converter Standalone 5.1 - Specify vCenter Server

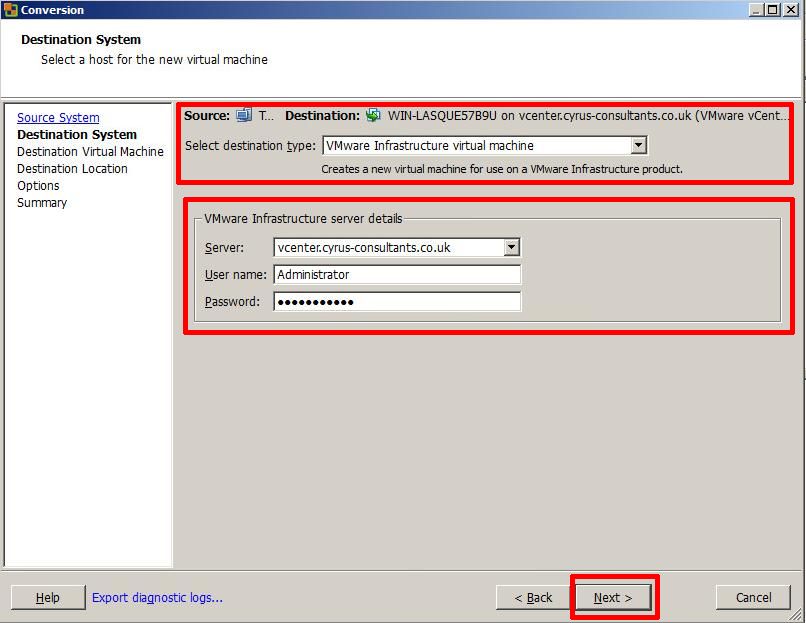
Select destination type: VMware Infrastructure machine

Enter the destination server, username and password, in this example, I’m using our VMware vSphere vCenter server details, but if you wanted to synchronize/replicate to a standalone VMware vSphere Hypervisor (ESXi) host, you would enter the VMware vSphere Hypervisor (ESXi)  host details here, e.g. root username and password.

  • VMware vCenter Converter Standalone 5.1 – Specify Destination Machine name

VMware vCenter Converter Standalone 5.1 - Specify Destination Machine name

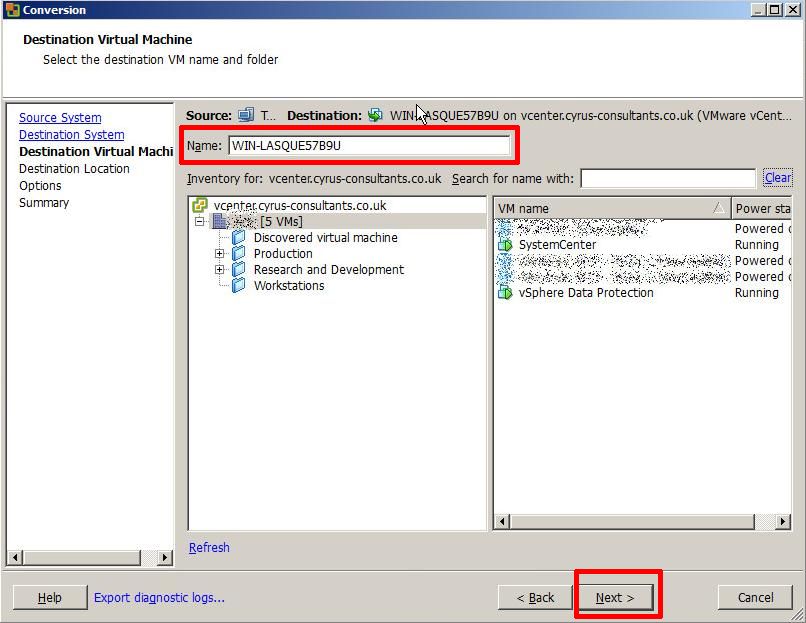
Specify the destination name of the machine followed by Next
  • VMware vCenter Converter Standalone 5.1 – Specify Destination Location

VMware vCenter Converter Standalone 5.1 - Specify Destination Location

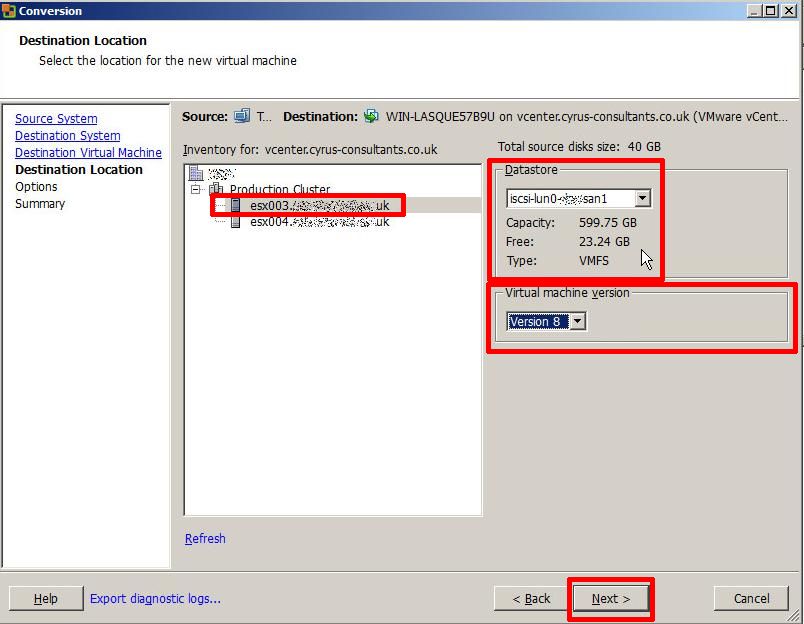
Specify the destination location for the machine followed by Next, if you are using a VMware vSphere vCenter Server and have a VMware Cluster created, you will have additional options to specify which VMware vSphere Hypervisor (ESXi) host to create the new virtual machine, also specify the datastore location. Ensure the virtual machine version matches the original VM, in this example v8.0.
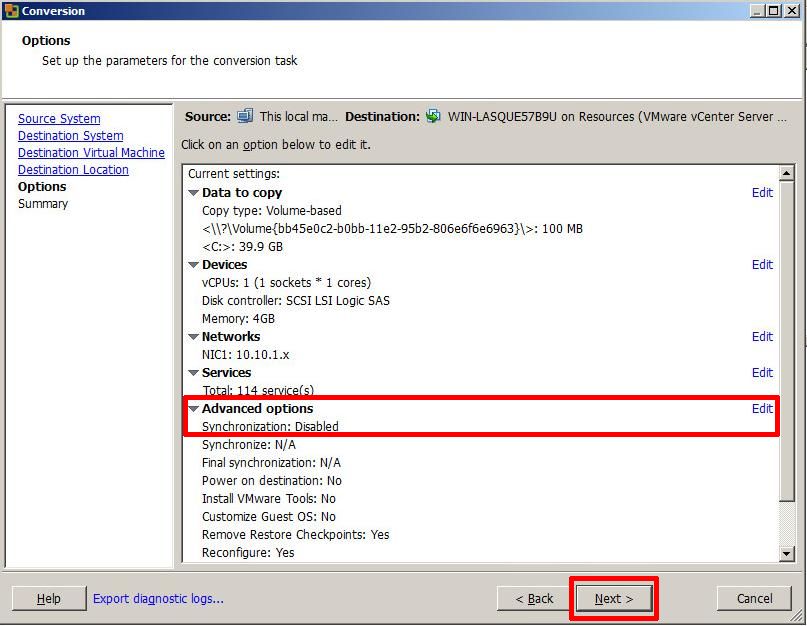
  • VMware vCenter Converter Standalone 5.1 – Enable Synchronize

VMware vCenter Converter Standalone 5.1 - Enable Synchronize

If you click Next at this point, the P2V (V2V) will complete as normal.

To enable the Synchronize function, you MUST select Edit

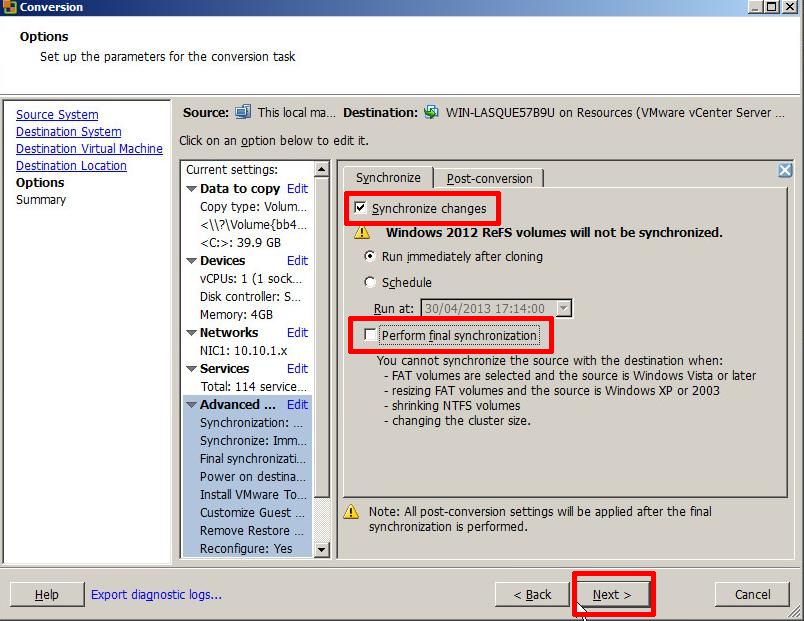
  • VMware vCenter Converter Standalone 5.1 – Enable Synchronise

VMware vCenter Converter Standalone 5.1 - Enable Synchronise

Ensure Synchronize changes is selected and ticked.

Ensure Perform final synchronization is Un-ticked.

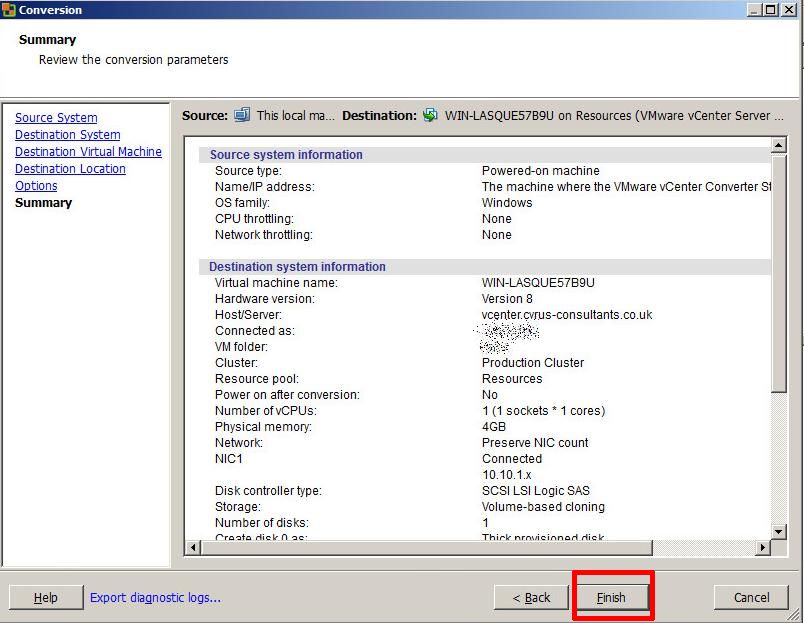
If you wanted to perform, a Scheduled Synchronize, select and set the Schedule Option. Select Next to continue, review the Summary screen, and select Finish.

  • VMware vCenter Converter Standalone 5.1 – Summary Screen

VMware vCenter Converter Standalone 5.1 - Summary Screen

A P2V job will be submitted and the P2V conversion will start.
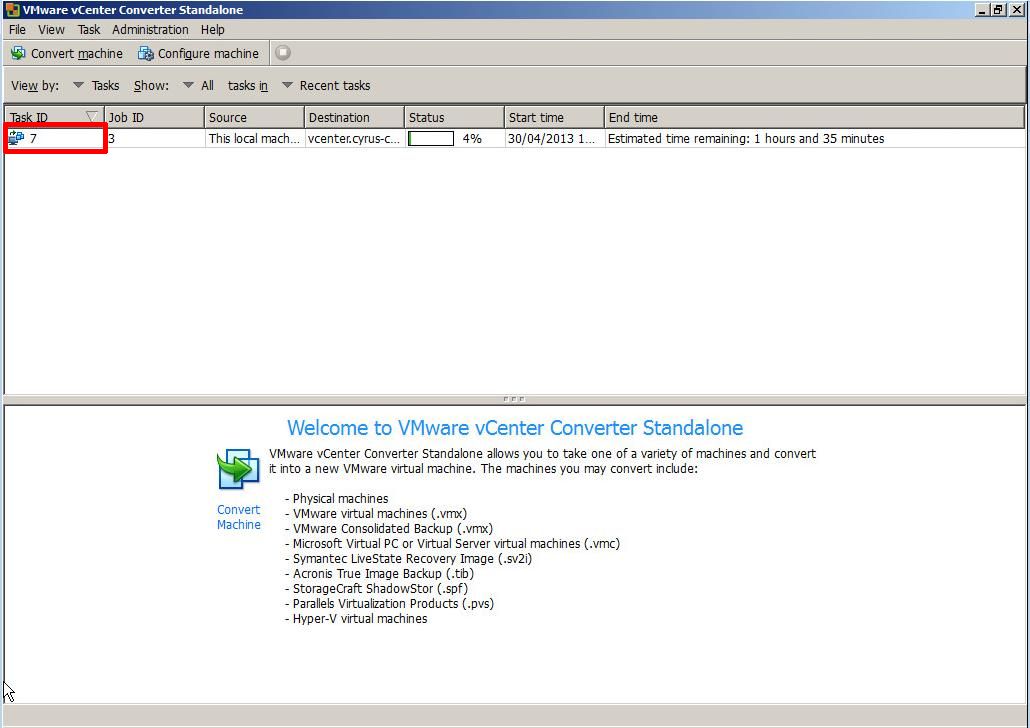
  • VMware vCenter Converter Standalone 5.1 – P2V Job Submitted

VMware vCenter Converter Standalone 5.1 - P2V Job Submitted

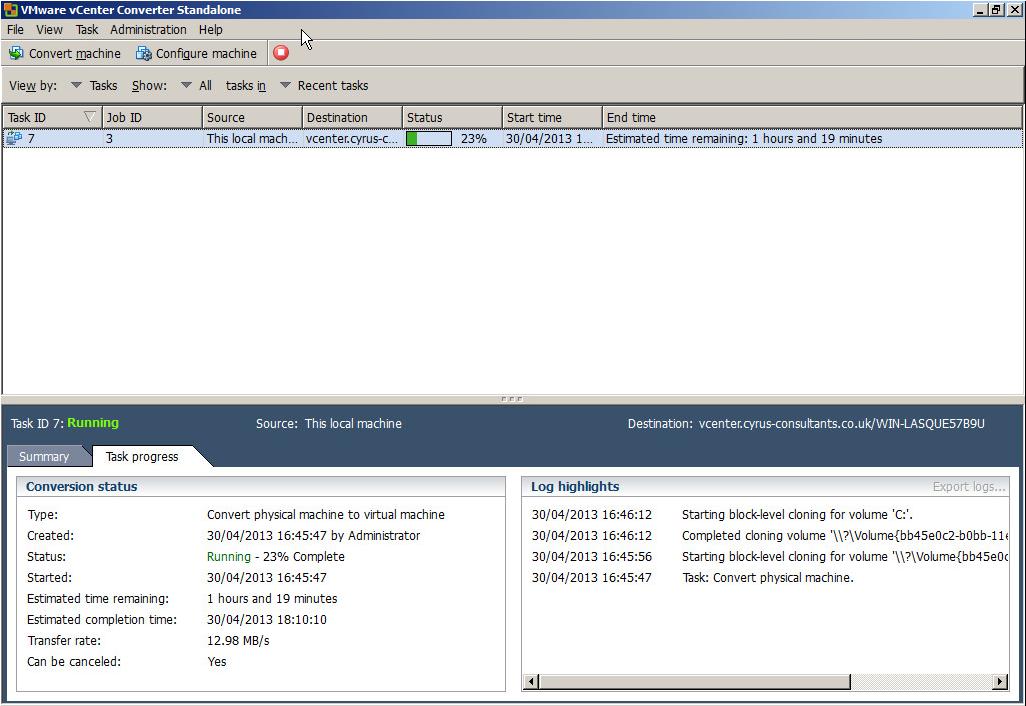
If you click the Task Id, you can check on the Task Progress.
  • VMware vCenter Converter Standalone 5.1 – Task Progress

VMware vCenter Converter Standalone 5.1 - Task Progress

3

Synchronize Changes

Once the initial P2V (V2V) conversion has completed, or “seeded” a new virtual machine, you can use the Synchronize function to replicate any changes that occur on the source machine to the virtual machine, the source machine could be a physical or virtual machine. (You can check the virtual machine by disconnecting networking, and powering up the virtual machine).

  • VMware vCenter Converter Standalone 5.1 – Job Status

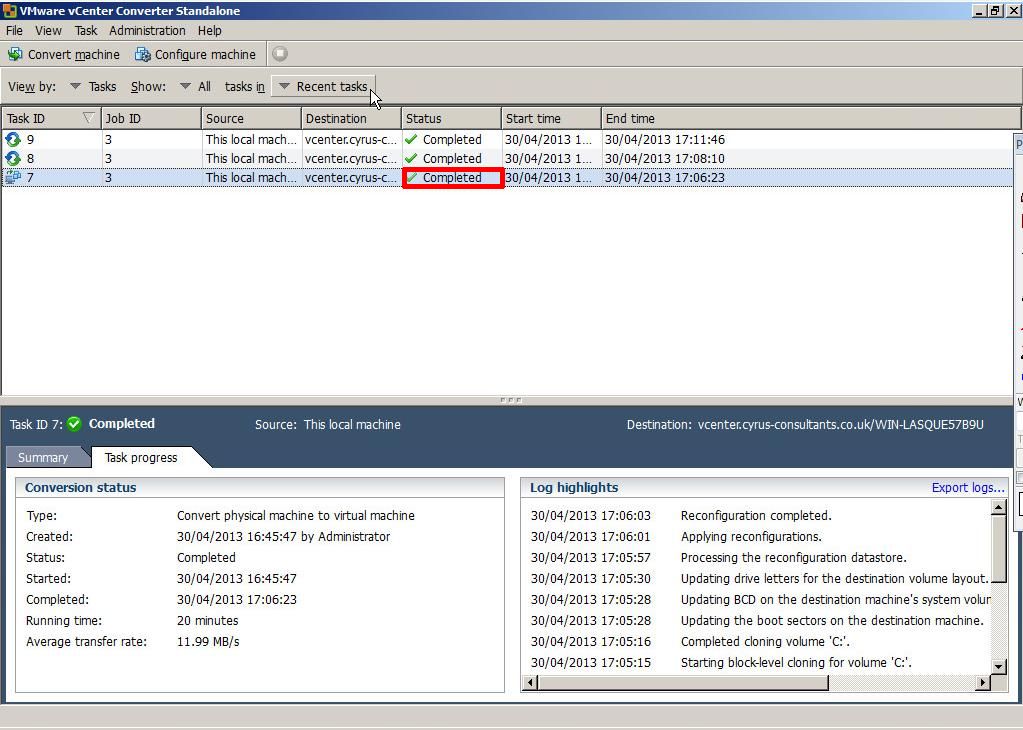
VMware vCenter Converter Standalone 5.1 - Job Status

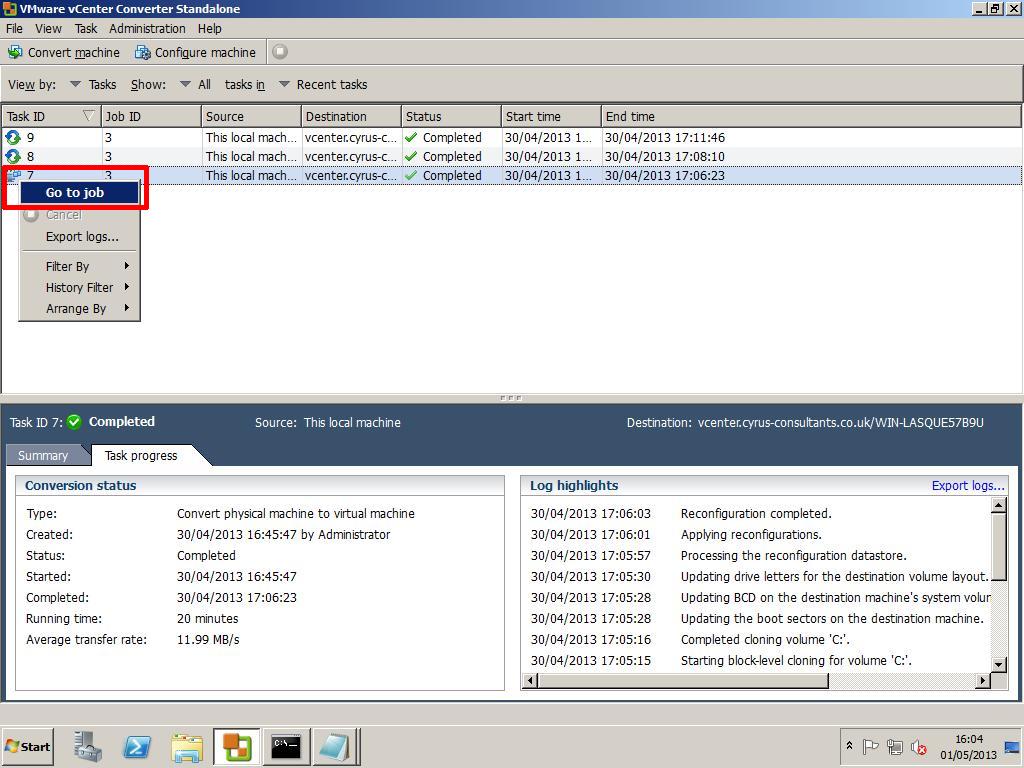
The Job Status should state Completed. Right Click the Task Id and select Go to job
  • VMware vCenter Converter Standalone 5.1 – Go to Job

VMware vCenter Converter Standalone 5.1 - Go to Job

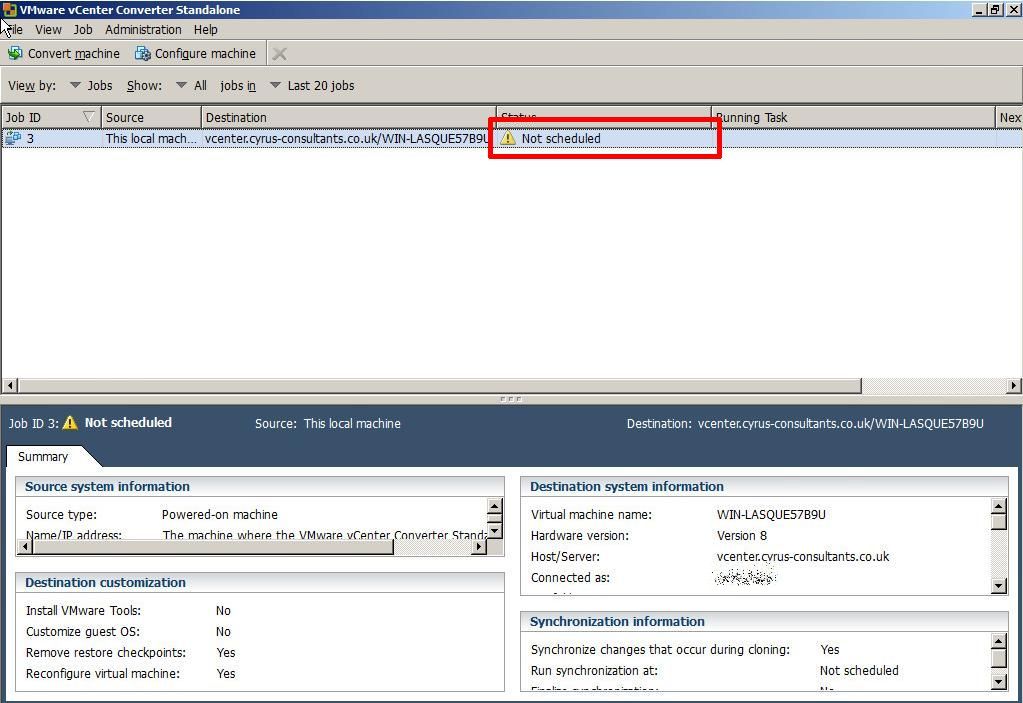
You will notice that the Status states Not Scheduled, this is because we did not set a schedule.
  • VMware vCenter Converter Standalone 5.1 – Not Scheduled

VMware vCenter Converter Standalone 5.1 - Not Scheduled

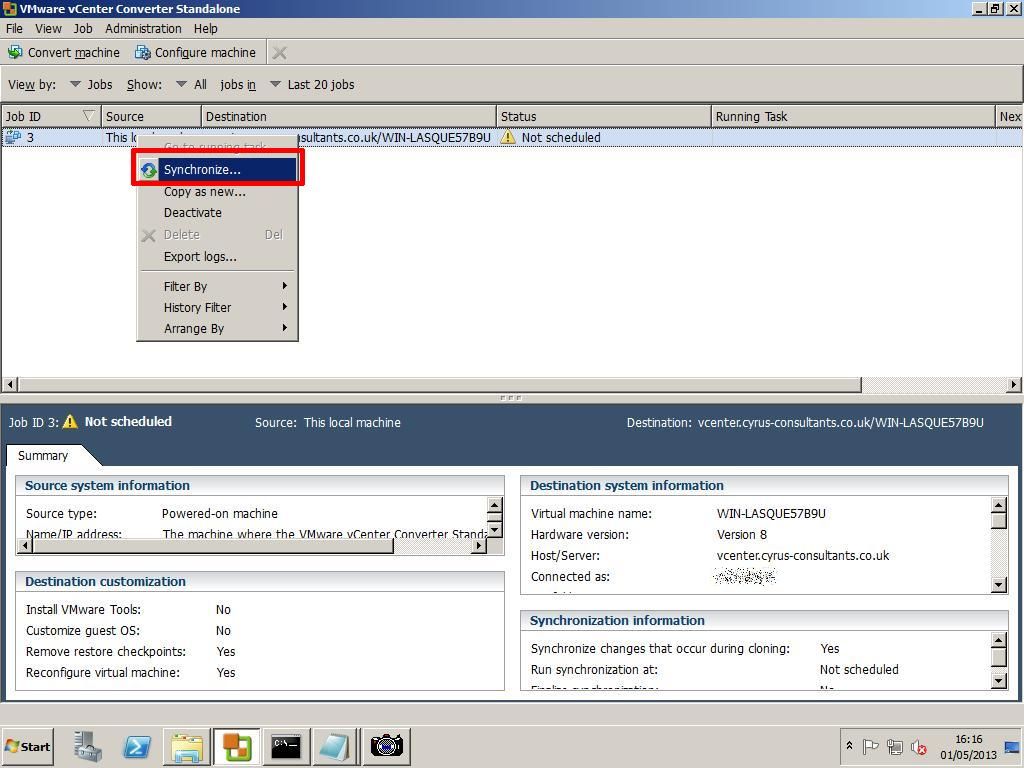
Right Click the Job Id, and select Synchronize.
  • VMware vCenter Converter Standalone 5.1 – Synchronize

VMware vCenter Converter Standalone 5.1 - Synchronize

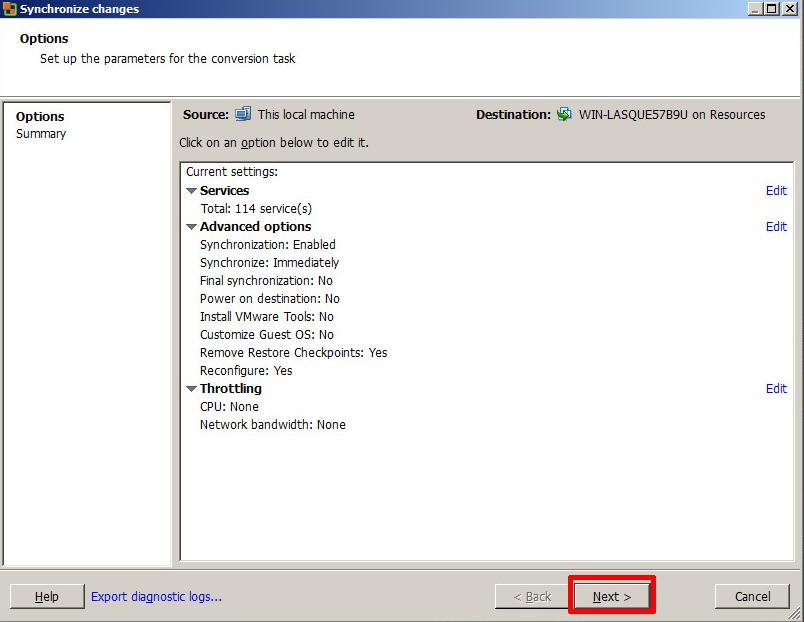
Click Next
  • VMware vCenter Converter Standalone 5.1 – Synchronize changes

VMware vCenter Converter Standalone 5.1 - Synchronize changes

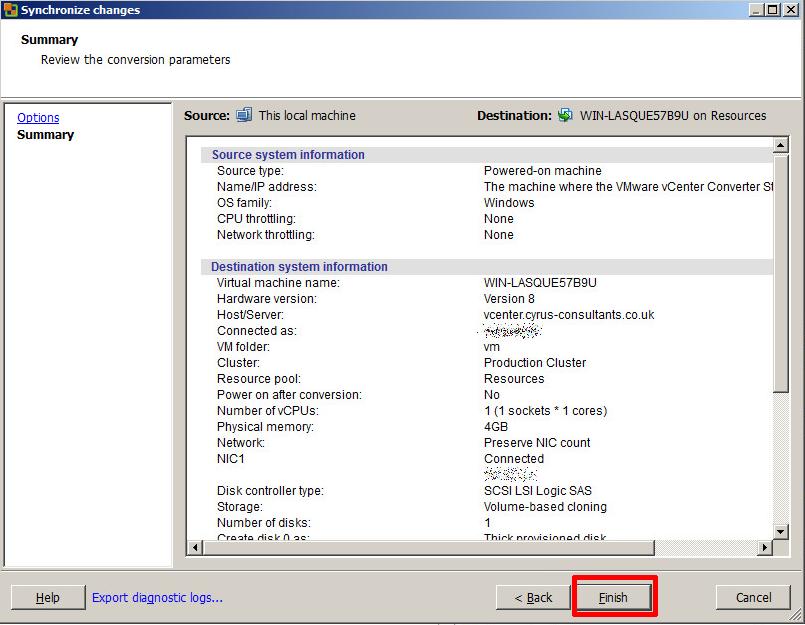
Check the Summary page and Click Finish
  • VMware vCenter Converter Standalone 5.1 – Finish

VMware vCenter Converter Standalone 5.1 - Finish

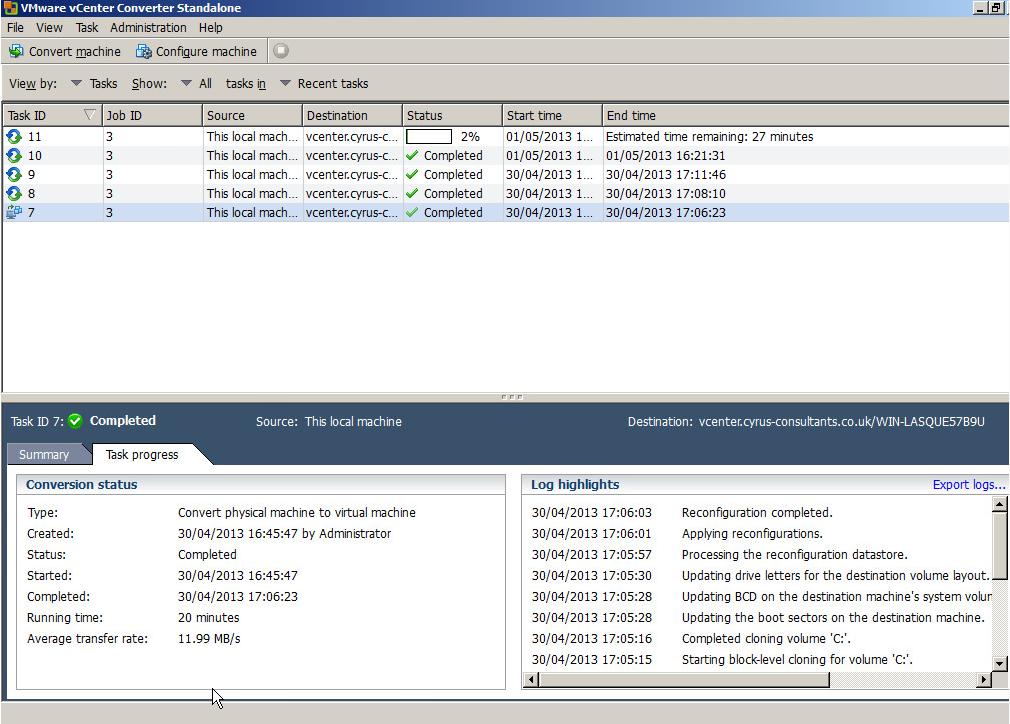
Click the View by Jobs
  • VMware vCenter Converter Standalone 5.1 – Synchronize Task Progress

VMware vCenter Converter Standalone 5.1 - Synchronize Task Progress

You will notice your Synchronize Job is Running, and it will have a new Synchronize icon, next to the job. All changes in the source machine will be synchronized or replicated to the virtual machine.

Congratulations you have successfully created a P2V (V2V) and Synchronized (replicated) your machine to a virtual machine.

HOW TO: P2V, V2V for FREE – VMware vCenter Converter Standalone 5.1

Thursday, May 2nd, 2013

HOW TO:  P2V, V2V for FREE – VMware vCenter Converter Standalone 5.1

If you need to complete a Physical to Virtual (P2V), Virtual to Virtual (V2V) conversion to a VMware product (VMware Workstation, Player or vSphere) for FREE, then there is some good news…VMware vCenter Converter Standalone 5.1 was released on 25 April 2013, and this latest version has new support for the following:-

  • Support for virtual machine hardware version 9
  • Guest operating system support for Microsoft Windows 8 and Microsoft Windows Server 2012
  • Guest operating system support for Red Hat Enterprise Linux 6
  • Support for virtual and physical machine sources with GUID Partition Table (GPT) disks
  • Support for virtual and physical machine sources with Unified Extensible Firmware
  • Interface (UEFI)
  • Support for EXT4 file system

Also fixes numerous issues with crashing and conversion issues, when converting physical or virtual computers to VMware vSphere vCenter Server 5.1 and VMware Hypervisor ESXi 5.1.

  • VMware vCenter Converter Standalone v5.1

VMware vCenter Converter Standalone v5.1

While I would recommend and use VMware vCenter Converter Standalone 5.1, there are other commercial products that do exist, and I have used.

If you have a large estate of physical machines to migrate, these products have a scheduler and can perform automated workflows, but these are commerical products and not FREE like VMware vCenter Converter Standalone 5.1

NETIQ Platespin Migrate

Acronis vmProtect

Storagecraft Shadow Protect

Symantec System Recovery Server Edition

If the operating system is Windows 2003, Windows 2000 or Windows NT 4.0, select and earlier version of VMware vCenter Converter Standalone version 3.0.3 or 4.0, support for early operating systems has been removed now from v5.1.

if you have recently upgraded to vSphere vCenter Server 5.1, and are looking for the Convert/Import vCenter plugin which existed with 4.x, it’s now longer available, and has been removed, and you will need to use  VMware vCenter Converter Standalone 5.1 for your conversions.

Download VMware vCenter Converter 5.1 here
VMware vCenter Converter Standalone 5.1 Documentation
VMware vCenter Converter Standalone 5.1 User Guide


If you have issues, you may want to consult the following articles and guides

Best Practice Video Guide here

Some Videos I’ve develeoped to show the VMware vCenter Converter process.

A Tutorial video by me:- Restore a Virtual Machine using the FREE VMware vCenter Converter to VMware vSphere 4.x, 5.0 ESXi 4.x, ESXi 5.0, ESX 4.0

A Tutorial video by me:- Backup VMware vSphere 4.x, 5.0 ESXi 4.x, ESXi 5.0, ESX 4.0 for FREE using VMware vCenter Converter

A Tutorial video by me:- VMware vCenter Converter Standalone 5.0 Convert monolithic sparse to monolithic flat for use with VMware vSphere 4.x 5.0 ESXi 4.x 5.0

What’s your Cloud Cred?

Monday, April 15th, 2013

VMware have launched a CloudCredibility website, what’s your Cloud Cred?, you get points for completing various Cloud Tasks (some with a VMware twist!).

I’m currently in team vExperts2 – (there are only 6 of us at present, hopefully more will join!)

My Team Members are:-

LucD – http://lucd.info

Andreas Peetz – http://www.v-front.de

Ed Czerwin

nielsengelen – http://foonet.be

Chris …

Update: I got 50 Cloud Cred Points for blogging this!

When VMware Snapshots go wrong – Snapshot Hell!

Friday, October 12th, 2012

this is the worst case of Snapshot Hell, I’ve ever seen! It’s not the largest snapshot, the total is only approx 83GB in snapshots, but the number of snapshot files!

A Total of 79 snapshots per virtual machine disk, see screenshots (I’ve obscured the server name for privacy!)

According to this VMware Knowledge Base article the maximum number of snapshots is 32 in a snapshot chain.

snapshop1snapshop2snapshop3

HOW TO: “Live Migrate” VMware Virtual Machines between ESX/ESXi hosts and/or datastores for FREE without licenses for vMotion or Storage vMotion

Monday, September 24th, 2012
Migrate VMs between hosts and/or datastores for FREE without vMotion/Storage vMotion or Shared Storage

Not all organisation have access to VMware’s vMotion or VMware’s Storage vMotion technology because of budgetry constraints. I’ve written this article because it’s a question which appears on Experts Exchange at least every few weeks, and now there is an easy solution to the problem.

Scenario 1
First implementation of VMware vSphere Essentials without shared storage, later the organisation purchases shared storage (iSCSI or Fibre Channel SAN or NFS NAS), and then needs to migrate existing virtual machines with little downtime to the shared storage platform.

Scenario 2
Organisation purchases a second newer replacement VMware vSphere host, needs to migrate existing virtual machines with little downtime to new VMware vSphere host.

Traditionally we would use ESXi/ESX Backup and Restore techniques, VMware vCenter Converter Standalone 5.0, or Datastore browser to clone or copy see my previous Experts Exchange articles below, to address the above scenarios, (remember here that VMware’s vMotion or VMware’s Storage vMotion is NOT available, because it’s not available in our licensed version of VMware vSphere).

VMware ESX/ESXi Backup Guide

HOW TO: Clone or Copy a virtual machine in VMware vSphere Hypervisor ESX/ESXi 4.x or ESXi 5.0

HOW TO: Improve the transfer rate of a Physical to Virtual (P2V), Virtual to Virtual Conversion (V2V) using VMware vCenter Converter Standalone 5.0

HOW TO:  P2V, V2V for FREE – VMware vCenter Converter Standalone 5.0

Software Technology has improved and using Veeam Quick Migration, we can migrate Live VMs between hosts and datastores for FREE!

In the latest version of Veeam Backup Free Edition, there is a new function called Quick Migration. Veeam Backup Free Edition is the same download as Veeam Backup and Replication v6.1, but a Veeam license is not applied at installation time.

The Quick Migration utility in Veeam Backup Free Edition lets you migrate a live VM to any host or datastore—even if you don’t use clusters or shared storage.

Quick Migration leverages native VMware technology, as well as exclusive Veeam technology, to accommodate any migration scenario, including:

Migrating a VM from a local datastore to shared storage
Migrating a VM between 2 separate hosts and datastores

With Quick Migration’s point-and-click interface, you can easily move a live VM from any source to any destination, even if vMotion and vStorage Motion are not available. And with Veeam’s SmartSwitch technology, downtime is reduced to mere seconds.

Source
http://www.veeam.com/free-vmware-esxi-backup.html

In the following steps, I will demonstrate, how a Live virtual machine can be migrated from a Local Datastore attached to a VMware vSphere ESXi host, to an iSCSI LUN on a SAN and different VMware vSphere ESXi host. – this demonstrates a vMotion (migrate from one host to another host) and Storage vMotion. (from one datastore to new datastore) – using Veeam Quick Migration.

Prerequisites

1. VMware vCenter Server for Windows or VMware vCenter Appliance installed and configured with one or more VMware vSphere ESXi/ESX hosts. So you would need to have purchased at least VMware vSphere Essentials.

2. Veeam Backup Free Edition for VMware and Hyper-V installed on a virtual or physical server. We often install Veeam Backup and Replication v6.1 (same product) on a Microsoft Windows Server 2008 R2, with 2 vCPU and 8GB RAM. I’m not going to document the installation of Veeam Backup Free Edition, because it is simply, point and click; download the software, extract the software from the ZIP archive, Run the setup program, and Click Next…Next…Next…Finish.

1

Start Veeam Backup & Replication

Click the Veeam Backup & Replication icon to start the backup application.

  • Click the Veeam Backup & Replication icon

Click the Veeam Backup & Replication icon

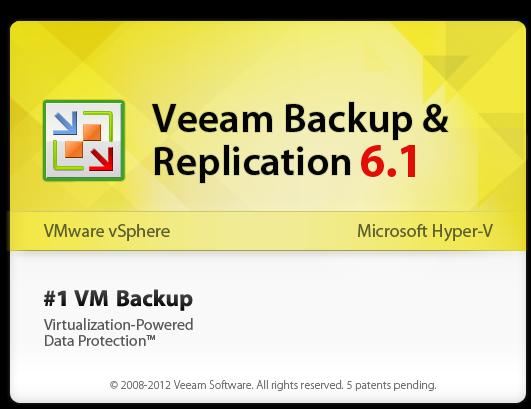
The application will start and display the following banner
  • Veeam Backup & Replication startup banner

Veeam Backup & Replication startup banner

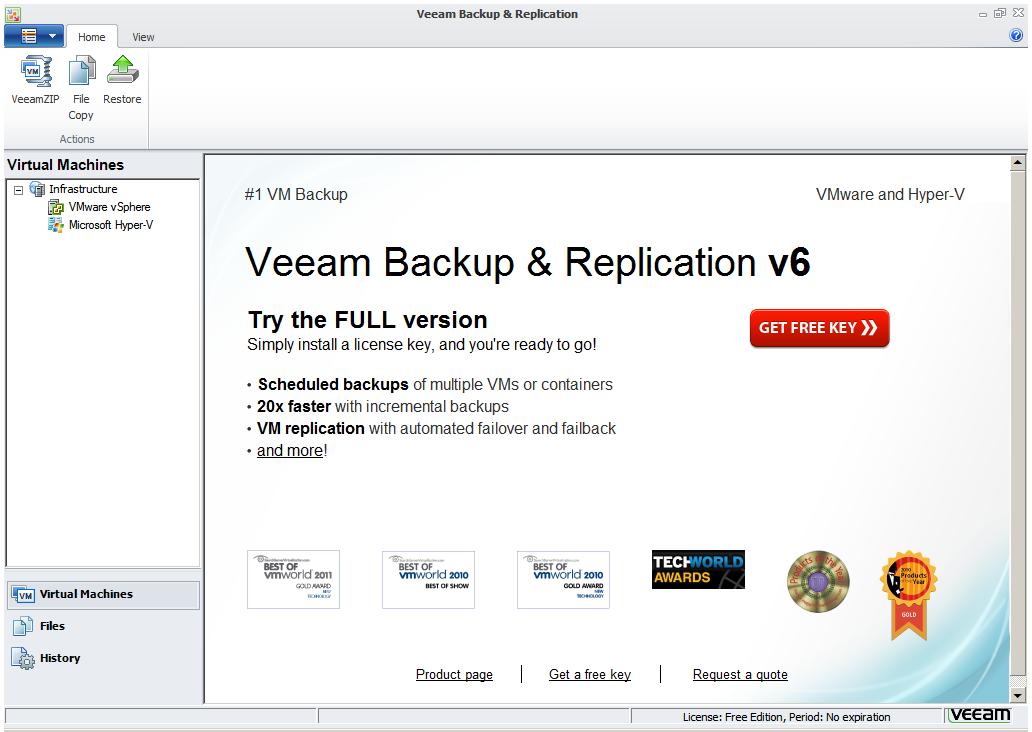
the following configuration screen will be displayed
  • Configuration Screen

Configuration Screen

2

Add VMware vSphere vCenter Server

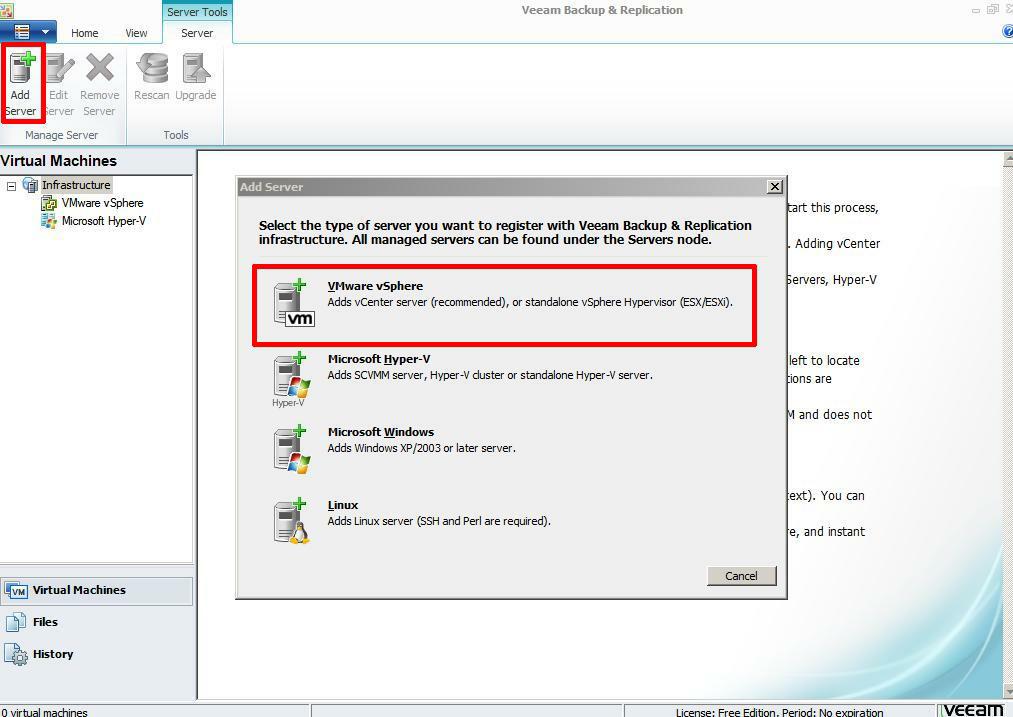
Before using Veeam Backup Free Edition, you must register your virtual infrastructure. To start this process, Click the Add Server button in the ribbon, the following Add Server Dialogue box will be displayed.

  • Add Server

Add Server

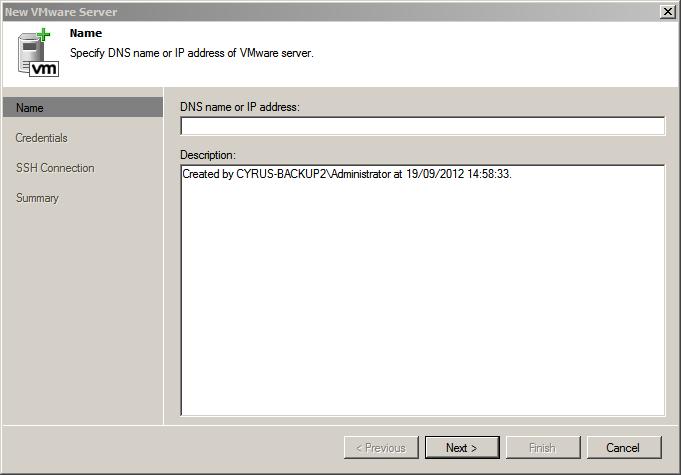
Select VMware vSphere, the following dialogue box will be displayed, add the DNS name or IP Address of your VMware vCenter Server. We always prefer to use DNS names, and to ensure that DNS is working correctly.
  • Enter DNS Name or IP Address

Enter DNS Name or IP Address

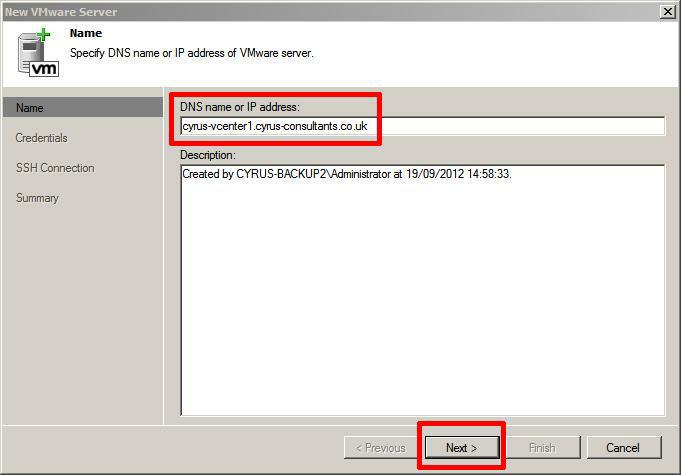
in this tutorial the vCenter Server for Windows we will be using is called cyrus-vcenter1.cyrus-consultants.co.uk. Enter the FQDN of the vCenter Server and Click Next
  • Enter vCenter Server DNS Name

Enter vCenter Server DNS Name

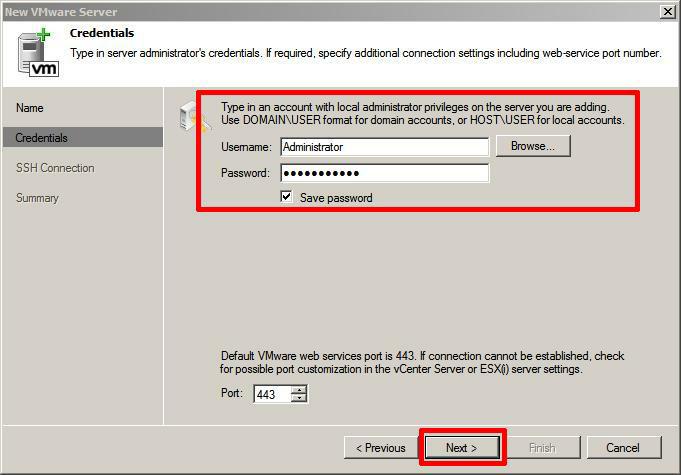
Enter an Administrator account and password which has access to vCenter Server, followed by Next.
  • Enter Administrator username and password

Enter Administrator username and password

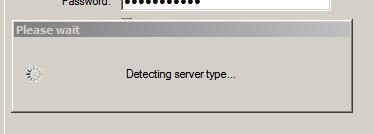
the following dialogue boxes will appear in turn
  • Detecting server type

Detecting server type

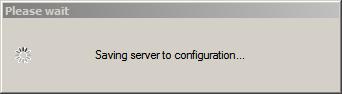
  • Saving server to configuration

Saving server to configuration

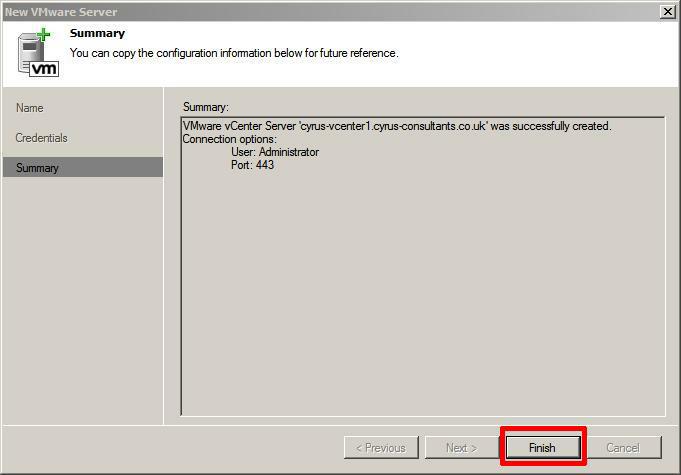
after a few seconds the final Summary dialogue appears, confirming Successful addition of the vCenter Server. Click Finish.
  • Successful Configuration

Successful Configuration

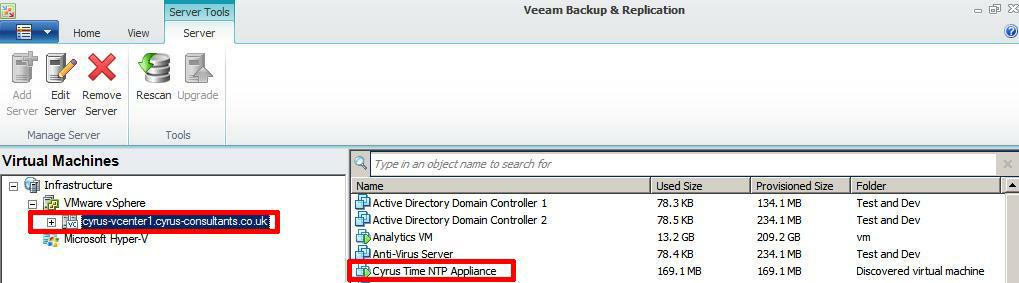
Click the “+” sign next to VMware vSphere, and expand, this will show the list of Virtual Machines registered on VMware vSphere vCenter.
  • Show Virtual Machines registered on vCenter Server

Show Virtual Machines registered on vCenter Server

3

Using the Veeam QuickMigration function

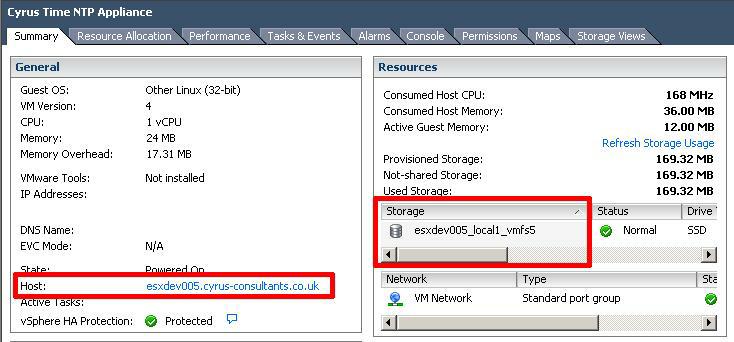
In this tutorial, we will Quick Migrate a Live virtual machine called “Cyrus Time NTP Appliance“, although this is a small virtual machine appliance it’s very important because this single appliance is responsible for providing correct time synchronisation for all servers, workstations, routers, switches and printers in our offices.

This virtual machine is currently hosted on an VMware vSphere Hypervisor ESXi 5.0 host called – esxdev005.cyrus-consultants.co.uk, and is stored on the hosts local datastore called esxdev005_local_vmfs5.

  • Virtual Machine to be Quick Migrated

Virtual Machine to be Quick Migrated

and in this tutorial we will Quick Migrate the Live virtual machine to a host called – esxdev004.cyrus-consultants.co.uk and a shared storage iSCSI LUN, formatted VMFS5 datastore called lun26_filer03. This is an iSCSI LUN, on a NetApp filer.

Right Click the Virtual Machine to be QuickMigrated and select Quick Migration

  • Select the Virtual Machine

Select the Virtual Machine

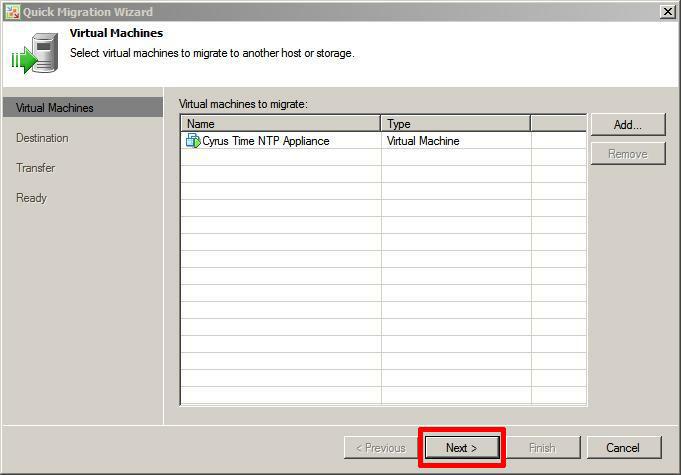
the following screen confirms the virtual machine you would like to Quick Migrate, Click Next to confirm
  • Confirm virtual machine for quick migration

Confirm virtual machine for quick migration

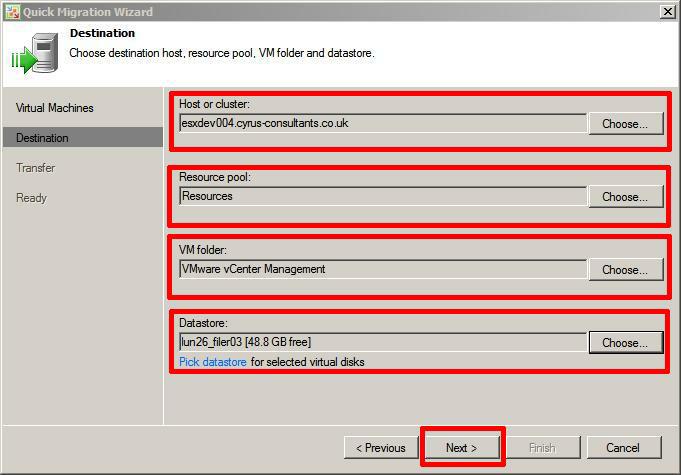
Select Destination host, resource pool, VM folder and datastore. In this tutorial the screeenshot shows the selection we have selected, followed by Next.
  • Select Destination host, resource pool, VM folder and datastore.

Select Destination host, resource pool, VM folder and datastore.

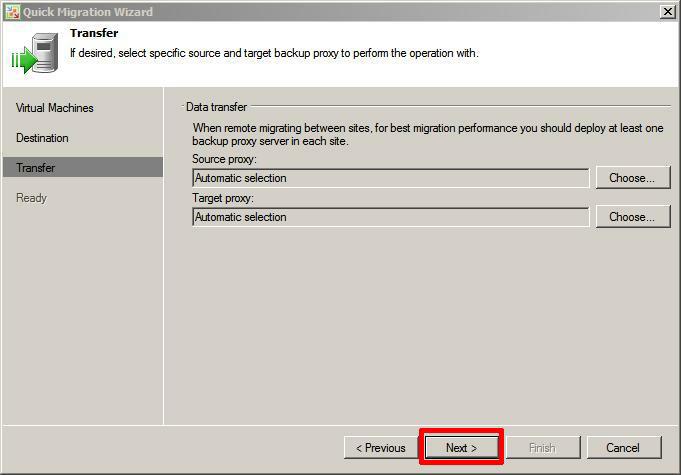
The next screen asks which proxy to use, with the Free Edition, there is only one Backup Proxy installed on the default server, so select Automatic, and click Next. In the licensed version of Veeam Backup & Replication, multiple Backup Proxys can increase transfer times.
  • Select Backup Proxy – leave as Automatic

Select Backup Proxy - leave as Automatic

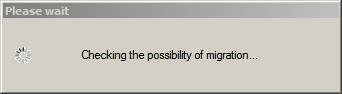
The following diaglogue boxes appears that
  • Checks the possibility of migration

Checks the possibility of migration

this ensures ESX/ESXi hosts are reachable, datastores, and networks are correct.

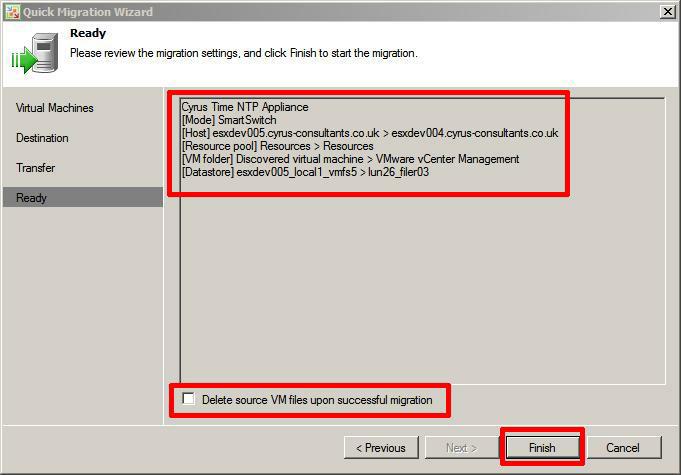
A confirmation screen is displayed which summarises the Migration, Click Finish to start the Quick Migration. You can also select that the source VM is deleted after a successful migration. (tick box)

  • Ready for Quick Migration

Ready for Quick Migration

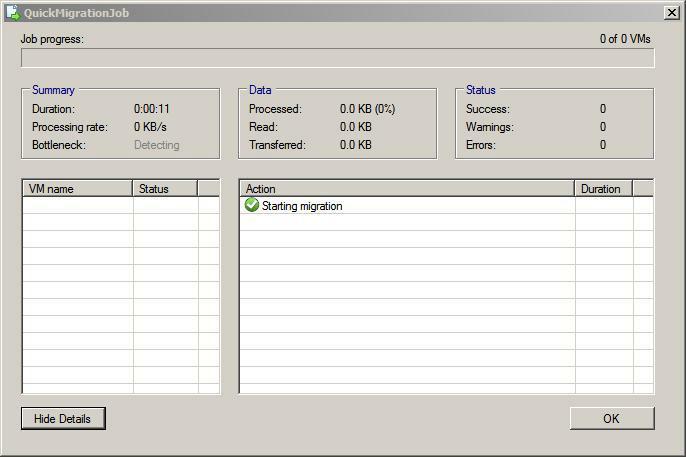
The Quick Migration in Progress
  • Quick Migration in Progress

Quick Migration in Progress

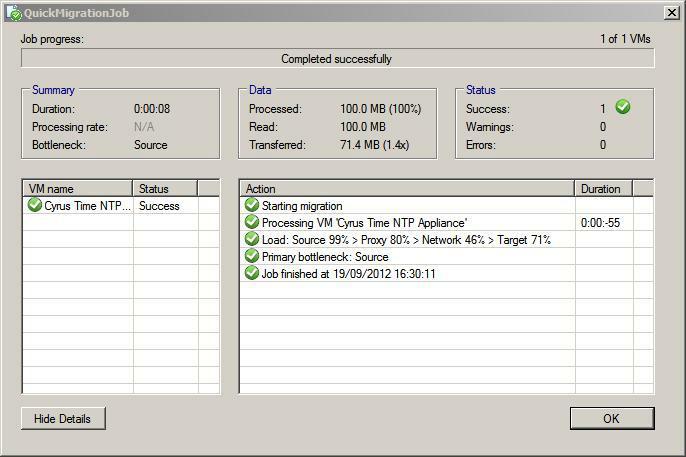
Quick Migration Completed successfully
  • Quick Migration Completed successfully

Quick Migration Completed successfully

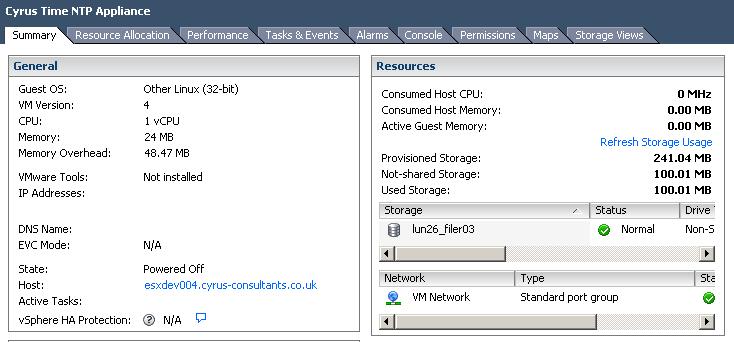
The following screenshot shows the Quick Migrated machine, on the correct host and datastore.
  • Quick Migrated Virtual Machine

Quick Migrated Virtual Machine

Finally, on inspection in the vSphere Client, you will find, you have a backup of the original VM called <vm name>_migrated and the migrated virtual machine on the host and datastore selected.

  • Quick Migrated Virtual Machines

Quick Migrated Virtual Machines

BUT, both VMs are Suspended, so just issue a Power-On Request to your original VM to resume service! (that’s CTRL+B)

I suspect there is a little bugget here with VMware vSphere Client because both VMs are suspended and should have Pause Symbols, but there is a Pause Symbol missing from the Migrated VM, I suspect it’s not refreshing after being Registered with vCenter Server, if you watch carefully, you will see a Pause symbol shortly after a Power-On is issued, and then changes to a Green Powered On Symbol.

In this tutorial article we have shown How To Migrate a Live Virtual Machine from an ESX/ESXi host, to another ESXi/ESX host, and migrate from local storage to shared storage for FREE using the Quick Migrate function in the latest version of Veeam Backup Free Edition.

Try it today, it’s free, and much easier than alternative methods.

Building End – User Computing Solutions with VMware View

Friday, August 3rd, 2012

screen-shot-2012-08-02-at-15-46-51

Barry Coombs and Mike Laverick’s new book Building End – User Computing Solutions with VMware View has just been published. It’s available here as an eBook.
I was fortunate enough as one of the VMware vExperts in the Community to proof read the book before publication. You can see my name in print on Page 6!

Needless to say, it’s an excellent book, and should be on all VMware View Admin Bookshelves!

Andy’s new gadget courtesy of VMware – A Kindle Fire

Monday, April 9th, 2012

On April 2nd, I blogged here about a mysterious parcel from VMware that arrived by FedEx.

The parcel contained an Amazon Kindle Fire, not available in the UK. To be released later this year. I’ve not done the Android experience, being strictly an Apple iOS, Microsoft Windows CE/Mobile, and Nokia nerd. So it will be interesting to checkout what Android 2.3 ‘Gingerbread’ has to offer, compared to Apple iOS 5.1.

kindlefirekindlefire1

The Amazon Kindle Fire is a Full Colour 7 inch, multi-touch display, tablet, with WiFi, web, movies, music, apps, games, reading & more, and it runs Android 2.3 ‘Gingerbread’.

VMware sent me the gift, as a Thank You for providing feedback in the My VMware Beta program.

Thank You VMware!

FedEx delivers VMware vExpert swag and what’s in this other box from VMware?

Monday, April 2nd, 2012

Got a surprise today when FedEx delivered not one, but two FedEx Boxes from VMware…A large box and a medium box. I happen to open the large box first!

The first large FedEx box contained my VMware vExpert swag, A VMware vExpert branded laptop bag, VMware vExpert luggage travel tag and my VMware vExpert Certificate.

Large and Medium Box from FedEx

Large and Medium Boxes from VMware, delivered by FedEx

VMware vExpert swag

VMware vExpert swag

Thanks to John and Alex that managed the VMware vExpert Program.

I’ll photograph, and blog tomorrow, what was in the other box!