and now……
12.00AM January 28th 2012!
in December 2011!
it all started with this…early December 2011
In November 2011
and now……
12.00AM January 28th 2012!
in December 2011!
it all started with this…early December 2011
In November 2011
You may notice today if visting Wikipedia you’ll be greeted with

It reads ”
For over a decade, we have spent millions of hours building the largest encyclopedia in human history. Right now, the U.S. Congress is considering legislation that could fatally damage the free and open Internet. For 24 hours, to raise awareness, we are blacking out Wikipedia. Learn more.”
As I type this reddit.com is about to go dark in the next 20 minutes, it was also hoped that Google, Facebook and Twitter my join…
Google.com has a link on it’s homepage
 Tell Congress: Please don’t censor the web!
I’ve been a little busy of late, writing articles for Experts-Exchange.com, which in the next few months will be releasing EE v.10 (new website version 10!).
But if you’ve been a little puzzled about what I’ve been doing, the following videos may help you understand about what Experts-Exchange.com is all about.
Site Administrator on What Makes EE Different from Experts Exchange on Vimeo.
Experts Exchange Senior Administrator on Community from Experts Exchange on Vimeo.
How to Backup ESXi installation on a USB flash drive or SD card.
Requirements
1. A valid ESXi installation on a USB flash drive or SD card.
2. A copy of Winimage for Windows.
3. A Windows computer.
4. Optional Blank DVD for making backup.
5. Optional USB flash drive or SD card for flash backup.
Using your internet browser, Internet Explorer or Mozilla, download a copy of Winimage from http://www.winimage.com/download.htm.
WinImage is a shareware product. You may copy, distribute, and try it for free, but if you use for longer than the evaluation period, you must register. You will receive a valid license, a registration code and the latest release.
Install Winimage as per the vendors instructions on your Windows computer you need to backup the USB flash drive or SD card.
Insert the ESXi USB flash drive or SD card inserted in a card reader into the computer you have installed Winimage on.
Start Winimage from the Start Menu on your Windows computer.
From the disk menu, in Winimage, select Creating Virtual Hard Disk Image from Physical Drive.
See picture below
Select the USB flash drive or SD card, from the list, in this example, I’m using a Flash LUXIO USB flash drive.
Select the Fixed Size Virtual Hard Disk, ensure there is a dot in this selection. This ensures that the saved backup image is exactly the same size as the flash drive, you are copying example 2GB for a 2GB USB flash drive, 4GB fort a 4GB flash drive.
Click OK
Once you have specified a location, a progress bar will continue on screen showing the progress of the copy.
When prompted to connect to partition, click okay and Exit Winimage
The contents will be saved to disk.
The operation is complete and you can exist Winimage, and Safely remove your USB flash drives or SD cards, from the computer, by selecting the Safely remove hardware icon, in the system Smart tray.
If you image size is less than the size of a DVD (4.5GB), I also backup the USB/SD card installation image to a DVD, and if you have a spare USB flash drive, it doesn’t hurt writing the contens to another USB flash drive or SD card. (and make sure you label with date, time, and version and build of ESX, and what server it is for!)
VMware ESX/ESXi Backup Guide
If you have a licensed version of ESX/ESXi, (paid for license) you could purchase the following third party applications to perform backups. If you do not have a licensed version of ESX/ESXi, your options are limited, because a non-licensed (paid for) version does not give access to the licensed APIs for third party products to function. You will there for need at least a Standard license for ESX/ESXi for the following products listed in 1 to 3 below.
1. Veeam Backup and Replication v5 – very popular, won many awards at VMworld 2010
Download a trial here – http://www.veeam.com/vmware-esx-backup.html
2. Quest Vizioncore Vranger Pro – the first VM backup product with a good pedigree.
Download a trial here – http://vizioncore.com/product/vRangerPro
3. PHD Virtual Backup – very fast backup technology, using virtual applicance.
Download a trial here – http://www.phdvirtual.com/phd-vb-51-vmware-vsphere
4. VMware Data Recovery – supports dedupe, integrated with vCenter – maybe included with your current VMware License (available in vSphere Enterprise Plus, Advanced, and Essentials Plus Editions. VMware Data Recovery can also be purchased a la carte with vSphere Standard Edition.)
http://www.vmware.com/products/data-recovery/overview.html
Free (download) alternatives for backing up VMs
5. ghettoVCB
http://communities.vmware.com/docs/DOC-8760 ((Will work on FREE ESXi, no licensed required.)
(can be performed whilst the virtual machine is live or powered on)
6. ghettoVCBg2
http://communities.vmware.com/docs/DOC-9843 (needs licensed version of ESX/ESXi)
(can be performed whilst the virtual machine is live or powered on)
7. Scripts and NFS backup
http://communities.vmware.com/message/1029047 (Will work on FREE ESXi, no licensed required.)
(can be performed whilst the virtual machine is live or powered on)
8. VMware Converter Standalone 4.3
http://downloads.vmware.com/d/info/datacenter_downloads/vmware_vcenter_converter_standalone/4_0
VMware vCenter Converter Standalone 4.x Documentation
http://www.vmware.com/support/pubs/converter_pubs.html
VMware vCenter Converter Standalone 4.3 User Guide
http://www.vmware.com/pdf/convsa_43_guide.pdf
With VMware Converter you can convert and copy a Virtual Machine to another datastore, this advantage is you can do this whilst the virtual machine is Online or Powered-Up.
9. Veeam FastSCP
Free download here http://www.veeam.com/vmware-esxi-fastscp.html
Fast Virtual Machine / File Transfer. Faster than WinSCP and other SCP-based tools as it uses full network capacity. The Veeam FastSCP engine also features traffic compression and empty block removal for best file copy performance.
You can use FastSCP to connect to the ESX/ESXi server, and download the entire virtual machine folder/directory to the current workstation or server, where yov’ve connected from. You must ensure that the virtual machines are powered off to complete this operation.
10. Datastore browser
The datastore browser is included in the vSphere GUI Client, and enables you access to the datastore, virtual machines are stored on. You can simple use the cut and paste, or download/upload options to backup and restore virtual machines. Again to copy a virtual machine, the virtual machine must be powered off.
Restoring with options 9 and 10, above, you must add the Virtual Machine manually to the inventory, by selecting the vmx file in the datastore browser, right click on the *.vmx file, and select “Add to Inventory”.
In VMware vSphere 4 1 and 5.0, if you have two or more hosts, using shared storage, (SAN/NAS) you can create a VMware vSphere Cluster and enable High Availability mode (HA), if you have the correct VMware vSphere Licensing.
VMware vSphere High Availability (HA) provides easy to use, cost effective high availability for applications running in virtual machines. In the event of VMware vSphere server failure, affected virtual machines are automatically restarted on other VMware vSphere production servers with spare capacity.
You may have noticed that after Turning On vSphere HA in Cluster settings from the vSphere Client that a Configuration Issues warning yellow box may appear on the Summary page of ALL host ESXi servers in the vSphere Cluster.
The Configuration Issues reports “This host currently has no management network redundancy”
You will also notice there is also a yellow/orange warning triangle displayed on ALL the vSphere ESXi host servers in the vSphere Cluster.

The only issue, is that the Warning triangle displayed in VMware vSphere vCenter can mask real warning events.
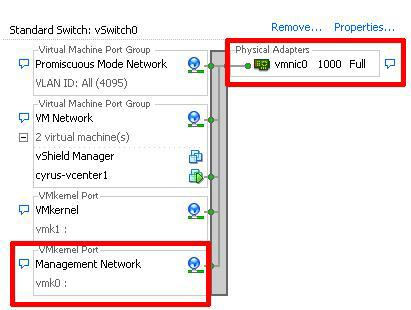
VMware vSphere HA will still function correctly, the configuration issue, is warning that there is only one physical network interface connected to the virtual vswitch which has the service console (ESX) or management network interface (ESXi) connected.
example vSwitch with single physical network interface vmnic0
These configuration issues and warnings alert triangles, can be suppressed as follows
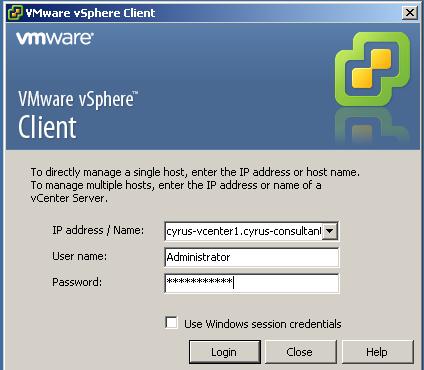
Using the VMware vSphere Client, Login and Connect to the VMware vSphere vCenter server, using IP address or hostname of the VMware vSphere vCenter server, using vCenter Server Administrator username and password credentials.
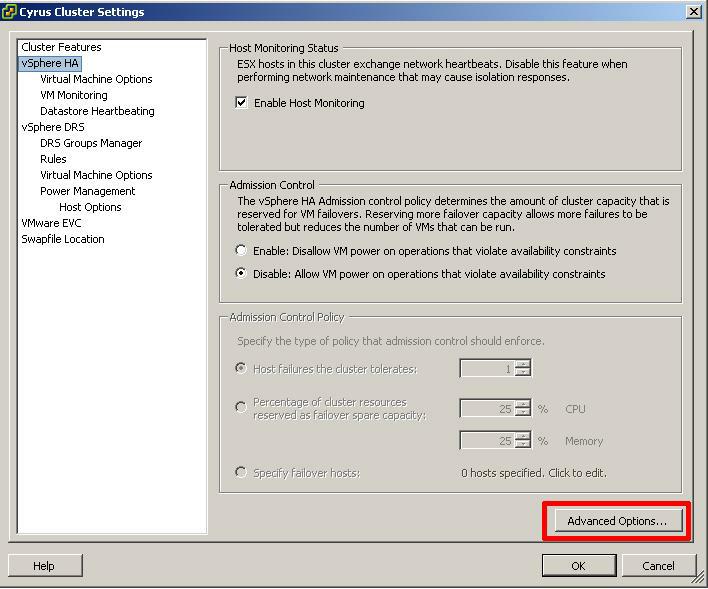
Select the Cluster in Inventory > Hosts and Clusters, Right Click the Cluster in the right hand panel, and select Edit Settings
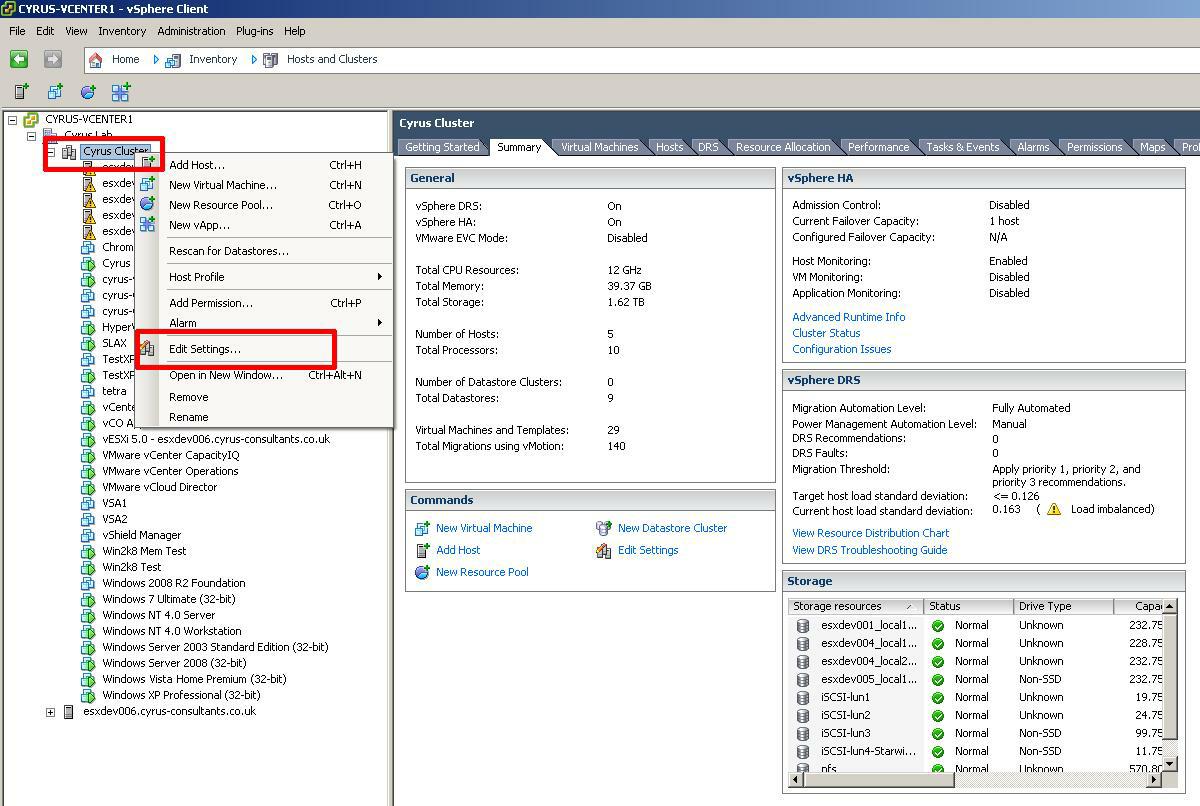
The vSphere Cluster settings dialgoue box will be opened.

Select vSphere HA and click Advanced Options, bottom right
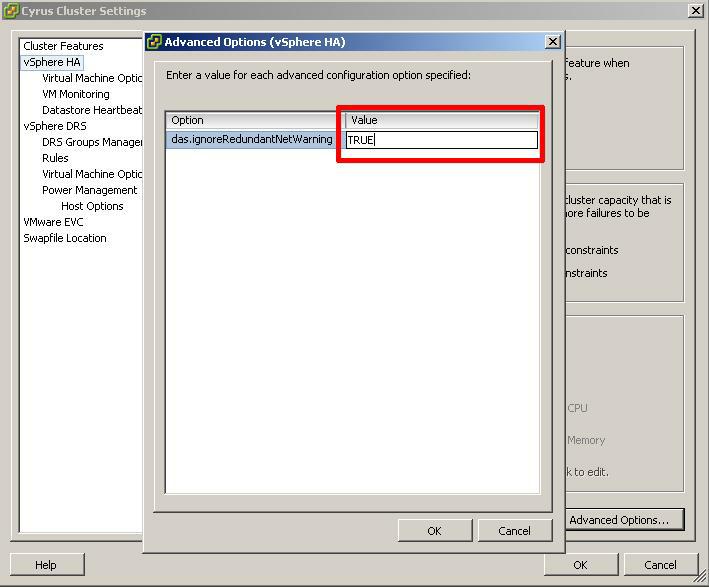
the Advanced Options (vSphere HA) diaglogue box will open.

To suppress the configuration issues box and warning triangles, the das.ignoreRedundantNetWarning needs to be added with a value of TRUE.
Click the left hand column under Option, and enter das.ignoreRedundantNetWarn
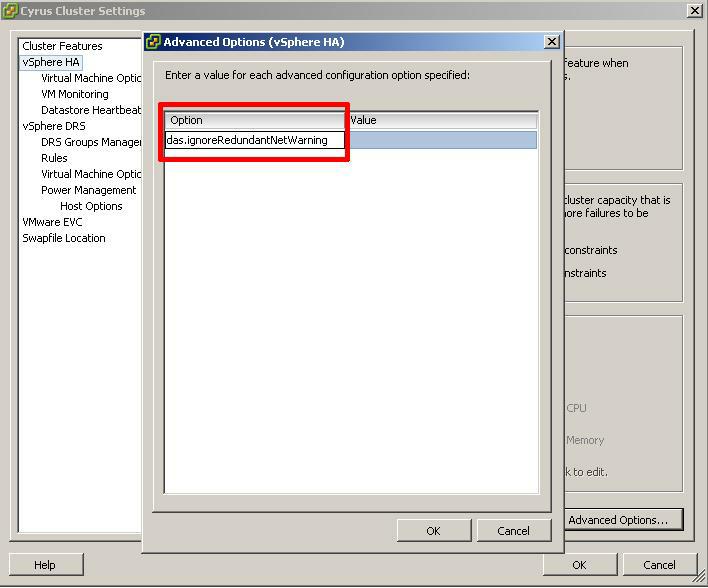
Click the right hand column under Value, and enter TRUE.
Click OK to return to Cluster Settings.
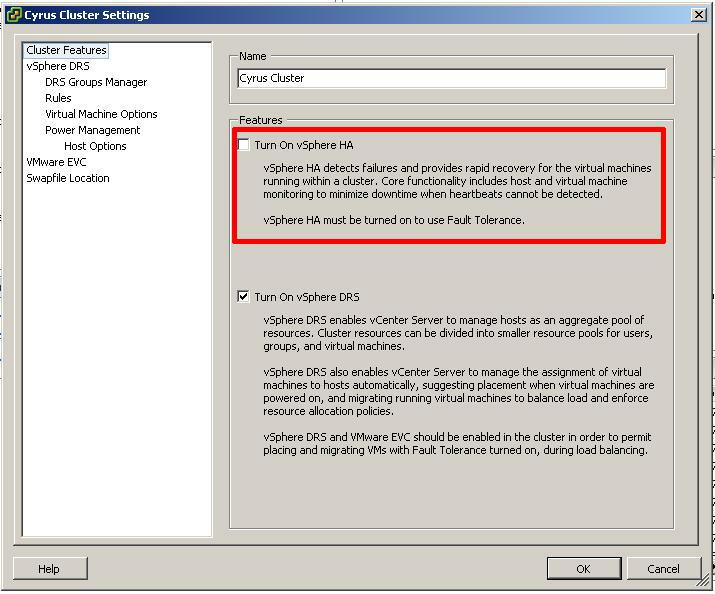
Click Cluster Features and remove the Tick from Turn On vSphere HA.
This action will disable HA on ALL ESX/ESXi hosts in the cluster. Please note I would recommend any changes to a production environment be carried out and schedule out of core SLA hours.
Click OK. The HA cluster will be reconfigured, this will take a few seconds.
Select the Cluster in Inventory > Hosts and Clusters, Right Click the Cluster in the right hand panel, and select Edit Settings
The vSphere Cluster settings dialgoue box will be opened.
Select Turn ON vSphere HA (by clicking and ensuring a Tick appears in the box)
Click OK.
The HA cluster will be reconfigured, this will take a few seconds. (Tested with Five hosts takes 40 seconds).
The Configuration Issues yellow box in the Summary Page and Warning Triangle will disappear immediately.
Thank you for reading my article, please leave valuable feedback.
In vSphere 4 1 and 5.0, you can enable both Remote SSH and the ESXi Shell for management of hosts from the vSphere Client and from the Direct Console User Interface.
You may have noticed that on enabling both Remote SSH and the ESXi Shell for management of hosts from the vSphere Client and from the Direct Console User Interface that a Configuration Issues warning yellow box appears on the Summary page of the host ESXi server.
This Configuration Issues warning yellow box only appears when Remote SSH and/or ESXi shell has been enabled.
If you are also connected to a Windows vCenter Server using the vSphere Client, you will also notice there is also a yellow/orange warning triangle displayed on the host server.
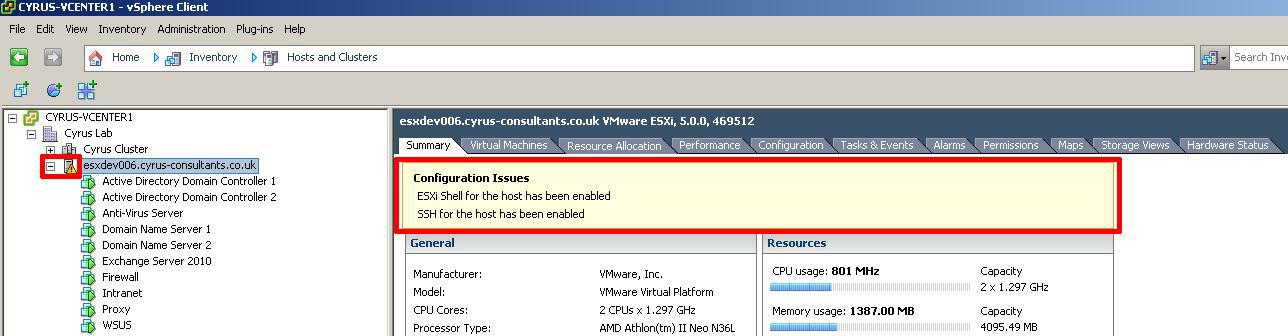
There is no vSphere ESXi configuration issue, VMware vSphere Hypervisor (ESXi) and VMware vSphere vCenter server are indicating there is a possible security issue with your installation, you may not be aware that SSH and ESXi shell have been enabled.
VMware state “This message is a proactive security measure designed to ensure that administrators are aware that remote access has been enabled for the server.”
The only issue, is that the Warning triangle displayed in VMware vSphere vCenter can mask real warning events.
These configuration issues and warnings alert triangle, can be suppressed as follows
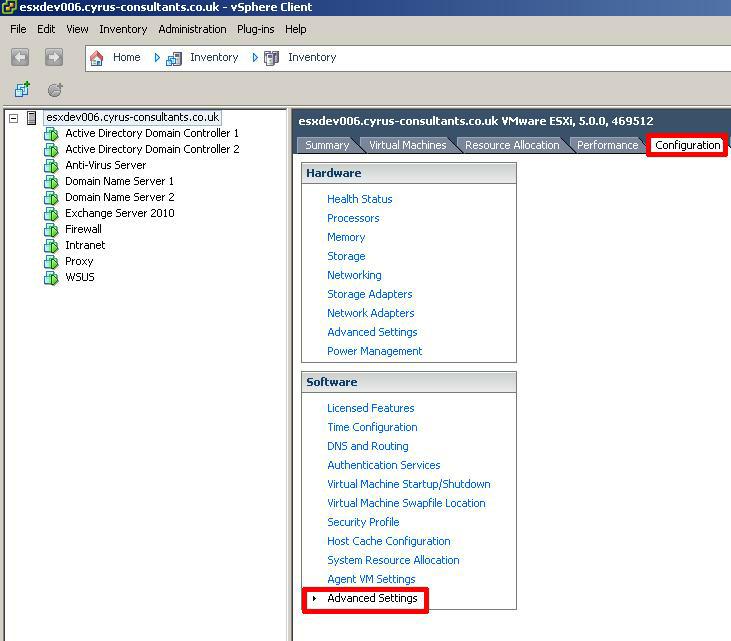
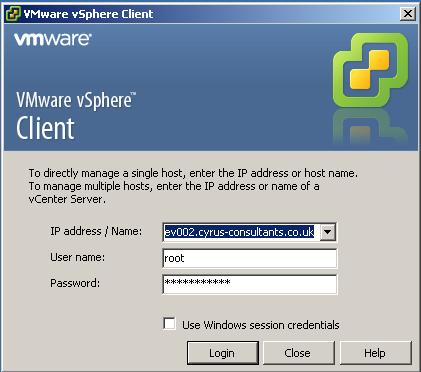
Using the VMware vSphere Client, Login and Connect to the ESXi server, using IP address or hostname of the ESXi server, using root username and password credentials. If you have a VMware vSphere vCenter server, you could also specify IP address or hostname of the vCenter server.
Once you are logged into and connected to the host ESXi or vCenter server, Select the host ESXi server, followed by the Configuration Tab.
Click the Advanced Settings option at the bottom of the list.
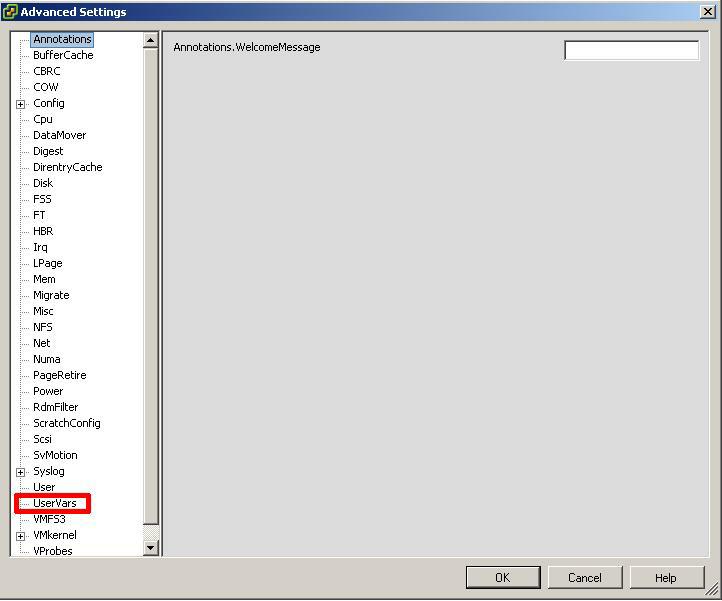
After Clicking Advanced Settings the following Advanced Settings dialogue box will open as shown in the following screenshot.
Navigate to and Click the UserVars section.
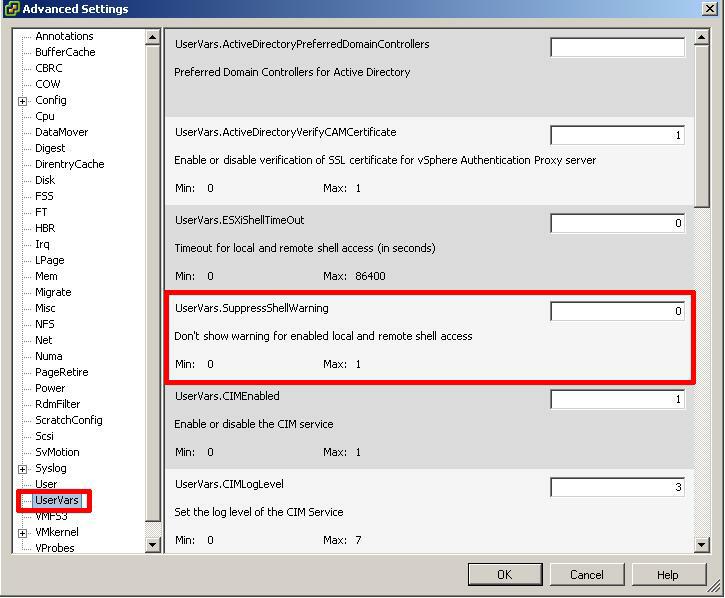
Set the value of UserVars.SuppressShellWarning from 0 to 1.
Click OK.
The Configuration Issues yellow box in the Summary Page and Warning Triangle will disappear immediately.
Please note: the variable UserVars.SuppressShellWarning is only available in ESXi 4.1 U2, ESXi 5.0 and vCenter Server 4.1 U2 and 5.0 only.
The original payload size or maximum transmission unit (MTU) of an ethernet frame is 1500 bytes. A jumbo frame has an ethernet frame size of 9000 bytes or over. Common Jumbo Frame sizes are 9000, 9216 bytes (example – HP switches).
Enabling Jumbo Frames may help reduce storage latency and increase storage throughput when used in conjunction with iSCSI or NFS storage network protocols with a VMware vSphere Hypervisor (ESXi 5.0) host server and a storage area network (SAN) or network attached storage (NAS) device.
Before enabling Jumbo Frames on an ESXi 5.0 server, check
(i) ensure the servers network interface card can support jumbo frames. Check with server or network manufacturer.
(ii) network switches support the use of jumbo frames, and enable jumbo frames on the network switches. Not all switches support the use of jumbo frames.
(iii) the SAN or NAS supports jumbo frames, and is enabled accordingly to manufacturers instructions.
The end to end network topology must support jumbo frames, otherwise ethernet frame packets will become fragmented, and performance will be degraded.
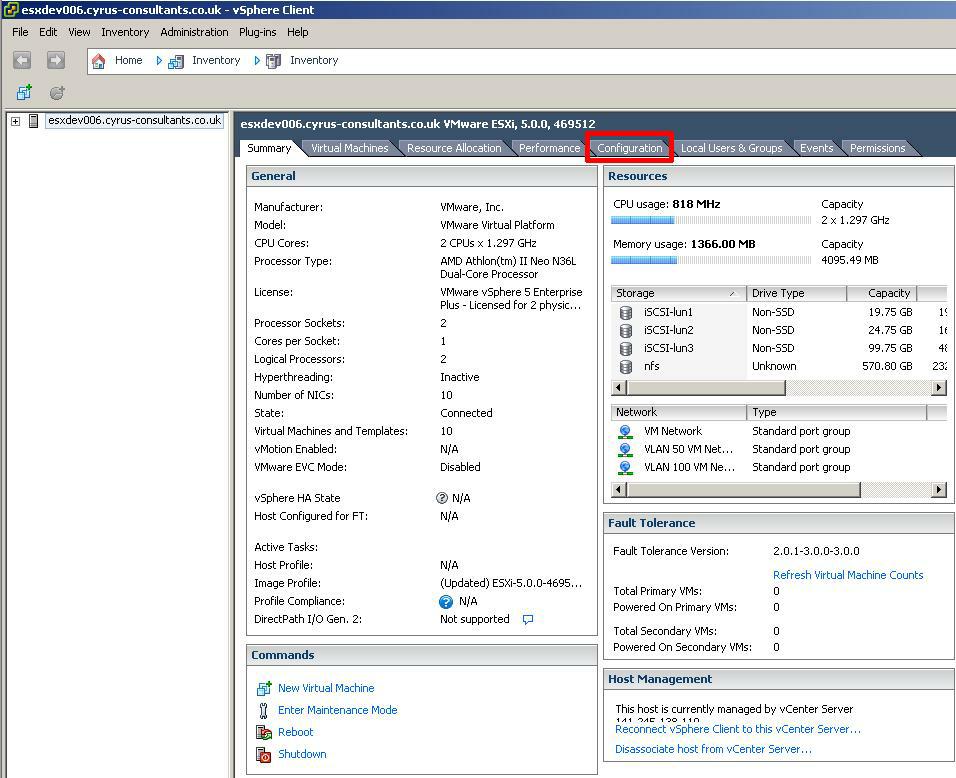
Using the VMware vSphere Client, Login and Connect to the ESXi 5.0 server, using IP address or hostname of the ESXi 5.0 server, using root username and password credentials. If you have a VMware vSphere vCenter server, you could also specify IP address or hostname of the vCenter server.
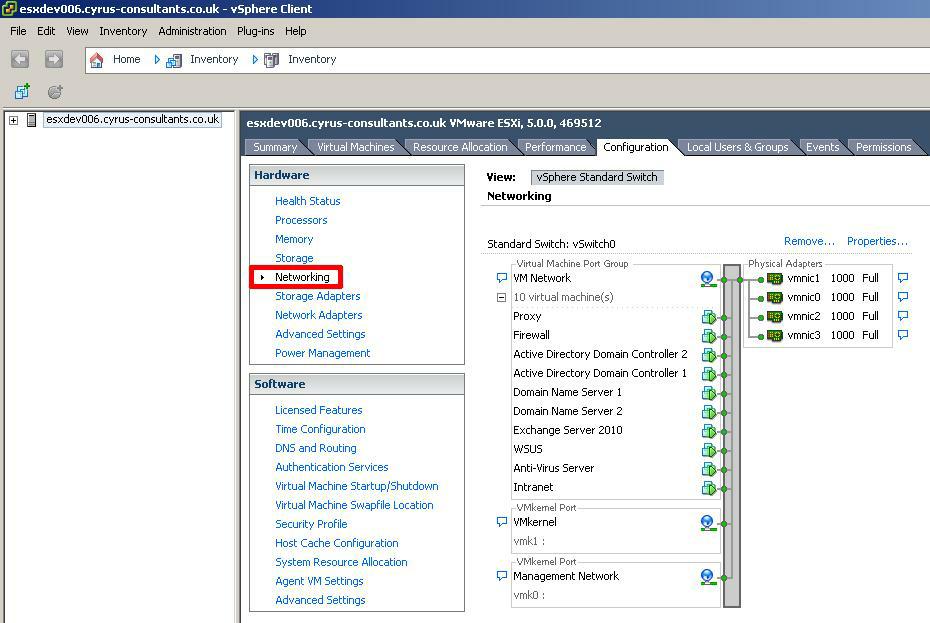
Once you are logged into and connected to the host ESXi 5.0 server, Select the Configuration Tab.
Click the Networking option to display the network vSwitches.
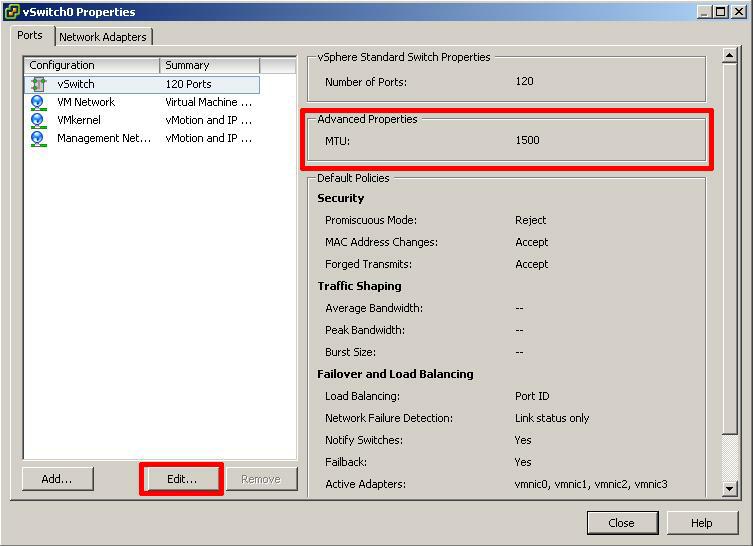
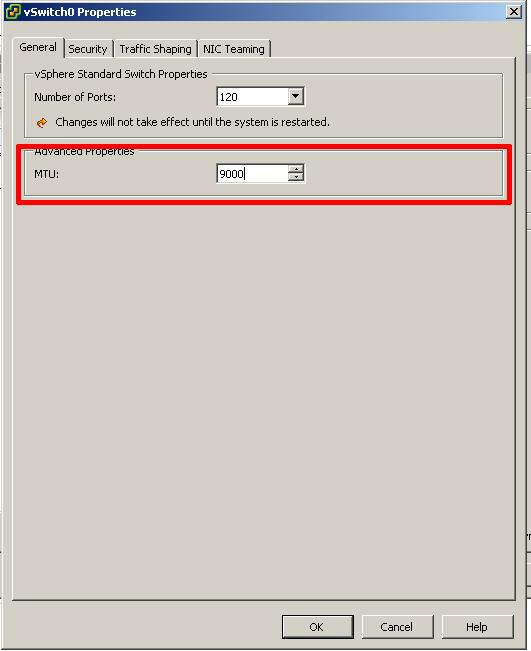
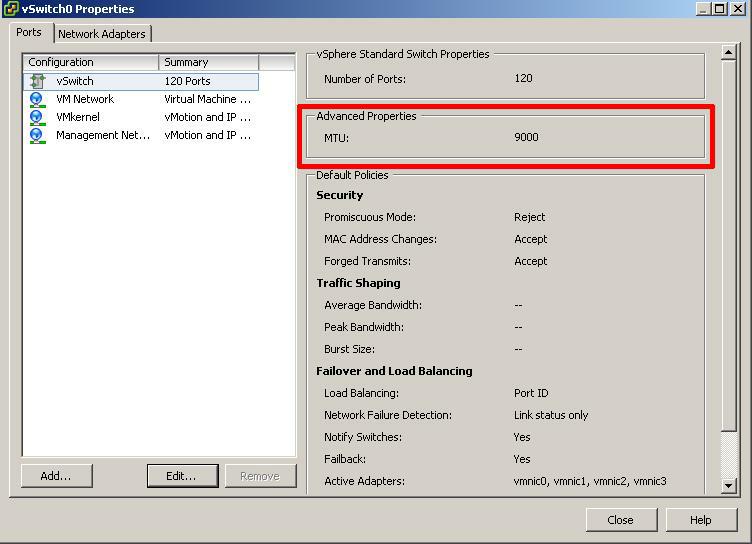
you can check the existing frame or MTU size of the vSwitch. In this example vSwitch0 is selected.
Click Edit
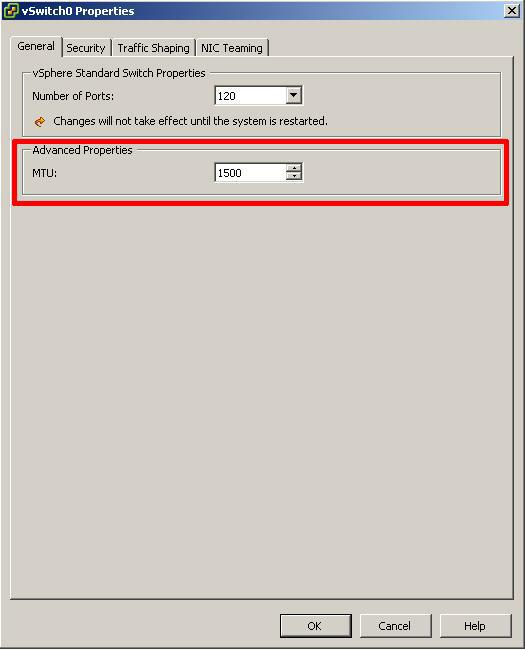
The default MTU (frame) size is 1500, enter the MTU (jumbo frame size) either 9000 (9216 if you switch is HP). Check with your network switch and SAN/NAS vendor for correct jumbo frame size.
Click OK and Close.
You have successfully configured your vSwitch for jumbo frames.
Once you have configured jumbo frames, it is important to test this change before commissioning any ESXi 5.0 server into production.
VMware vCenter Converter Standalone 5.0 is a FREE tool available from VMware upon registration, the purpose of this software tool is to easily convert physical or virtual computers, images of computers to VMware virtual machines. Server and Workstation operating systems are supported in the conversion.
Download VMware vCenter Converter Standalone 5.0 here
VMware vCenter Converter Standalone 5.0 Documentation
VMware vCenter Converter Standalone 5.0 User Guide
In September 2011, VMware released version 5.0 of VMware vCenter Converter Standalone 5.0, with many new features including partition alignment important for aligning partitions correctly on storage array networks (SAN).
BUT, we’ve noticed that completing conversions using VMware vCenter Converter Standalone 5.0 compared to using VMware vCenter Converter Standalone 4.3, were taking much longer, and the transfer rate of a conversion had become degraded when using version 5.0.
The following modification will improve the transfer rate when using VMware vCenter Converter Standalone 5.0, to similar transfer rates obtained when using VMware vCenter Converter Standalone 4.3 to perform conversions.
It would appear that VMware uses a proprietary VMware protocol called NFC, to image to destination, also by encrypting (SSL) the data payload transfers in version 5.0, this additional overhead causes transfer performance degradation. The result of which is a longer than expected conversion time, when compared to version 4.3.
Turning OFF SSL Encryption in VMware vCenter Converter Standalone 5.0 can improves transfer rates.
(if appropriate for your environment)
To turn OFF SSL Encryption in VMware vCenter Converter Standalone 5.0, please follow the following steps:-
this file is location in the following locations
Windows Vista, Windows 7, Windows 2008
%ALLUSERSPROFILE%VMwareVMware vCenter Converter Standalone
Windows XP, Windows 2003, Windows 2000
%ALLUSERSPROFILE%Application DataVMwareVMware vCenter Converter Standalone
You may find it easier to edit the file using Microsoft XML Notepad 2007 to edit the XML file. But Notepad or Wordpad can edit the file, just ensure, you make a copy of the original file for backup before making any alterations. Using Microsoft XMP Notepad 2007, you do not have to scroll the contents of the file, and the <useSsl> section is quicker to find and alter, but whatever tool you find most comfortable to use to edit the file, is okay.
Change
<useSsl> true </useSsl>
to
<useSsl> false </useSsl>
save the XML file.

Using Microsoft XML Notepad 2007

Using Microsoft XML Notepad 2007 to change to false
For changes to take effect – Restart “VMware vCenter Converter Standalone Worker” service.
We have seen performance increases from at least 2x to 6x. So if you want to half the conversion time at least, then alter the encryption setting. If appropriate for your environment.
In the following example, a Windows 2003 Server was converted from Virtual Machine to Virtual Machine (V2V) using VMware vCenter Converter Standalone 5.0 installed on the server to be converted. In the first conversion (TaskId10) the SSL Key was left as the default TRUE, and encryption was used. In the second conversion (TaskId11), the SSL Key was set to false.
As can be seen from the following screenshots Average Transfer rate has increased from 2 MB/s to 6 MB/s and the conversion time has reduced from 1hr 38mins to 33mins..

Default encryption value of true 2MB/s transfer rate

Default encryption value of false 6MB/s transfer rate
A performance increase of 60%! just by chaning a value from true to false.
I think the other email was the Experts Exchange Community Newsletter, this is the Official email!


![[Valid RSS]](http://andysworld.org.uk/images/valid-rss.png "Validate my RSS feed")