Migrate VMs between hosts and/or datastores for FREE without vMotion/Storage vMotion or Shared Storage
Not all organisation have access to VMware’s vMotion or VMware’s Storage vMotion technology because of budgetry constraints. I’ve written this article because it’s a question which appears on Experts Exchange at least every few weeks, and now there is an easy solution to the problem.
Scenario 1
First implementation of VMware vSphere Essentials without shared storage, later the organisation purchases shared storage (iSCSI or Fibre Channel SAN or NFS NAS), and then needs to migrate existing virtual machines with little downtime to the shared storage platform.
Scenario 2
Organisation purchases a second newer replacement VMware vSphere host, needs to migrate existing virtual machines with little downtime to new VMware vSphere host.
Traditionally we would use ESXi/ESX Backup and Restore techniques, VMware vCenter Converter Standalone 5.0, or Datastore browser to clone or copy see my previous Experts Exchange articles below, to address the above scenarios, (remember here that VMware’s vMotion or VMware’s Storage vMotion is NOT available, because it’s not available in our licensed version of VMware vSphere).
VMware ESX/ESXi Backup Guide
HOW TO: Clone or Copy a virtual machine in VMware vSphere Hypervisor ESX/ESXi 4.x or ESXi 5.0
HOW TO: Improve the transfer rate of a Physical to Virtual (P2V), Virtual to Virtual Conversion (V2V) using VMware vCenter Converter Standalone 5.0
HOW TO: P2V, V2V for FREE – VMware vCenter Converter Standalone 5.0
Software Technology has improved and using Veeam Quick Migration, we can migrate Live VMs between hosts and datastores for FREE!
In the latest version of Veeam Backup Free Edition, there is a new function called Quick Migration. Veeam Backup Free Edition is the same download as Veeam Backup and Replication v6.1, but a Veeam license is not applied at installation time.
The Quick Migration utility in Veeam Backup Free Edition lets you migrate a live VM to any host or datastore—even if you don’t use clusters or shared storage.
Quick Migration leverages native VMware technology, as well as exclusive Veeam technology, to accommodate any migration scenario, including:
Migrating a VM from a local datastore to shared storage
Migrating a VM between 2 separate hosts and datastores
With Quick Migration’s point-and-click interface, you can easily move a live VM from any source to any destination, even if vMotion and vStorage Motion are not available. And with Veeam’s SmartSwitch technology, downtime is reduced to mere seconds.
Source
http://www.veeam.com/free-vmware-esxi-backup.html
In the following steps, I will demonstrate, how a Live virtual machine can be migrated from a Local Datastore attached to a VMware vSphere ESXi host, to an iSCSI LUN on a SAN and different VMware vSphere ESXi host. – this demonstrates a vMotion (migrate from one host to another host) and Storage vMotion. (from one datastore to new datastore) – using Veeam Quick Migration.
Prerequisites
1. VMware vCenter Server for Windows or VMware vCenter Appliance installed and configured with one or more VMware vSphere ESXi/ESX hosts. So you would need to have purchased at least VMware vSphere Essentials.
2. Veeam Backup Free Edition for VMware and Hyper-V installed on a virtual or physical server. We often install Veeam Backup and Replication v6.1 (same product) on a Microsoft Windows Server 2008 R2, with 2 vCPU and 8GB RAM. I’m not going to document the installation of Veeam Backup Free Edition, because it is simply, point and click; download the software, extract the software from the ZIP archive, Run the setup program, and Click Next…Next…Next…Finish.
- 1
-
Start Veeam Backup & Replication
Click the Veeam Backup & Replication icon to start the backup application.
The application will start and display the following banner
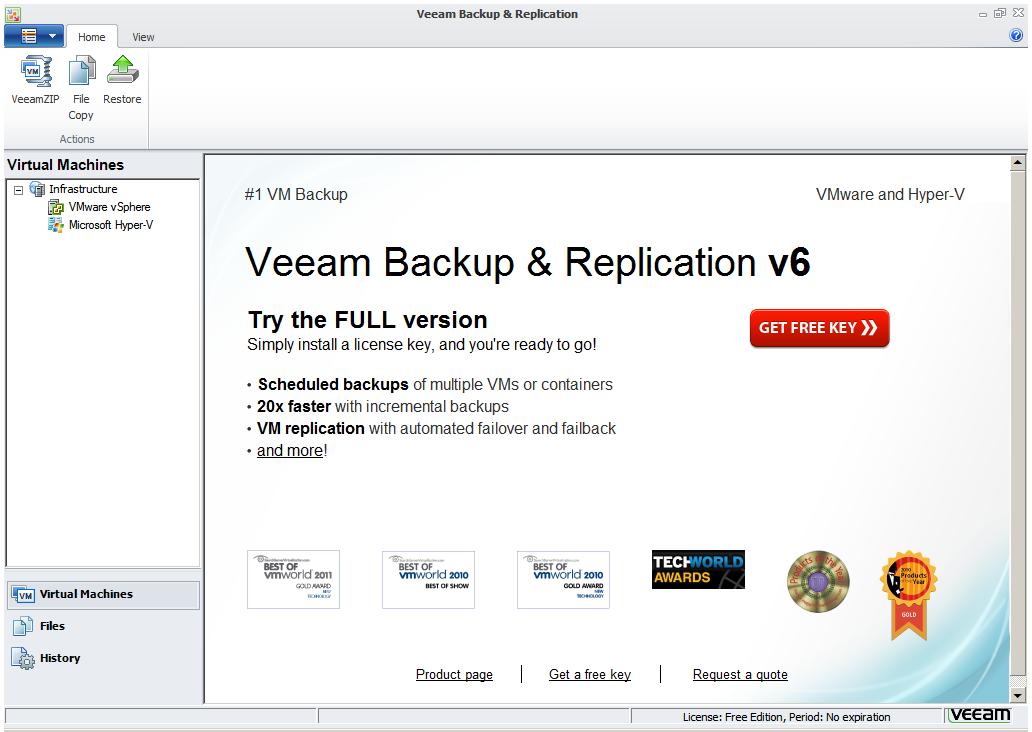
the following configuration screen will be displayed
- 2
-
Add VMware vSphere vCenter Server
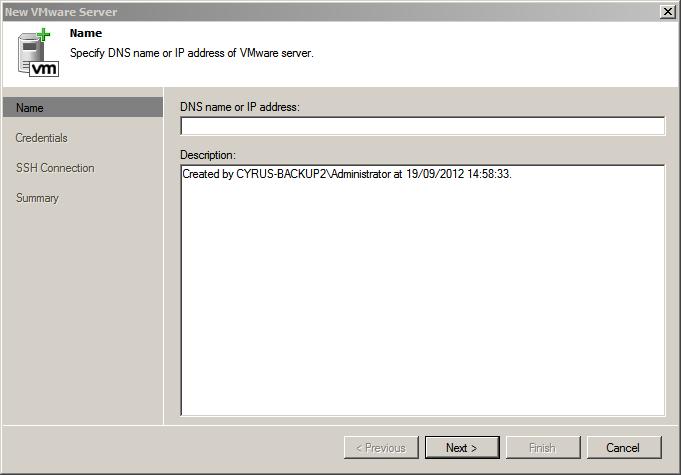
Before using Veeam Backup Free Edition, you must register your virtual infrastructure. To start this process, Click the Add Server button in the ribbon, the following Add Server Dialogue box will be displayed.
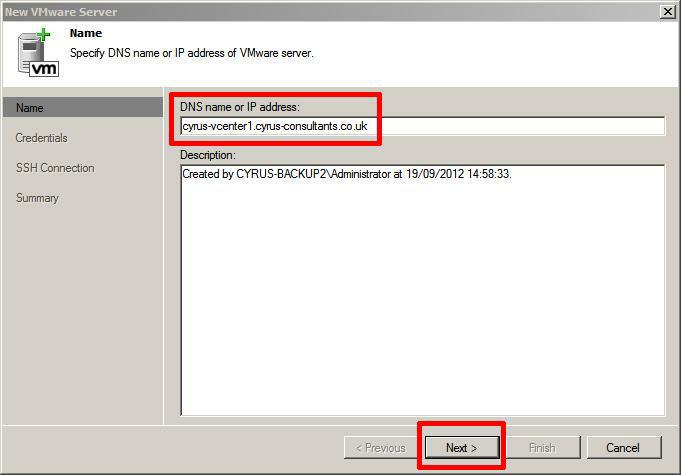
Select VMware vSphere, the following dialogue box will be displayed, add the DNS name or IP Address of your VMware vCenter Server. We always prefer to use DNS names, and to ensure that DNS is working correctly.
in this tutorial the vCenter Server for Windows we will be using is called cyrus-vcenter1.cyrus-consultants.co.uk. Enter the FQDN of the vCenter Server and Click Next
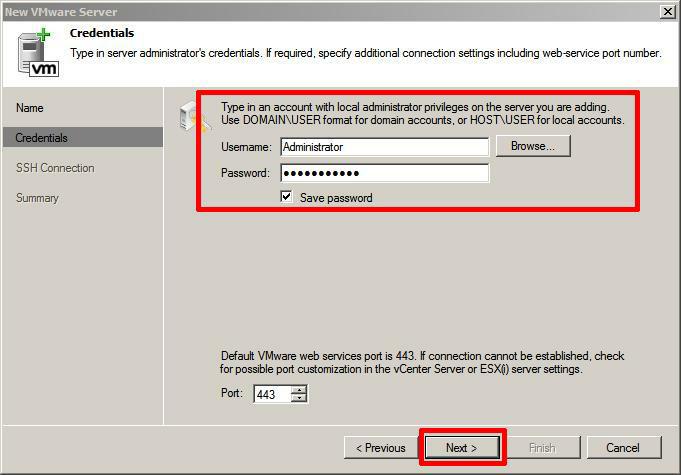
Enter an Administrator account and password which has access to vCenter Server, followed by Next.
the following dialogue boxes will appear in turn
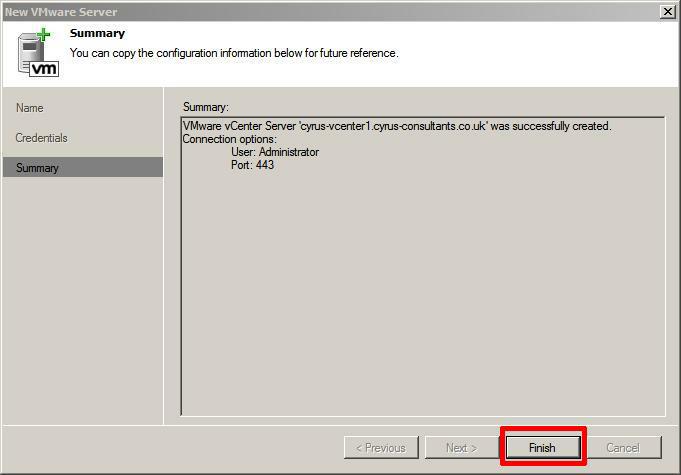
after a few seconds the final Summary dialogue appears, confirming Successful addition of the vCenter Server. Click Finish.
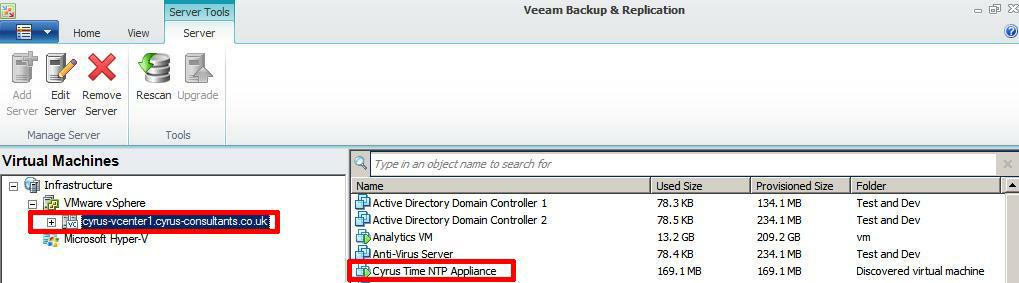
Click the “+” sign next to VMware vSphere, and expand, this will show the list of Virtual Machines registered on VMware vSphere vCenter.
- 3
-
Using the Veeam QuickMigration function
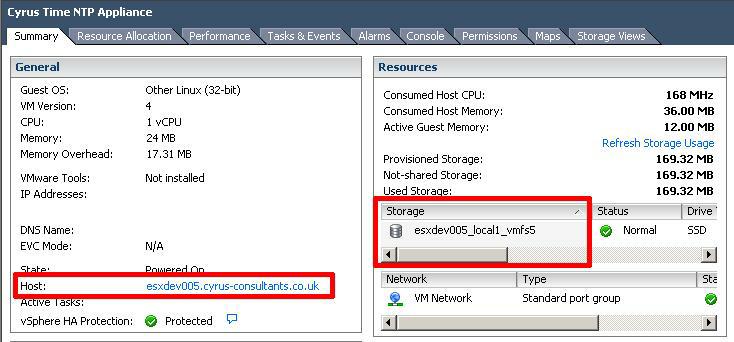
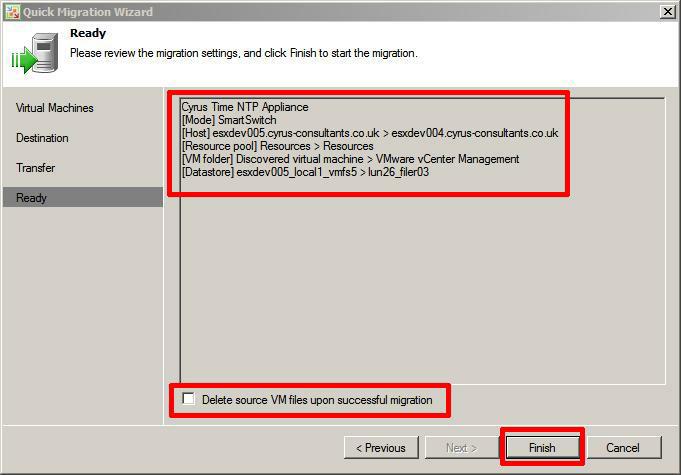
In this tutorial, we will Quick Migrate a Live virtual machine called “Cyrus Time NTP Appliance“, although this is a small virtual machine appliance it’s very important because this single appliance is responsible for providing correct time synchronisation for all servers, workstations, routers, switches and printers in our offices.
This virtual machine is currently hosted on an VMware vSphere Hypervisor ESXi 5.0 host called – esxdev005.cyrus-consultants.co.uk, and is stored on the hosts local datastore called esxdev005_local_vmfs5.
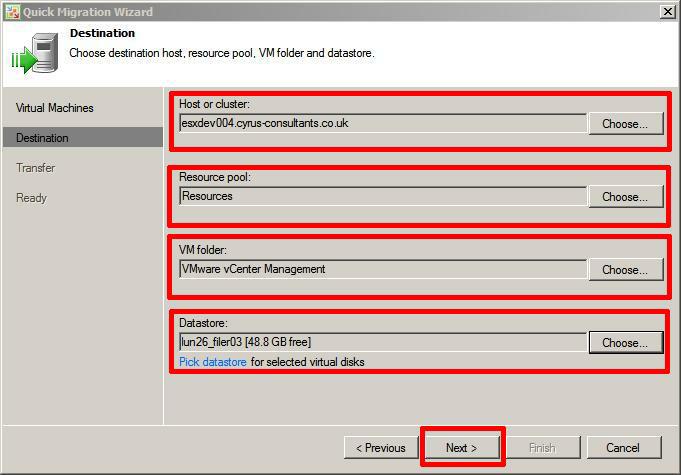
and in this tutorial we will Quick Migrate the Live virtual machine to a host called –
esxdev004.cyrus-consultants.co.uk and a shared storage iSCSI LUN, formatted VMFS5 datastore called lun26_filer03. This is an iSCSI LUN, on a NetApp filer.
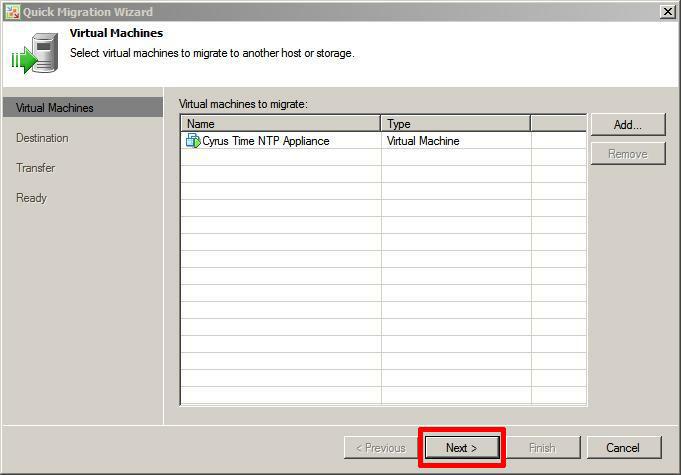
Right Click the Virtual Machine to be QuickMigrated and select Quick Migration
the following screen confirms the virtual machine you would like to Quick Migrate, Click Next to confirm
Select Destination host, resource pool, VM folder and datastore. In this tutorial the screeenshot shows the selection we have selected, followed by Next.
The next screen asks which proxy to use, with the Free Edition, there is only one Backup Proxy installed on the default server, so select Automatic, and click Next. In the licensed version of Veeam Backup & Replication, multiple Backup Proxys can increase transfer times.
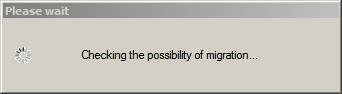
The following diaglogue boxes appears that
this ensures ESX/ESXi hosts are reachable, datastores, and networks are correct.
A confirmation screen is displayed which summarises the Migration, Click Finish to start the Quick Migration. You can also select that the source VM is deleted after a successful migration. (tick box)
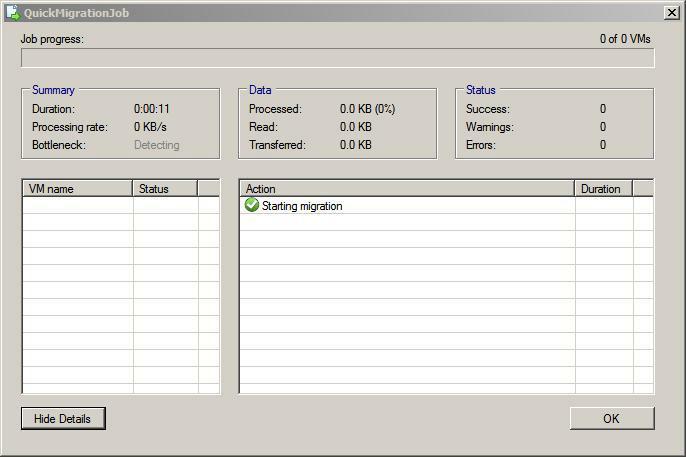
The Quick Migration in Progress
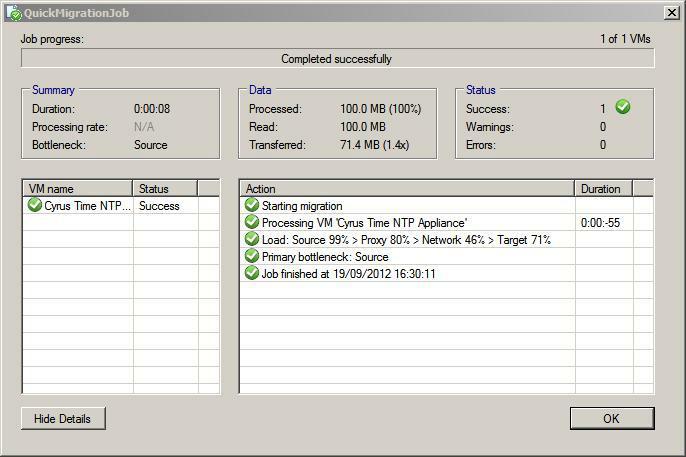
Quick Migration Completed successfully
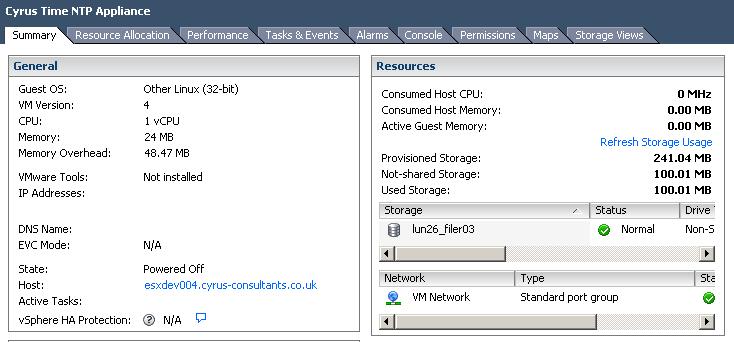
The following screenshot shows the Quick Migrated machine, on the correct host and datastore.
Finally, on inspection in the vSphere Client, you will find, you have a backup of the original VM called <vm name>_migrated and the migrated virtual machine on the host and datastore selected.
BUT, both VMs are Suspended, so just issue a Power-On Request to your original VM to resume service! (that’s CTRL+B)
I suspect there is a little bugget here with VMware vSphere Client because both VMs are suspended and should have Pause Symbols, but there is a Pause Symbol missing from the Migrated VM, I suspect it’s not refreshing after being Registered with vCenter Server, if you watch carefully, you will see a Pause symbol shortly after a Power-On is issued, and then changes to a Green Powered On Symbol.
In this tutorial article we have shown How To Migrate a Live Virtual Machine from an ESX/ESXi host, to another ESXi/ESX host, and migrate from local storage to shared storage for FREE using the Quick Migrate function in the latest version of Veeam Backup Free Edition.
Try it today, it’s free, and much easier than alternative methods.


![[Valid RSS]](http://andysworld.org.uk/images/valid-rss.png "Validate my RSS feed")